Do you know about getting started withQuickBooks Online? If you are an accountant or bookkeeper and work with this amazing accounting software. The first thing you should do is, get familiar with the features of QuickBooks Online accounts. You will require a little help in getting started with QuickBooks. You do not need an accounting background to complete the QuickBooks set up process; our step-by-step setup process course is created just for QuickBooks beginners like you. QuickBooks offers a free 30-day trial. So, if you are getting started with QuickBooks Online, here in this article, we are going to discuss 10 important tips to understand and get comfortable with QuickBooks Online. For any assistance contact QuickBooks Online Support toll-free: +1-844-405-0904
Tips to get more comfortable with QuickBooks Online.
1. Find the best and most suitable Accountant Toolbox
The first thing you should do that you need to explore the tool that is unique to accountants. As well as shortcuts to the tools and transactions that you are using most. You should know about the accountant tools, like what tool is best to help in preparation for a tax return or how can you change transactions in a quick way. Well here are some accountant tools you need to know and get you comfortable with QuickBooks Online.
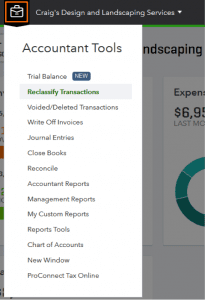
Trial Balance: With the help of a trial balance you can review and adjust your books without facing any bounce between applications when preparing for tax returns. You also create, view, map accounts, and also file tax returns in Tax online.
Reclassify Transactions: You can use this tool to make changes to the accounts or classes with many types of transactions. Reclassify Transactions in QBO can be very useful to help with it.
Reports Tools: With the help of this tool you can set a default date range and basis for different financial reports and other accountant tools. You also can mark a QuickBooks journal entry as adjusting and undo a reconciliation in QuickBooks.
2. Review the Audit Log
Audit Log track the additions and changes made to the company data. With the help of these tools, you can also track the persons who log in to the company accounts. The audit log can’t be deleted or disabled. You can compare changes and also filter by user, activity, and date over time. To find the audit log: Select menu>gear-icon> Audit Log.
Note: it only shows the name of the firm, not show any user details when the client views the audit log.
3. Learn about the Layout
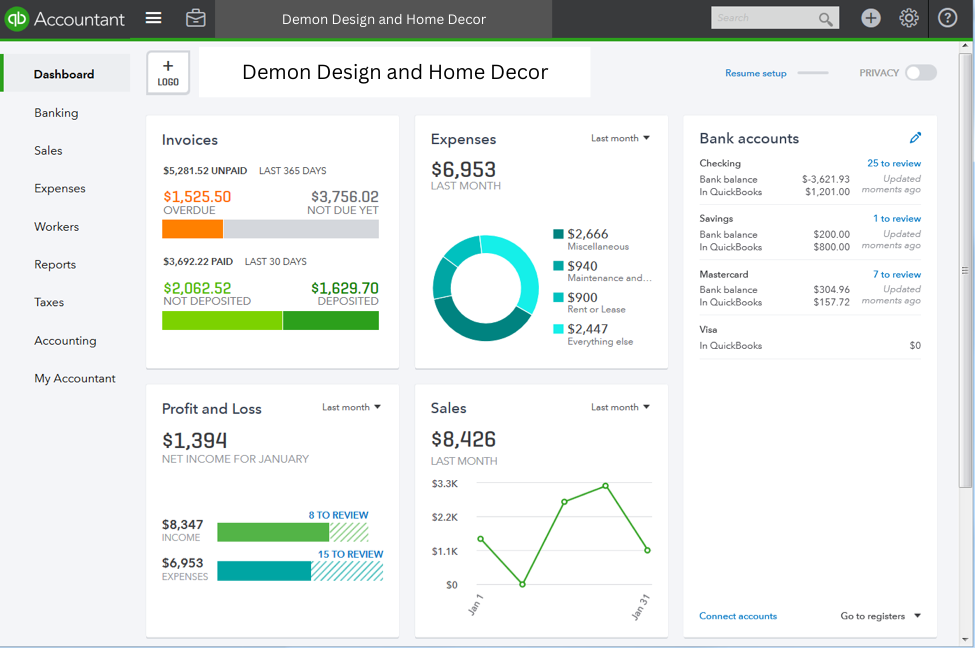
You can use this software across multiple operating systems and devices. You can use QuickBooks online on a smartphone and also on a tablet-like app. If you’re habituated to desktop software, the cloud-based layout can take a little getting used to. Let’s take a look at QuickBooks online:
Dashboard
You can see a very interactive overview of the invoices, sales, profit and loss statement, Expenses, and the bank account when you will open the client’s company account in QuickBooks Online.
Left navigation
Here in this panel, you can see the different tabs you need for working with your client’s QuickBooks. All tabs are broken up by category. When you click on a tab, you can see the smaller subcategories at the top. Eg. when you click the Sales tab, you can access these subcategories: All Sales, Invoices, Customers, and Products and Services.
Note: You can use the Hamburger icon to compress and Enlarge the left navigation to give yourself more space to work.
Gear icon
You can use the gear icon to access your client’s account, lists and tools, Settings, and many more. This icon will appear at the top of the right corner.
Note: You can configure the setting of the transaction or reports, lists, and tables when a small gear icon appears at the top of the corner.
Create (+) icon:
You and your client can create all the types of transactions and activities in QuickBooks Online in one menu. You just have to click on the Create (+) icon, next to the search bar to choose what you’d like to add.
Search bar
The search bar lets you find a transaction in a quick way. With the help of a search bar, you can also open a bank account register or a report very quickly. You just need to start typing the name of the account or report, whatever you want to open. You can also see the list of recent transactions added to the books when you click on the search bar.
Note: Use Advanced Search in the bottom right to fine-tune your search.
Accountant Toolbox
Let me tell you about this tool, this is a tool that you will surely find unique to an accountant, as well as shortcuts to the tool and also transactions that you will use the most. But there is a thing that you need to know, this menu will only appear if you signed in as an accountant.
View window side by side
This option helps you to open multiple windows in QuickBooks online simultaneously. You can compare easily through the screen multi-window is open. This makes you comfortable while working and multitasking.
4. Make Transactions Recurring
You can make many types of transactions recurring if your clients are using QuickBooks Online Essentials or QBO Plus. Also, you can set these up under the gear-icon menu. You can save time and improve the accuracy of the data by automating transactions, especially when used with the bank feed. Also, you can schedule transactions to generate automatically, set reminders, and create unscheduled templates.
5. Settings Configuration
You and your clients can configure QuickBooks Online according to your choice and the needs of your company. You will find the account and settings in the gear menu. If you want the best result then you have to get familiar with the Advanced tab under the account and Settings section. In this tab, you’ll find options like Close the Books and Enable Account Numbers.
Note: The Billing & Subscription tab will only appear if your client is paying for their subscription. If you are using Wholesale Billing, you’ll manage the client’s billing and subscription through QuickBooks Online Accountant.
6. Create My Custom Reports List
Whenever you are going to create a QB custom report list included in your client’s contribution. For future use, you can arrange your best reports in QuickBooks Online to show you and your client’s demand to check those reports. You will access your report lists through the accountant toolbox in “My Custom Reports”.
To make a better and quicker way to customize each report, we level up some frequently used options along the top. Like Selecting the reporting period or switching it between cash/accrual basis. Always you have to click Run Report to reflect your changes.
The customization option will only be based on the report that you’ll run. To see all the options of the report you have to click on Customize. The option will appear at the top of the right corner.
To add the reports to My Custom List, Click on Save Customization when all your preference is set. When applying the process for saving your reports, there is an option to give a name to your reports. You can also add these reports to a group if you want to or like to share them with all the users or only with your firm.
In My Custom Report List, you can run your report or export it to PDF. You can also change your sharing settings and also view the reports that other users share with you.
In addition, you can schedule a single report or group of reports to email automatically on a recurring schedule.
7. Set up the Chart of Accounts
As you know, a great Chart of Accounts is key to powerful reporting. You can set up the chart of accounts manually or you can import the data from excel to an existing list. You can enter this from the gear-icon menu, from the Accounting tab on the left panel, or from your Accountant toolbox. If you’ve converted a client’s QuickBooks Desktop file, the Chart of Accounts converts automatically.
You have to click on the pencil icon at the top of the right to assign or edit account numbers/names in batch instead of editing each one individually.
You can also edit the accounts individually, you can delete accounts, or mark the accounts inactive with the help of a drop-down menu under the action column.
8. Connect Bank and Credit Card Accounts
If you haven’t yet, work with your client to connect to their financial institutions, which will help you both save time and reduce data entry. You can do this in the Banking tab in the left nav.
Once accounts are connected, you can review, accept, and categorize transactions from the bank into QuickBooks. QuickBooks Online has built-in auto-categorization that learns from you over time. You also have the option to match existing transactions recorded in the register.
To improve how QuickBooks Online categorizes transactions, Click on the bank rule tab at the top. This can be helpful if you don’t know how to categorize transactions on your own or have a high volume of similar transactions.
9. Set up 1099 Vendors
QuickBooks facilitates 1099 vendors to be installed to eliminate time loss at the end of the year. If you deal with contractors, this is definitely going to help you as you will be able to sort your taxes and payments from the beginning of the year.
10. Never Forget to Create your Backup!
Backup is the most important part. It seems so simple but many people forget to do it. Backup stress should be prevented when the system crashes or you lose data in some way. Set schedule automatic backups.
QuickBooks Online is a cloud-based program. If you use it, your data is backed up and protected at all times. That feature is not for free, you have to pay $ 5.00 per month. After that, you are allowed to recover your files from any system with an internet connection.
How to get started with QuickBooks online
This guide helps you to get started with QuickBooks online easily.
- You have to sign up for QuickBooks Online: You have to choose the QuickBooks Online subscription according to your requirement so that you can access it from your mobile or your computer from anywhere anytime with an internet connection. If you have already registered with QuickBooks Online then sign in QuickBooks Online with your credentials.
- Set up company file: After registering in QuickBooks you have to enter some details about your business to set up your company file. This helps to better fit your requirements. Then you can see the dashboard of your Quickbooks that serves as a homepage. From here, you can go to Settings to add information about your business by selecting Account Settings.
- Link your bank and credit card account: After linking your bank account all the transactions are downloaded automatically. To link your bank account and credit card you have to go to Transactions then click on Bank Transactions after that select Connect Account. After that sign in to your account after choosing a bank.
- Import your list: Here you have the option to import your list from another QuickBooks company into QuickBooks Online such as customers, chart of accounts, inventory, supplier, etc.
- Create and Customize your invoices: You have to create your invoices By selecting +New and then choosing Invoice. For customizing the look of your invoices you just click on customize and edit the existing templates. You have also the option to add the logo and change the font color.
- Enable and receive payments: This feature is very important to receive your payments from customers using online payment methods. You can enable it from the dashboard.
- Set up sales Tax: For this, you have to go to Taxes and then QuickBooks asks you some questions about how to manage current sales tax and then gives guidance accordingly.
- Enable QuickBooks Payroll and Add Employees: If you are enabling the payroll then it helps to manage employee payroll, track time, handle labor-related tax, and create paycheques. For this you have to go to Payroll and then select Employees after that click on Add an Employee then you need to fill out the form and then click on Save.
- Manage Users: You have to add the users by giving them access that helps in managing your books. There are five different types of users in QuickBooks Online:
- Primary administrator
- Company Administrator
- Standard users
- Reports only users
- Time tracking only users
For this, you have to click on Settings and then Manage Users. The primary Administrator can assign the role to another user through the Action column.
- You can also invite an accountant to run your QuickBooks.
- Firstly you need to go to Bookkeeping and then click on My Accountant.
- Then next select Settings and then click on Manage Users.
- Now enter the mail address from the accounting firms tab.
- Now finally click on Invite.
Now after reading this article, I think you have an idea of How can you be more comfortable with QuickBooks Online. I hope these given tips in this article will help you.
Thanks for visiting us. If you want more discussion related to this topic or want support for Quickbooks issues, you can contact us and talk to our Intuit Certified QuickBooks ProAdvisor at our toll-free number +1-844-405-0904 in order to get instant help.