Is the QuickBooks error H202 blocking you from the multi-user connection in the server? This can be a big problem for other company file access holders, who want to work on the company file. In this article, we will help you to get rid of this error code. Here we will discuss the reasons, signs, and solutions for this H202 error code in QuickBooks. Meanwhile, you can take the QuickBooks error support through the toll-free number +1-844-405-0904, for further assistance.
What is QuickBooks Error H202
H202 error is a multi-user issue in QuickBooks, which does not allow us to run the QuickBooks company file in multi-user mode. This error can occur because of different reasons. So we can’t the solution according to a particular reason.
Error Code: H202
Error Type: Multi-User Issue, Hosting & Server issue
Error Message: The company file is on another computer, and QuickBooks needs some help with connectivity.

How to Identify H202 Error Code in QuickBooks
These are a few indications that QuickBooks may show before it actually reveals the real reason behind the malfunctioning of software.
- QuickBooks suddenly freezes while running.
- The system and QuickBooks performance is not as usual.
- Users may not be able to switch to the QuickBooks Multi-user mode.
- Company files are not opening that are stored in a system other than hosting a computer.
Why the Multi-User H202 Error Occurs
Read the following reasons to find your answer to the question.
- Damaged or corrupted Database Server Manager may installed on the system.
- The firewall settings of the computer are blocking QuickBooks from communicating with others.
- DNS (Domain Name System) settings are configured incorrectly.
- QuickBooks is unable to connect to the server.
- Hosting settings are configured incorrectly.
- QBCFMonitorService or QuickBooksDBXX service is not working normally.
- QuickBooks company files are corrupted or damaged.
How to Fix QuickBooks Error Code H202
We have given solutions according to the scenarios, so choose the solution according to that;
QuickBooks error h202 is mainly a hosting server issue. So there will be two scenarios;
- Hosting your own network
- Using another hosting solution
If you haven’t installed the QuickBooks Database Server Manager on your server for each QuickBooks version, that you are using. Then it ensures that the computer is the server, which hosts company files. Install the QuickBooks Database Server Manager, and set up the server in the following ways;
- The Full Program: To set the full version of QuickBooks Desktop with the Database Server Manager.
- The Server Only: Only for installing the Database Server Manager on your server computer.
If you are using another solution like Intuit hosting provider, or Enterprise hosting then directly contact them for the hosting environment.
Now follow the solutions to troubleshoot the error code;
Solution 1: Run QuickBooks Database Server Manager
Follow the procedure to run the QuickBooks Database Server Manager;
Step 1: Download QuickBooks Tool Hub
- Close all of the QuickBooks programs.
- Download the QuickBooks Tool Hub from the official site, in the latest released version.
- Keep the downloaded file (QuickBooksToolHub.exe) in a portable location, where you can easily access the file.
- Follow the on-screen instructions, and agree with the terms, and conditions.
- Double-click on the QuickBooks Tool Hub icon to open it.
Step 2: Use QuickBooks Database Server Manager
- Open the QuickBooks Tool Hub, and visit the ‘Network Issues’ section.
- Choose the ‘QuickBooks Database Server Manager’, if it is not on your server.
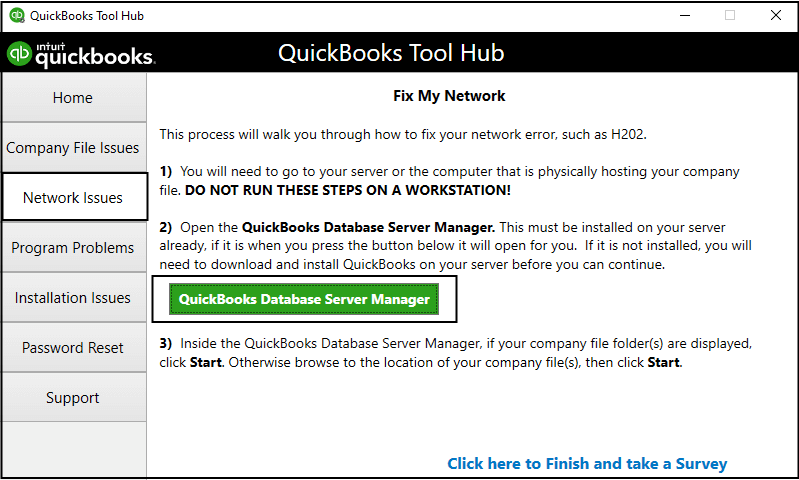
- Select the ‘Start Scan’ option from the ‘QuickBooks Database Server Manager’.
- If you have no company file in the server manager tool then click on the ‘Browse’ option, and find the location of the company file. And then the ‘Start Scan’ option.
- The tool will repair all of the firewall permissions automatically. After the process, you can click on the ‘Close’ option.
- After that, open QuickBooks on every workstation.
- Click on the ‘File’ menu, and select the ‘Switch to Multi-user Mode’ option.
If you are able to access the multi-user mode without any hassle, then the issue is gone.
Solution 2: Check QuickBooks Services on the Server
You can check the services on your server. But before that, you should remember that, if you are using the Full Program option then need to turn on the multi-user hosting. Follow the steps to Turn on multi-user hosting;
- First of all, open the QuickBooks on the server system.
- Visit the ‘File’ menu, and select the ‘Utilities’ option.
- If you can see the option of ‘Host Multi-User Access’ then click on it.
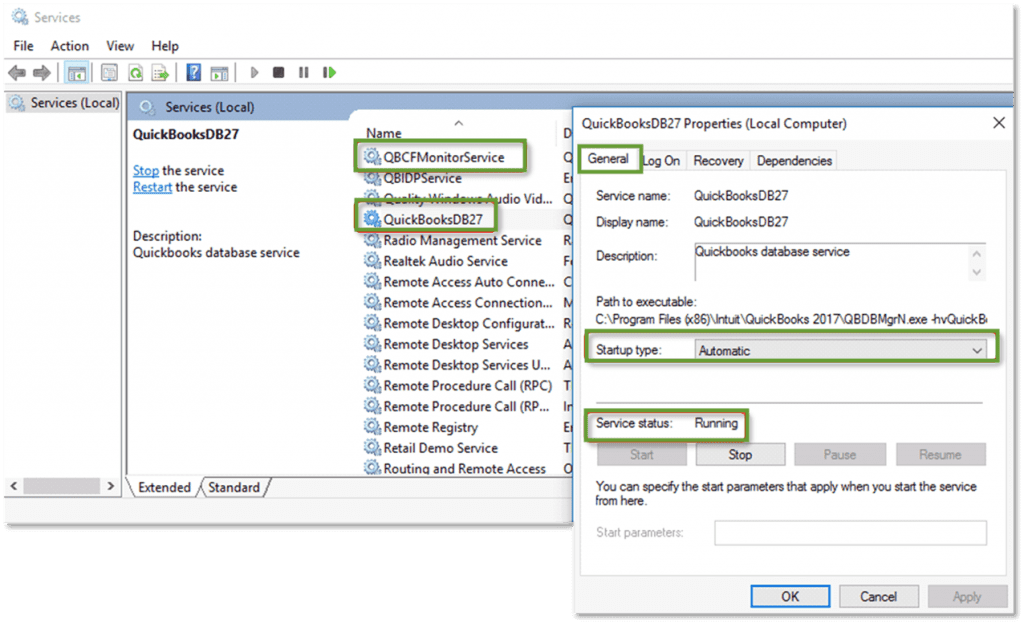
Now follow the steps to ensure that the services are running on the server system;
- Click on the ‘Windows Start’ button on the server system.
- Open the run command window, or type, ‘Run’ in the search bar to open ‘Run’.
- Type ‘services.msc’ in the Run window, and hit the ‘Enter’ key.
- Find the QuickBooksDBXX file from the list, and open it. (XX is the version of QuickBooks)
- Now choose the ‘Automatic’ option for ‘Startup Type’.
- The service status should be started, or running, if it isn’t then click the ‘Start’ option.
- Select the ‘Recovery’ tab.
- You will see three failure drop-down menus named First Failure, Second Failure, and Subsequent Failures.
- Select the ‘Restart the Service’ option for all drop-down menus.
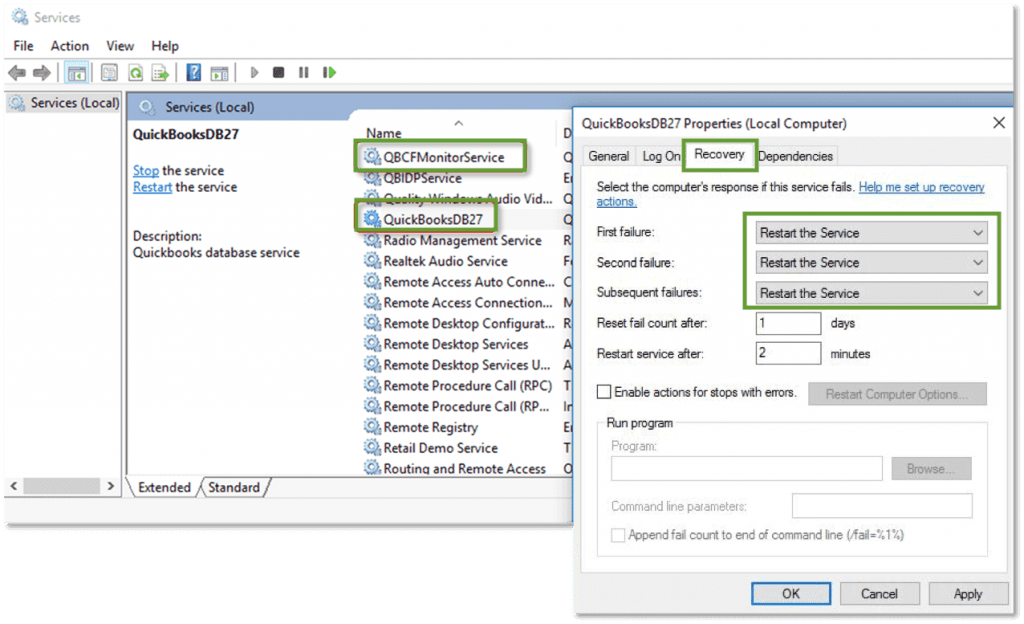
- Click ‘Apply’, and then ‘Ok’.
- And repeat the same procedure for ‘QBCFMonitorService’.
After that, open the QuickBooks on every workstation, and try to run the ‘Switch to Multi-user mode’ from the ‘File’ menu. If the file is opening then everything is ok, and the error is fixed now.
Solution 3: Add Services to Windows Admin Group
If you haven’t granted admin permission for the QuickBooksDBXX and QBCFMonitorService on the server then set Windows access permissions to share company files, to fix the issue. Follow the steps to set permission in Windows 10;
- Click on the ‘Windows Start’ button, and search for ‘File Explorer’.
- Locate the folder that contains company files, and right-click on it.
- Click on the ‘Properties’ option then the ‘Sharing’ option.
- After that, choose the ‘Share Add’ option and the QBDataServiceUserXX.
- Set the permission level to the ‘Full Control’ option then select the ‘Share’ option.
Solution 4: Configure Firewall Settings
Make sure that, the firewall connection is allowed for QuickBooks on the server system.
- Check the firewall and internet security settings for QuickBooks.
- And open QuickBooks on workstations, after the firewall permission setting.
- Visit the ‘File’ menu, and click on the ‘Switch to Multi-user Mode’ option.
Solution 5: Ping the Server from the Workstation
Ensure that, the server is working properly. For that, you can ping from all workstations to the server. Turn on the Network Discovery on the server as well as in any one of the workstations that are affected by QuickBooks error h202. Then follow the below procedure;
- Open the Windows Start button on both server and workstation.
- In the search bar, type ‘Network’, and search.
- You can find the Network and Sharing Center, just click on it.
- Then cross-check that the ‘Turn on network discovery’ is selected in the Network Discovery and File and Printer sharing sections.
It was the primary step to perform. Now, go back to the server only, and follow the steps;
- Open the Run command window.
- Enter ‘CMD’, and press the ‘Enter’ key from the keyboard.
- Now in the CMD window, enter ‘ipconfig/all’, and hit the ‘Enter’ key.
- Go to the ‘Windows IP Configuration’ section, and find out the ‘Hostname’ on the right.
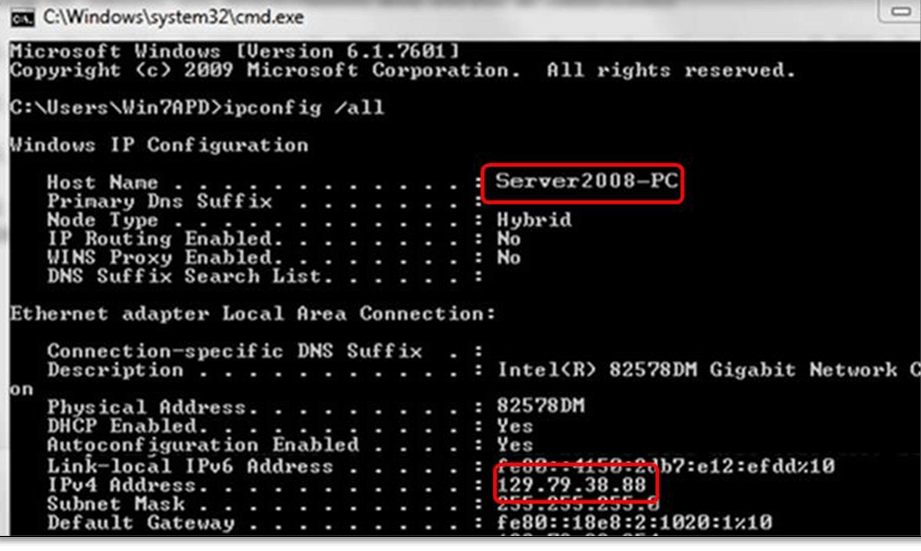
- Keep the hostname.
Now go back to the workstation, and follow the steps;
- Run, ‘CMD ’ in the run command window.
- Type, ‘ping [your server name]’, and hit the ‘Enter’ key. Note: The brackets should not be used as your server name.
- Reaper the steps for every workstation.
If there is no packet loss, then the server is ok.
Solution 6: Add Server to the Windows Hosts File
Follow the steps to perform the solution
- First, go to the location where the Windows host file is stored i.e. (Local Disk C\Windows\system32\drivers\etc).
- Open the Windows Host File in the notepad. You can do this by right-clicking on the file and then selecting, Open with.
- Scroll all the way to the end in the command prompt window and enter the IP address of the server.
- Press the tab from the keyboard and then enter the QuickBooks Server name.
- To save the change you made press Ctrl+S and then close the command prompt window.
Solution 7: Renaming the .TLG and .ND files
- First, close the QuickBooks and other programs running on the system.
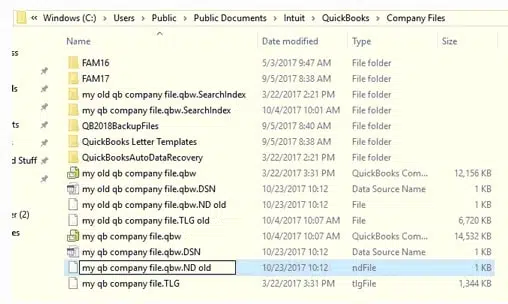
- After that, you have to open the company file folder on the server system.
- Now search the .tlg file having an error.
- Next, right-click on that and select for the Rename.
- Rename with the prefix “.old” and press enter to remember that file.
- You have to do a similar step for the (.ND) file and then close the folder.
- After completing the above steps, QuickBooks will automatically create the .nd and .tlg files when you open the company file again. These new files will be free of any suspected errors.
- The next step is to open the company file by pressing the Alt key until it opens.
Solution 8: Alter the QBGlobalAppConfig.ini file on the Fedora Linux Server
- In order to use this method, you must access QBGlobalAppConfig.ini and open the Linux Terminal Window.
- Now, make sure that there are no spaces before or after the (=) equal sign in the Default range for ports.
- Now install Linux Database Server Manager, and you can get a complete list of ports.
- Save QBGlobalAppConfig.ini file.
- Now finally, reboot the QBDBFILEMON and QBDBMGRN services.
Solution 9: Repair QuickBooks through the Windows Control Panel
- First, you need to close QuickBooks on your system.
- Then next go to the start button and open the control panel.
- After that, choose Programs and features.
- Moving forward select QuickBooks and then click on change and repair from the installed program list.
- Now follow the instructions to start the Repair process.
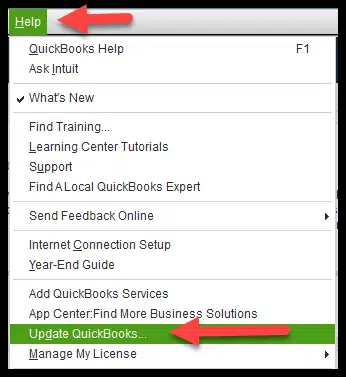
- Update the QuickBooks to the latest release after completing the repair process.
- Then finally check by opening the company file whether the problem is fixed successfully or not.
Frequently Asked Questions
Read the Most frequently asked questions by our QuickBooks users.
How do I fix H202 If I use Windows Server 2012 Essentials R2?
Follow the below steps only if you are using Windows Server 2012 Essentials R2 and see error H202 in QuickBooks.
Step 1: Check your server version
Step 2: Install QuickBooks Database Server Manager
Step 3: Stop the Base Filtering Engine Service
Step 4: Restart your computer
Step 5: Restart the Base Filtering Engine Service
How do I fix error H202 that occurs when hosting the company file on a non-Windows Server?
If you see an error when opening a company file, you should follow the given steps:
1. Add the Fully Qualified Domain Name of the Server to the host file of each computer.
2. Edit the QBGlobalAppConfig.ini file on the Fedora Linux Server
3. Create a mapped drive
The complete procedure was all about the QuickBooks error H202. Still, if you have any queries regarding this error then drop a call to this number+1-844-405-0904 to consultancy from our certified QuickBooks ProAdvisors.