Read this article to get a brief introduction to the Intuit QuickBooks CAMPs platform. Learn how to use the customer account management Portal for QuickBooks Desktop. Apart from this, We’ll also discuss the issues, features, and requirements needed for the customer account management portal. In this article, we will give you an overview of Intuit CAMPs, its need, benefits, and usage. Learn how to use the Customer Account Management Portal for QuickBooks Desktop. Also, get help for camps.intuit.com login & other sign-in issues.
Overview of QuickBooks Camps
The Intuit QuickBooks CAMPs are the fastest and easiest way to manage your accounts, contacts, products, billing, and user ID access. It also provides a convenient way to download the product, update your payment method, review charges, update billing information, change a credit card, update email addresses, find yourlicense number, and cancel your subscription.
As you know that QuickBooks is a widely used accounting and management software and is far better than its alternatives. It gives ease to work with a large amount of data relating to their inventory, bank transactions, employees, and many more. Customer Account Management Portal Site or CAMPs helps in managing all QuickBooks Desktop Products and also performs many tasks from account data to subscription management.
How to Use the Customer Account Management Portal in QuickBooks.
Here is a complete guide on how to use CAMPs. Follow the procedure step by step.
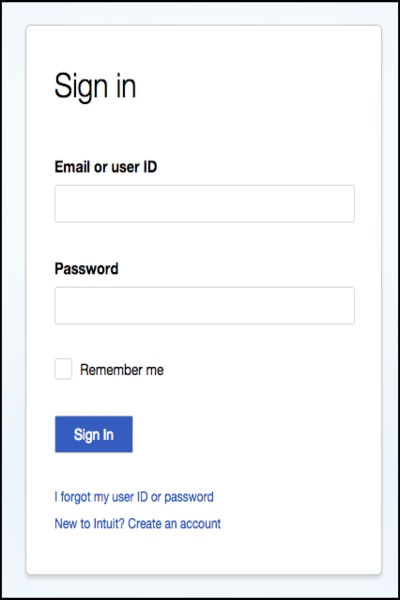
Sign in to QuickBooks CAMPs
Here are the steps that help you to do sign up:
- First, go to camps.intuit.com.
- Then sign in to the Intuit Account information. However, this could be different from the sign in the company file.
- If there is the option to see the multiple products to choose then select QuickBooks Desktop to go CAMPs option.
Issues That May Occur While Signing to camps.intuit.com
Camps use the email address to which your product is registered. This may be different from the email that you use in the QuickBooks company file.
If the email address you are registering for your product is not already connected to your Intuit account, then it will create a new account automatically. You may need to claim if you have never signed in to that account before. Or also need to merge if you have multiple accounts.
What You Need To Do:
- Choose I forgot my user ID or password on the CAMPs sign-in page.
- If it is not helpful, then visit camps.intuit.com and choose Claim Account.
If You Are Not Able to See All Your Products:
You may be registered to different products by different emails. This could be the reason for being unable to see all of your things in one place. Follow the steps to resolve this.
- Sign in to the CAMPs, then visit camps.intuit.com again.
- Select Claim Account. This helps you to connect the account with different emails.
After claiming your account, you must sign in to one account and see all the products.
If you are facing issues while signing in, follow the steps that help you to sign-up.
My Account (QuickBooks CAMPs) Needs sign-up help
The customer Account Management Portal is the best and quick way to manage or gathered all-important information regarding your company’s Intuit account.
Note: For security purposes, Intuit automatically sends you a confirmation email to confirm the changes you have done to your Login info like password, email, security questions, phone, name and address, and login name.
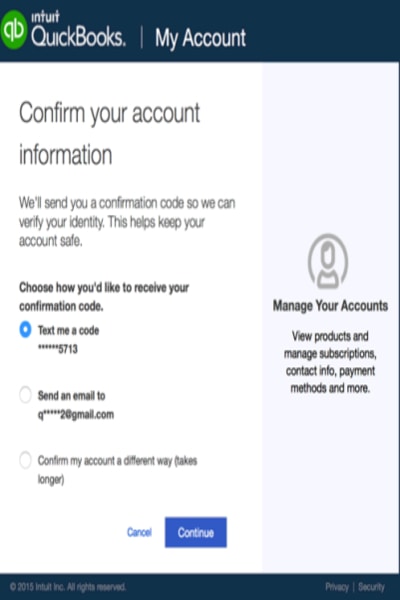
Asking for Confirmation Code
Sign up at https://camps.intuit.com.
2. Choose the way you want to get your confirmation code and then select Continue. If you are not able to access the email list, choose another option to Confirm my account in a different way.
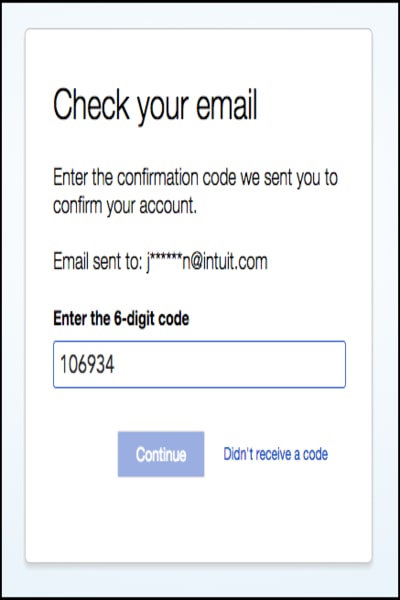
3. Retrieve the confirmation code, sometimes it takes some moments to receive. You may also need to check your bulk/junk/spam folder to check if the code went there. Still, if you don’t receive the code then choose Didn’t receive a coded link on the check your email page to get a new code.
4. Then enter the confirmation code and choose Continue.
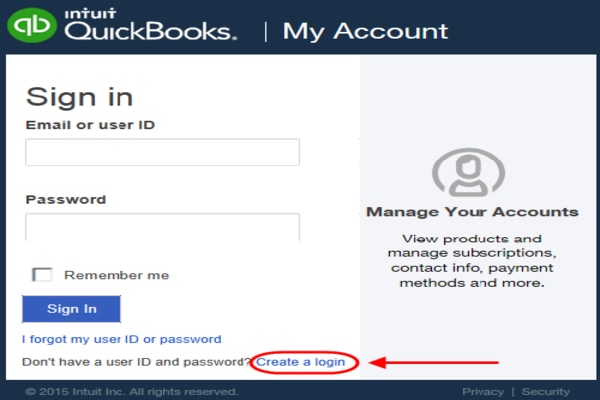
If You Don’t Have an Account
Note: You’re almost done! Within a few minutes, Intuit will send you the link through an email which let you complete the process of getting access to My Account.
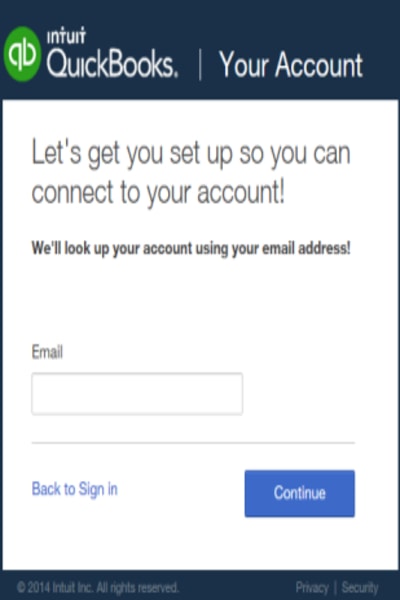
1. Choose to Create a login on the Sign In page.
2. Then mention your email id and click Continue.
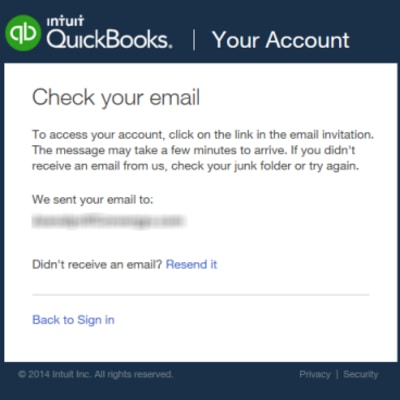
3. Check out your email box and check the email from Intuit. If the email is not to you then choose the Resend it option.
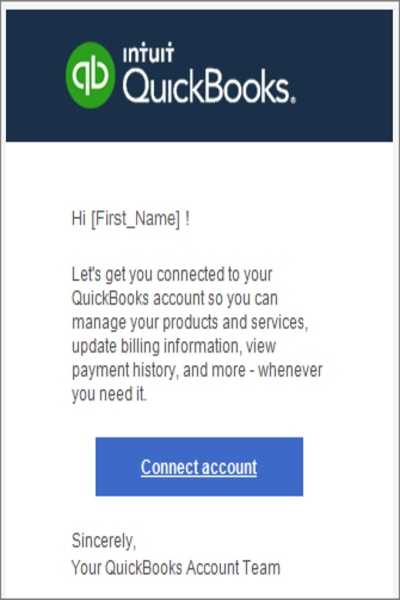
4. Select the Connect account in the email.
5. Mention all the mandatory account info and choose to Create Login.
The system will detect if an existing login has been associated with your email. If you have an existing login, you may retrieve your User ID and/or Password.
If You Forgot Your User Id and Password
- Select I forget my user ID or password on the Sign In page.
- Insert your email address and user ID and choose Continue.
- Look for an email (From do_not_reply@intuit.com; Subject: Your SBG Self-help Account) from Intuit. The email includes a list of user IDs that match your email address.
- Select the option you want to choose: Password Help orSign In.
- If you know your password then click Sign In to open My Account.
- By chance, if you forget your password then choose Password Help. Select a new password and then select Reset Password.
- If you set up security questions and answer at the time you created your login to My Account, so now you have to require to give all the security questions answers. But if you forget the answers then you need to visit www.payroll.com/helpme.
- Choose the Account and search for contact information.
Need Update Login Information
- Sign in to https://camps.intuit.com.
- In the Manage your QuickBooks page, choose the product or service option that you would like to manage.
- Go to the top right of the My Account, and select Edit Login in the Company Name.
- Choose the Edit option located next to the information you need to change.
- Make your all-important changes and then click Save to save these changes.
- You need to confirm your password and choose Continue.
- You will see the Exit option at the bottom left, click on that.
Note:
- You will need to enter a password to My Account to make changes in your User ID, Email address, and Security question, you will need to enter a password to My Account.
- Remember that you will receive an email through which you can recover your user ID and password.
Functions of Customer Account Management Portal (QuickBooks CAMPS)
- Keep your eye on payment methods and their updates.
- Management and updates about account information
- Managing the contacts list in QuickBooks
- Subscription details and tracking activity.
Advantages of using Customer Account Management Portal (QuickBooks CAMPS)
- The user can change or edit the email anytime easily.
- Using QuickBooks CAMPs, you can search license number easily.
- The advantage of managing all QuickBooks tools in one go.
- You can have a view of all the product orders, transactions and charges easily.
- The users can be added, removed or edited.
- Time-saving process in terms of data management and customer handling.
- You can access it from any place at any time.
Features of Customer Account Management Portal (QuickBooks CAMPS)
✅ See your account details:
You can access the recent transactions on the Customer Account Management Portal. There is an option “Show All” that helps you to show a full history of transactions. You can also get other details, such as license and product information, regarding software updates, and the expiry dates of the products. Click on the Details tab which is next to the list of particular objects.
✅ View your subscription related to QuickBooks:
There is the Details tab near the list of every product on the Products and Services column of the site. Make the selection of the product and service that you want to cancel by selecting the cancel option. It may ask for the reason and confirmation. After providing all the details, you can proceed with your product cancellation. If you want to renew the subscription, this is done automatically in the Customer Account Management Portal.
✅ Make changes and updates to the payment:
There is the option to make changes in the billing information for a particular product in the Product details section. If there is a need for an update specifically regarding the payment methods and billing invoice, you can take help from CAMPs.
✅ Purchasing Products and Services related to QuickBooks:
For accessing any product from any location, use the CAMPs for accessing or adding new products and services to QuickBooks.
✅ Updating Account settings and details:
You can make changes in your personal details such as account number, security settings, or password, and make changes in phone number using Customer Account Portal Management. Also, make changes in the billing and mailing addresses insert in QuickBooks using this portal.
✅ Manage Payroll Services:
Make changes in the payroll settings,EIN information, and service key with the Customer Account Management Portal.
✅ Manage transaction details:
This is the most highlighted feature that helps you to view and print bills from the transaction history.
✅ Feature of inviting other authorized users:
There is a shared portal option that helps you to invite any user. This is the step in which you just need to mention the correct details. If you want to make another user the authorized accessor of QuickBooks, so you can do this using the Customer Account Management Portal.
✅ Manage your Products and Services:
The product and Services segment on the page enlists all these products and services purchased from Intuit online and offline, or from any device from the same account. After signing in, you can access it from anywhere.
Manage your subscription and services for QuickBooks Desktop
You can find all your registered desktop apps and subscriptions here. You can also have license information and download different versions of QuickBooks Desktop. Follow the given steps:
- Firstly, you have to log in to the QuickBooks CAMPs.
- After that go to the product and services list there you will see your app or subscription.
- Then click on the details option.
- Select the Download option.
- Then proceed to install QuickBooks Desktop.
When you choose a specific product or subscription then you gain access to detailed information such as license and product number, user limit, payroll service key, EIN, subscription number, other payroll subscription details, product edition and version information, and details about your care plan inclusion.
Update Your Payment Method in QuickBooks Desktop
There is always a designated payment method record for every version of QuickBooks Desktop or the connectivity service. You should know that the primary contact for your QuickBooks account can update billing information only. To modify your payment method, you can follow these steps for each product associated with your account.
- Firstly, log in to QuickBooks CAMPs.
- Then find your app or subscription in the products and services list.
- After that, you have to click on the Details option.
- Then you have to find the payment method in the billing information section and then have to click on the edit option.
- Then update your information as necessary.
- And the final step, choose save and close.
Access Billing History in QuickBooks Desktop
Review your transactions, including details on the service you paid for, the card used for billing and the payment dates. All the transactions that are made within the last two years, CAMPs provide a comprehensive view of. To access the billing history in QBDT, you have to follow these steps:
- Firstly, log in to the QuickBooks CAMPs.
- After that you have to click on View your transaction history option.
- Then choose a date range for transactions from the Time Period drop down menu. You can only select the transaction from the past 2years.
- Now locate the specific order you require and then click on the order number to view its details.
- For the hard copy you have to choose the Print this page option to print the transaction list.
- After that you have to click on the Back to my Account option to return to your CAMPs dashboard.
Change or Update the Primary Contact on QuickBooks
You should always keep your contact information up to date mainly during business transitions. You can easily make these updates either through a phone request or conveniently online using the customer account management portal site. You can follow these steps to update using the CAMPs easily:
- Primarily, you have to log in to your QuickBooks CAMPs.
- After that, search for the primary contact section and choose the option for change.
- You have to select the new primary contact from the list of contacts on the account.
- Finalise the process by clicking on the save and close option.
Add, Edit, and Remove Authorized Users in My Account (QuickBooks CAMPs)
Authorized users are the users who are allowed to access My Account (CAMPs) and represent your company while interacting with Intuit. And they have the authority to update or modify the information within the account. You can create as many users as you wish to access My Account and permit you to share your company’s account info.
To add an authorized user
There are steps to how you can add authorized users:
Note: Any of the authorized users have the control to give access to any new user to the account.
- Sign in To My Account.
- Choose the product or service according to your need on the Manage your QuickBooks page.
- Check you are opening the right account, at the upper right of the page.
- Then scroll down to Authorize Users segment.
- Choose to Invite a User. Option.
- Mention all needed contact info such as; Name, Email, and Phone number
- Select Send Invite at the lower right.
The user you invited will receive an email inviting them to join your account.
To Edit an Authorized User’s Information:
Steps to edit the user’s email and contact info:
Note: You can right to edit your own info only.
- First, need to sign up for My Account.
- Choose the product and service you want to manage on the Manage your QuickBooks page.
- Scroll down the authorize Users section in My Account.
- Choose your name.
- Then edit or update your Email or Phone.
- And choose Save and Close.
This updates specific company info that you can access. Now you can update your CAMPs sign-in and profile information:
- Choose the drop-down at the top right.
- Then choose My profile. This segment lets you edit your user ID, email, password, and Phone.
To modify a user’s name
Note: For securing your data from someone that anyone can’t update or edit your contact info without getting permission from you, i.e Intuit doesn’t allow a user to change the user name in My Account.
- Download the Intuit Account Personal Name Change Form.
- Complete the form online with all mandatory info, then get print, sign, and date it.
- To avoid delays in processing requests, complete all highlighted sections shown in the image.

4. Then send the completely filled form to the Inuit Fax# 877.699.8996 or SBPFCSOperations@intuit.com.
5. After completing the request you will get the confirmation email.
To delete or remove an authorized user:
Note: Primary contact has only permission to remove the users.
- Sign in to My Account.
- In the Manage your QuickBooks page, choose the product and service according to your need.
- Verify if you open the correct account by clicking on the upper right.
- Then scroll down to Authorize Users segment.
- Choose the user name you want to remove or delete from the list of contacts.
- Click on Remove User at the bottom of the user’s Contact Info.
If the user didn’t accept the invitation from the email, you’ll see Cancel Invite.
- Choose the Remove option in the confirmation window.
Need to Update the Email Address
It is important to update your email because it is the primary source of communication or sending an important notification. And today it is the main source of recovering passwords and user IDs.
Email Address for Receiving Notifications
This email is the one connected with your name to the authorized users in the company. If you are billing in the account to a particular contact, you will get notifications regarding the account through that connected email address.
What type of notifications do user can get
As there are different types of notifications. Some examples of notifications are:
- Payroll newsletters
- Auto-renewal notices for annual subscribers (at least 45 days from the renewal date)
- Intuit QuickBooks Desktop payroll Tax Table Updation notifications. Whenever a new tax table is available.
- Order/charge confirmation
- Other critical notices related to the changes in federal and state regulations.
Update email for notification
- First, sign in to My Account
- Select Product and Service in Manage your QuickBooks page.
- See that you are logged in to the correct company by looking at the top right corner of the page. If it is not, then choose the correct company name from the drop-down list.
- Search for the authorized Users list.
- Choose the Edit option nearby your name.
- Mention your new email address, then Save. Choose the X button to go back to the home page.
- You will receive notifications about any updates to your new email address.
Email address for Retrieving User ID/Password
The email address is associated with your login info. So you will receive a user ID and password at your email address if you want to reset your login information.
The updated email address associated with your login:
- Sign in to the My Account option.
- In the Manage your QuickBooks page, choose the product and service you want.
- Choose a company name from the drop-down list at the top right.
- Go to the Profile tab in the Edit login option.
- Choose Edit in the Email address field.
- Mention your new email in the Email address and Confirm email address sections.
- Then enter your login password in the password field.
- After changes choose the Save option. And you will receive a verification message at your new email address.
- Open that email and click Verify my email.
- Once the email address is verified then, continue.
Customer Account Portal Management Site (QuickBooks CAMPs) is a helpful tool provided by QuickBooks that lets you manage many actions related to your account in one go. It simplifies your experience of using QuickBooks and its related tools. If you still have any queries feel free to contact us at +1-844-405-0904.
Conclusion
A Customer Account Management Portal (CAMP) is a secure and self-service online platform where customers manage their accounts, access information (like orders, bills and history) and update their details. As you have read in this blog that it is easy to use the Customer account, with the help of which you can easily understand the QuickBooks CAMPs.