In this article, we will discuss how you can add and set up the Products and Services in QuickBooks Online. We all know that Setting up products and services lists helps you to create invoice in QB that will automatically populate the Quantity, description, and price of the product or service fields on the invoice, and It also helps to keep track of your sales by product or service. So, through the article and get all the details, and follow the steps to set up products and services in QuickBooks Online. For any suggestion or help contact our QuickBooks ProAdvisor toll-free: +1-844-405-0904
Importance of setting up your product and service list in Quickbooks online.
It becomes very important for you to set up a product and service list in Quickbooks online if you are billing your customers for products and services sold. It is also very important if you need to monitor inventory costs and quantities.
By setting up your services and product list in QuickBooks you will be allowed to do the following things.
- You will be able to track your sales by services or by-products. By this feature, you will get complete knowledge about what product is in demand and what product is not selling at all.
- The time required to create an invoice will decrease a lot as Quantity, Description, and price for product or service will be filled automatically in your invoice.
Now, let’s move on to the steps you should follow to set up your product and service list.
Steps to set up the Products and Services list in QuickBooks
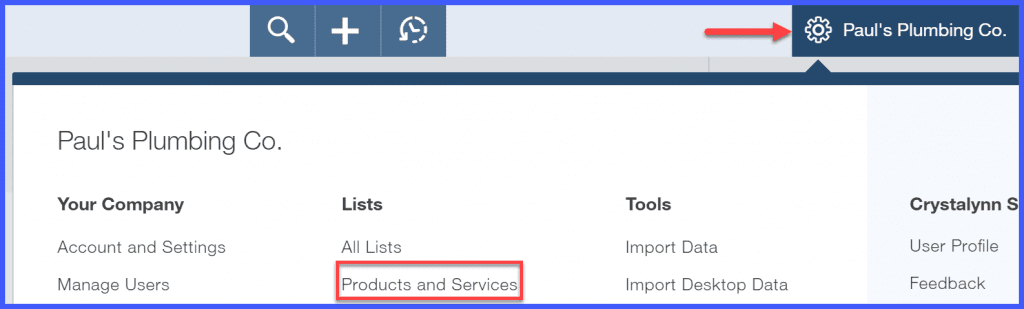
Step 1 – Navigate to the Products and Services List
After signing in to your QuickBooks Online account, Go to the gear icon to the left of your company name. Choose the products and services listed below, just below the list menu column:
Step 2 – Generate New Item
From the list of products and services, go to the blue button in the top right to create a new product or service item, as shown below.

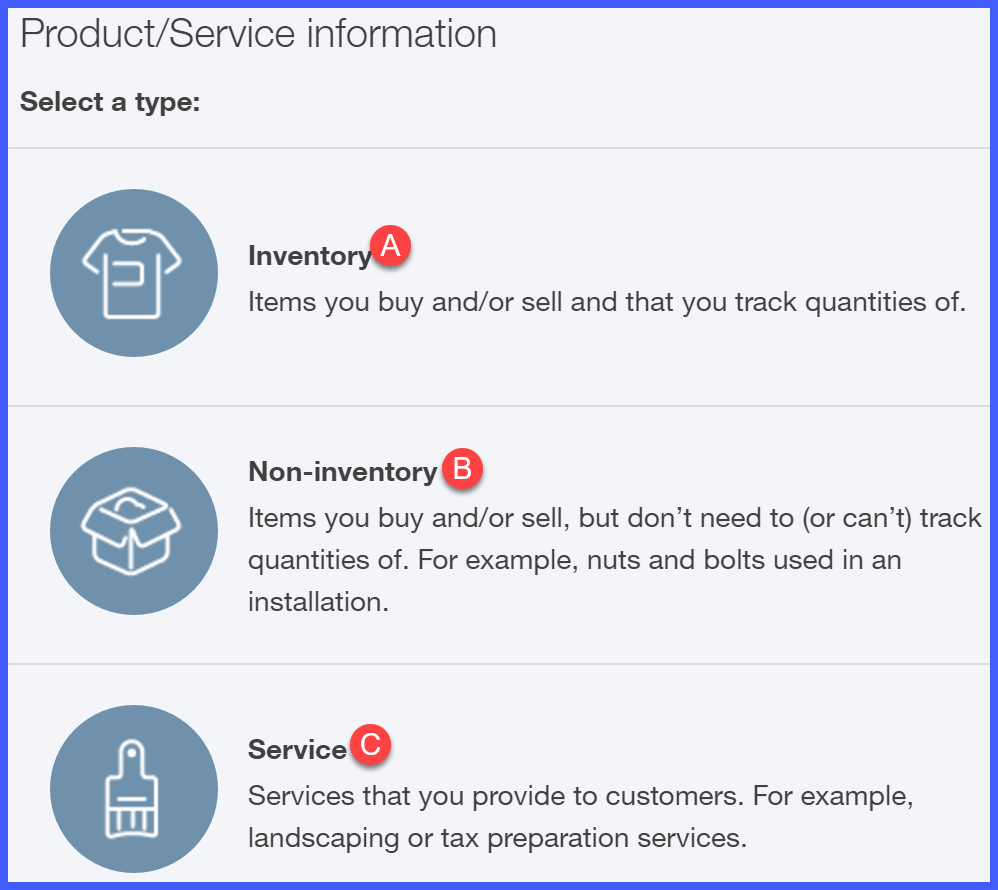
Step 3 – Choose Item Type
While creating a new item in QuickBooks Online, you have 3 alternatives to pick from:
- Inventory
- Non-inventory
- Service
Steps to Set up an Inventory Item
Choose this choice if you want to track costs and quantities for items you purchase and sell. Setting inventory items enables you to track inventory stock levels as items are sold. By doing this, when you are running low on an item, you will be able to keep an eye so that you can order with the supplier before exiting.
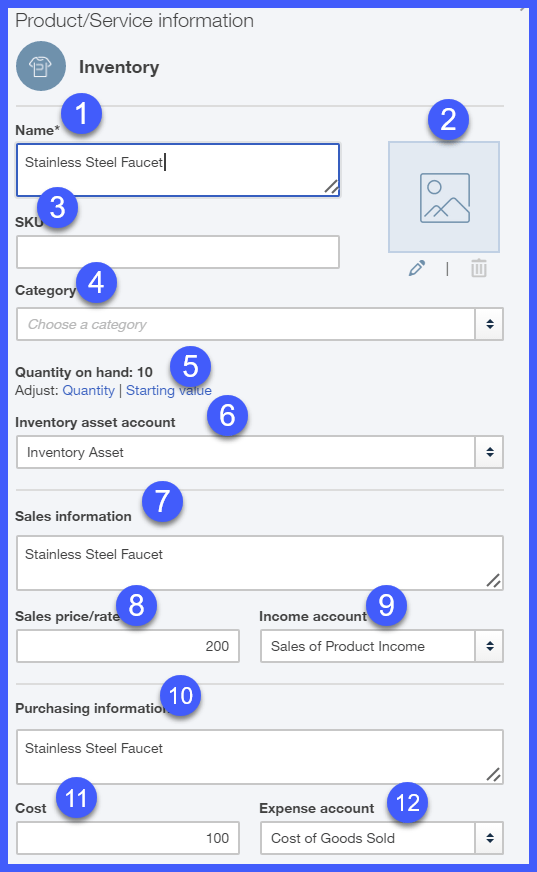
The fields are shown in the above picture must be completed for anInventory Item Set Up, let’s discuss the different fields:
- Name – you need to insert the name of the item in this box.
- Picture of Item – you have to upload a snapshot of the item
- SKU – If you want to keep track of inventory by SKU then only you have to insert that info in this box
- Category – This area enables you to describe inventory items. For illustration, if you sell shoes then you need to set up a shoe Category and then set up the items into a category, for which category(men, women,& child) you sell your item
- Quantity On-hand – Set the current quantity that you have in inventory.
- Inventory Asset Account – QuickBooks will automatically allot this account to inventory items. A word of caution: Do not modify this account or it may result in an incorrect quantity/cost estimation.
- Sales Information – Keep a description of the item you want to be displayed on your customer’s invoices and sales receipts. Usually, this will be similar to the information you entered for the item name.
- Sales price/rate – Insert the selling price of your item.
- Income account – This is the account where you desire to track your income for the particular item.
- Purchasing Info – Keep a description of the item you want to be displayed on the purchase orders that you send to suppliers while placing your order.
- Cost – Insert the cost that you buy for the item.
- Expense account – QuickBooks will automatically assign inventory items according to the cost of your goods. A word of caution: Do not replace this account or it may result in an incorrect quantity/cost estimation.
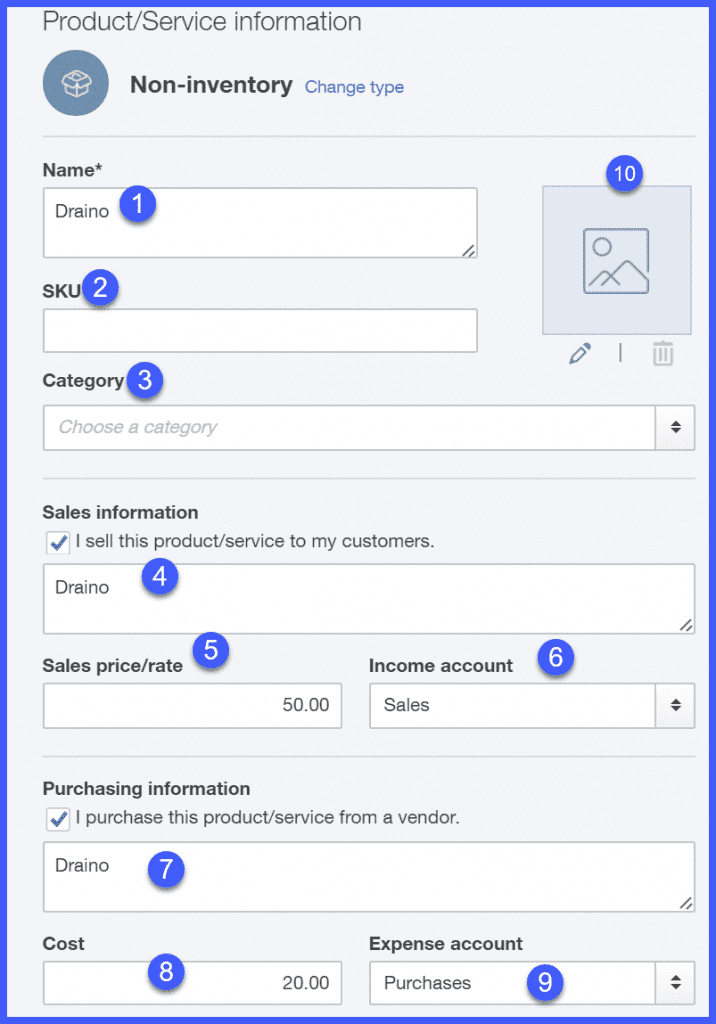
Setting up a Non-Inventory Item
Choose this choice if you want to track costs, but not quantities for the items you purchase and sell.
For eg: Paul buys a variety of barriers and loops, such as nails, glue, and opening of drains, solutions. It does not have to keep an eye on the quantity, but it does need to keep an eye on the cost of these items.
The fields to be completed for the non-inventory item set up are shown in the figure below. Note that the fields are exactly the same as the information required to set up an inventory account with the exception of the expense account. Unlike the inventory item, this expense account is authorized by you and not by QuickBooks.
Setting up a Service Item
Choose this choice for the services that you sell to customers. For instance, plumbing services, bookkeeping services, and tax preparation services come within this category.

let’s discuss the different fields shown in the above picture.
- Name – Insert the name of the service for which you are billing
- Sales Information – This is the information that will look on client invoices.
- Sales Price/Rate – Insert the amount you charge consumers for the service.
- Income Account – Choose the account that you need to use to trace income for the service.
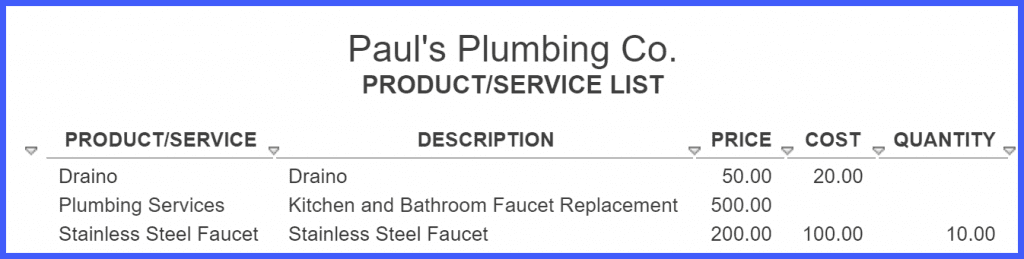
Step 4 – Run Products and Services List Report
After adding all your products and services, you can easily run a report to view the complete list., Choose the run report as described below, from the products and services screen

It should be displayed on your screen similar to the report below. Examine it for efficiency.
Steps to Modify a Product or Service on a List
Here you know how to modify or change the account for a product or service item in QuickBooks Online.
- Navigate the settings tab and find the Products and Services option.
- After that, click on that tab.
- Search for an item that you want to edit or change and click on the Edit tab.
- Find the dropdown menu of the Income account and select the appropriate account.
Note: At the end hit on the save and close option.
Update Past Transactions
After stepping through the process for service and non-inventory items, I will check the Also update this account in the historical transactions box.
Note: If you change the income account for inventory items, it can affect the prior transactions. You can also create new items with the income account if you don’t want to update prior transactions.
- You have to choose the right income account to add a new inventory item.
- Choose the invoices from the sales menu.
- Select the appropriate invoice carefully.
- Then click on the delete option by the old inventory item.
- After that add a new inventory and go to the corresponding quantity.
- Click on the save tab to complete the process.

How to Delete a Product or Service from the List?
Once used in a transaction you cannot remove a product or service from QuickBooks (i.e an invoice created for the customer). This is because of the point that all transactions are related to financial statements. However, if you have a situation where you do not need the item that is currently on your product and service list, you can disable that item. This clearly indicates that it will no longer seem in the list of products and services, but it will also arrive in the financial report when used in a transaction.
To deactivate an item, choose the drop-down arrow next to the Edit option and choose to Make Inactive. This item will no longer appear in the list of products and services.

I hope you find this article useful. If you still have any queries related to this or any other topic related accounting and bookkeeping, you can call on QuickBooks Support by dialling +1-844-405-0904 and get instant solution from Intuit certified ProAdvisor.