Want to know, how to move or reclassify transactions in QuickBooks online Account? Don’t worry, this is to provide the suggestions and help that is very worthy in QuickBooks Online Accountant. If you want to change the class or transfer multiple transactions to another account then QuickBooks Online Accountant helps you and saves lots of time of yours because now you do not need to edit them all at once. In QuickBooks Online reclassify transaction tool helps you to make the same changes across multiple transactions at the same time. For More Info. Contact Us On:+1-844-405-0904
What types of transactions you can not move
Reclassify tools are almost used for any kind of reclassification transaction but do not work for those transactions that attach to particular accounts and features. Check out the below points:
- You are allowed to modify the class for invoices, sales receipts, checks, or bills with items (products or services) on them. But, you cannot change accounts.
- You are not able to change the payment account for expenses(for both bank or credit card).
- You are not able to change the account or class for inventory adjustment until they are linked to your inventory shrinkage and asset accounts.
- You can change the payment account for the expenditure of bills, but not the income account for related income transactions.
- You can easily handle all your payroll transactions in the Payroll menu.
Note: Before you can transfer transactions to accounts receivable or accounts payable, you will need a customer or vendor linked with them. Do not leave these fields empty.
Steps To Move And Reclassify Transactions In QuickBooks Online Accountant
How to reclassify by location
Follow the below steps to use the Reclassify feature in QuickBooks Online Accountant to reclassify locations.
- First, you have to open your client’s QuickBooks Online company.
- Later, click on Settings ⚙ and look for the Account and Settings.
- Click on the Advanced tab and later look for the Sections section and click on Edit ✎.
- Click on the Track locations.
- Click on Location from the Location label ▼ dropdown menu.
- Next, click on Save.
Steps to set report options
You can design a rule to filter out particular transactions that you have to reclassify by a certain date.
- First, you have to open your client’s QuickBooks Online company.
- Now, click on the Accountant Tools symbol and later go to the Report options.
- When you receive your report, set a date for it.
Steps to reclassify and move transactions
You can use the reclassify tool to transfer transactions to identical accounts or to completely change their class.
Note: You are allowed to reclassify accounts, classes, and sales tax codes in bulk.
Check out the following steps to move and reclassify transactions In QuickBooks Online Accountant.
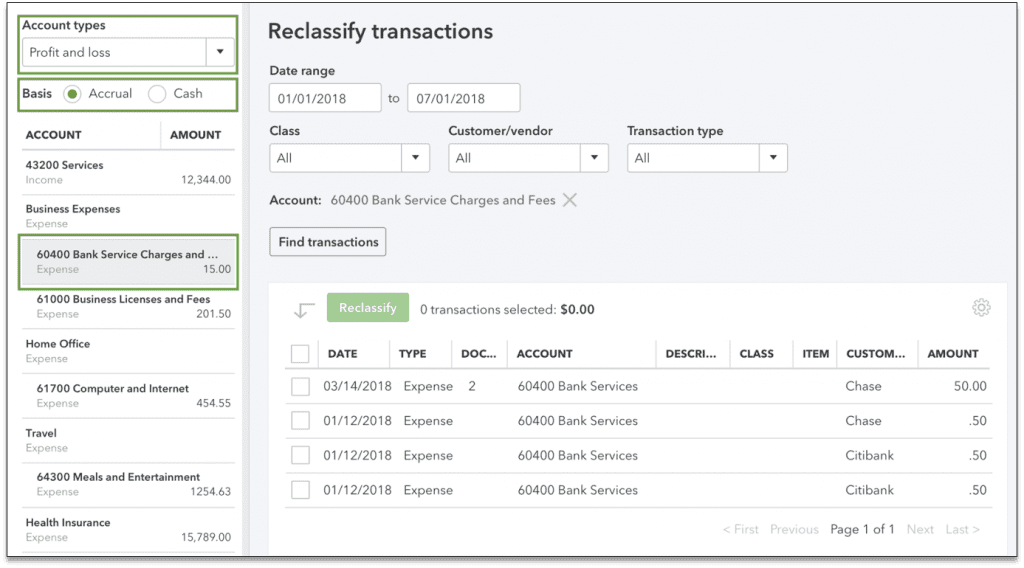
- First, you have to open your client’s QuickBooks Online company and later, click on the Accountant Tools symbol and next click on Reclassify Transactions.
- Click on the Profit and Loss under the account type drop-down menu to view Income and Expenditure accounts. Or click on the balance sheet report to view your asset, liability, and equity accounts.
- Click on the account with the transactions under the Account list that you need to change.
- These are the following filters are available:
- Type: With this, you can easily filter by transaction type.
- Class: With this, you can filter by transactions below a Class or no class. If it is not accessible for you need to turn on class tracking.
- Customer/vendor: With this, you can filter for a particular customer or vendor.
- Modify With this you can filter by transactions that you have modified.
- Next, click on the Find Transactions.
- Click on the box for every transaction that you need to change. Later, click on Reclassify.
- Now, from the drop-down, click on a new account to move the transactions to a new class
- After completing the above steps, click on Apply.
Some Important points:
- If you want to view all paid and unpaid transactions or cash to see only paid transactions then click on accurals
- Click on Settings ⚙ above the net amount to hide columns or to view all your hidden transactions.
You can also use the reclassify tool for your personal transactions in QuickBooks Online Accountant. Select the Dashboard menu. Then select the Accountant Tools (briefcase) icon and Reclassify Transactions.
Hope this article will be helpful to you to reclassify transaction in QuickBooks Online Accountant. If you still have any doubt or query then feel free to reach us by dialing our toll-free +1-844-405-0904 and have a one-to-one talk with our Intuit Certified ProAdvisors. We are 24*7 available with the assistance of our customers.