Want to create and modify QuickBooks scheduled reports, QuickBooks automated reports? In this article learn to create and modify QB scheduled reports, the article contains the requirement for scheduled reports, Edit & modify the report, steps to set up with real-time images to show process flow. Go through the article & resolve all your related queries. Still, having a problem contact QuickBooks ProAdvisor toll-free: +1-844-405-0904

QuickBooks Scheduled reports is a brand new feature in QuickBooks Desktop that authorizes you to send company reports on a systematic and recurring scheduled time. If you have ever found yourself sending the same reports on a daily, weekly, monthly, quarterly basis, you may want to consider setting up scheduled reports to automate this task.
You can select the time and frequency for sending out your scheduled reports. You can also send more than one company report at one time.
Requirements for Scheduled Reports
QuickBooks can send your scheduled reports if they are scheduled to send at that time:
- The computer on which you scheduled the report to send is running and should not sleep or hibernate mode.
- Be sure User Account Control is set to OFF. Warning: Turning off user account control may cause a security risk to your computer.
- When QuickBooks is running.
- Make sure your company file with the scheduled report must be open.
- If you want to set a scheduled report on multiple company files, the NO company file should be opened.
- Make sure, your QuickBooks is updated to the fresh version.
- The company file should be in single-user mode.
- Make sure the email account that you setup up in QuickBooks is running. As an instance, If your email preference is set to Outlook be sure it is open and running.
- You need to keep your QuickBooks running for quick startups preference disabled. Below are the steps to do this.
- Go to the Edit menu, and click on Preferences.
- Next, go to the left menu, click on the General, later click on the My Preferences tab.
- Now, unmark the box for ‘Keep QuickBooks running for quick startup’. Note: This startup preference is NOT accessible for QuickBooks 2018 and later.
If on your computer multiple versions of QuickBooks Desktop are installed (for example, you have installed bothQuickBooks Desktop Pro 2018 and QuickBooks Desktop Enterprise 18.0), and the sub-menu is showing greyed-out for Scheduled Reports, in that case, you need to download the latest update.
Set up a new scheduled report
Important: Make sure to ensure that there is an email account set up and attached with QuickBooks, before scheduling reports. If still you have not set up, first set up your email service in QuickBooks Desktop, then follow the below steps.
Check out the below steps to create a new scheduled report:
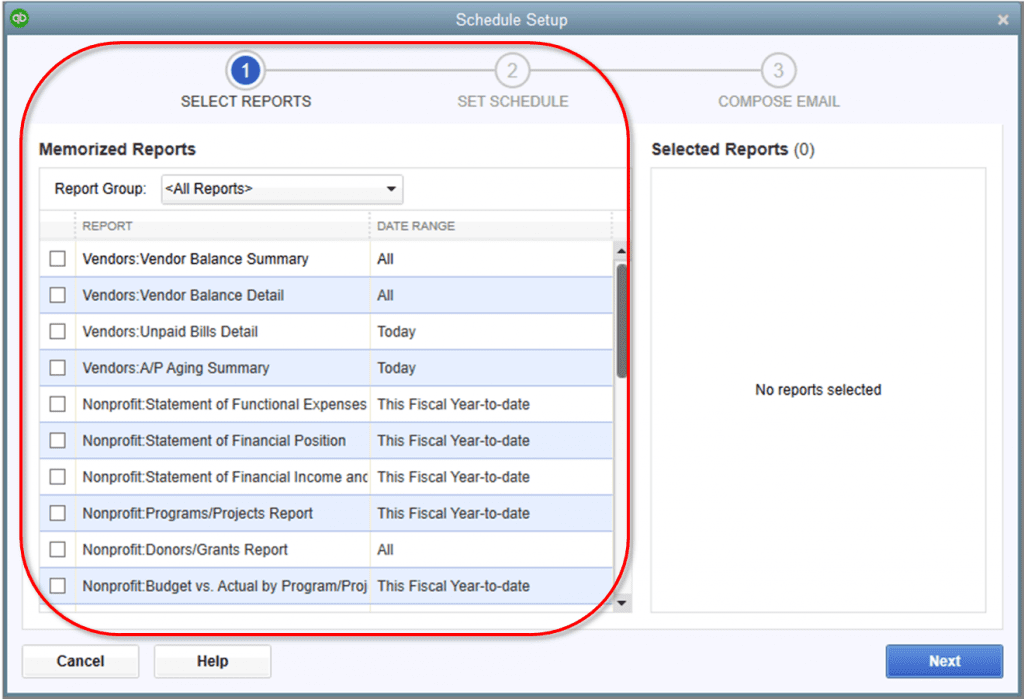
- Go to the QuickBooks Reports menu, and click on the Scheduled Reports and then click on Schedule Setup.
- Now, choose the report you need to send. You can also choose the multiple reports to be sent in the same manner. When you have completed scheduling your reports, then click on Next. Important: Always keep in mind, you only set up a schedule for memorized reports. If in case, you are not able to see the report which you want to schedule, then first open the report and memorize it.
- Later, you need to set up a report schedule. To do this follow the below steps
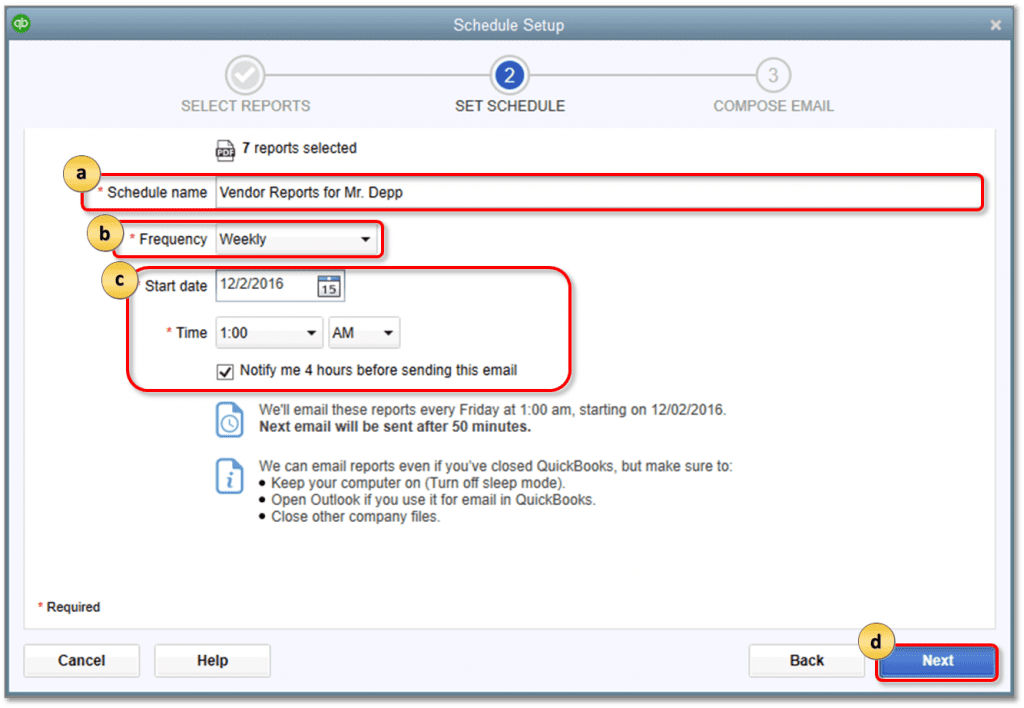
- Give a name to your new schedule.
- You also need to set how frequently you require to send the report.
- Click on the Start Date and Time. Also, you can also select to have QuickBooks you 4 hours before it sends the reports.
- Click Next to proceed.
- Select Start Date and Time. Additionally, you can also select the option that QuickBooks report you 4 hours before sending the reports.
- Create scheduled reports email.
- Insert the e-mail address that you require to send the report. You can also send multiple e-mail addresses just by a semicolon to separate them.
- Before ending the set-up, you need to assign a password for the report attachments. For security purposes, never enter the password in the subject or body fields of the e-mail.
- Go to the Schedule to finish the process.
- Look for the preferences, if it is set up accurately.
- Go to the Edit menu, and click on the Preferences.
- From the left menu, click on the integrated Apps, then select the Company Preferences tab.
- Now, give a checkmark on Scheduled Reports, later click on Properties.
- On the Access Rights tab make sure both permissions are selected.
- Go to the Access Rights tab, check both permissions should be selected.
- Click on OK, then select OK.
Edit or delete an existing scheduled report
Follow the below to modify the currently scheduled report:
- Go to the QuickBooks Reports menu and then choose Scheduled Reports and then click the scheduled report center.
- After that, click the Action drop-down and then choose either Edit Schedule or Delete.
- If you like to make a scheduled report inactive, remove the checkmark in Active This will retain the settings of a scheduled report but will prevent it from running until re-activated.
If you are unable to create and modify QuickBooks Scheduled reports then contact our QuickBooks Support+1-844-405-0904. Our technical experts are available 24/7 for your help.