This article is helpful for those who are new to QuickBooks Online and looking for some resources. Whether you are running any small business, restaurant, rental property, construction company, or non-profit organization, our step-by-step guide will prove to be useful for you. You will learn how to set up a business profile, sales form, tax form, and many more details you need to set up your account to run the business smoothly and efficiently. For More Info. contact us toll-free: +1-844-405-0904
If you recently started using QuickBooks Online and you don’t have prior knowledge related to bookkeeping, then it must be difficult for you to cope with so many features that QBO offers.
Follow this process step by step and your account will be set up in no time.
Setup QuickBooks Online Business Profile
In the first part, we’ll explain to you how to set up a company profile in simple steps. This section includes various sub-sections.
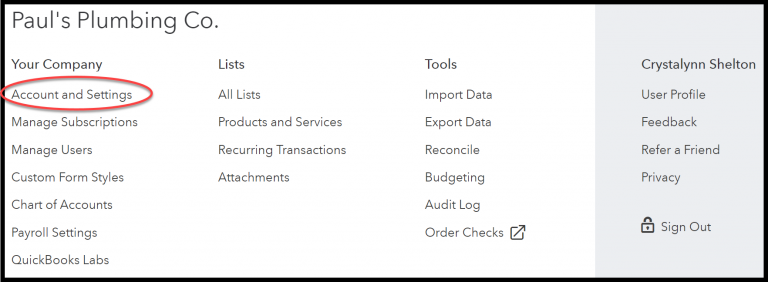
- Click on the Gear icon on the top right corner of the navigation bar.
- After that select the ‘Company’ option in the drop-down menu.
- And then click on the ‘Account and Setting’.
After that six different sub-windows will appear – Company, Billing and Subscriptions, Sales, Expenses, Payment, and Advanced. You need to edit all one by one by clicking on the pencil icon.
Let’s get started without any further delay
Company
Company Name
Enter your company name and upload the company logo. Also, provide your Employer Identification Number (EIN) or (Social Security Number) SSN.
Company Type
Select the company type like Sole proprietorship, Limited liability Partnership (LLP), etc.
Contact Info
Update your company phone number, website and provide an E-mail for the customer service. All the mentioned information will be displayed on the invoices that are issued to customers. Therefore, it is necessary to do it perfectly.
Company Address
This is the address for your customers. If you want then you can mention one other than your legal address again because this address will display on the invoices.
Marketing Preferences
In this option, you can select how Intuit can contact you for their promotional offers like via email or phone.
Billing and Subscription
Company ID
You can see your company ID in the green bar at the top. Company ID is required when you call Intuit for any queries. We recommend you to save in some other place too.
QuickBooks
You can change these configurations if you want to upgrade to the new version of QuickBooks software, or change the payment methods unless you can leave them untouched.
Sales
Customize
Skip this invoice part for later otherwise, it will complicate this right now.
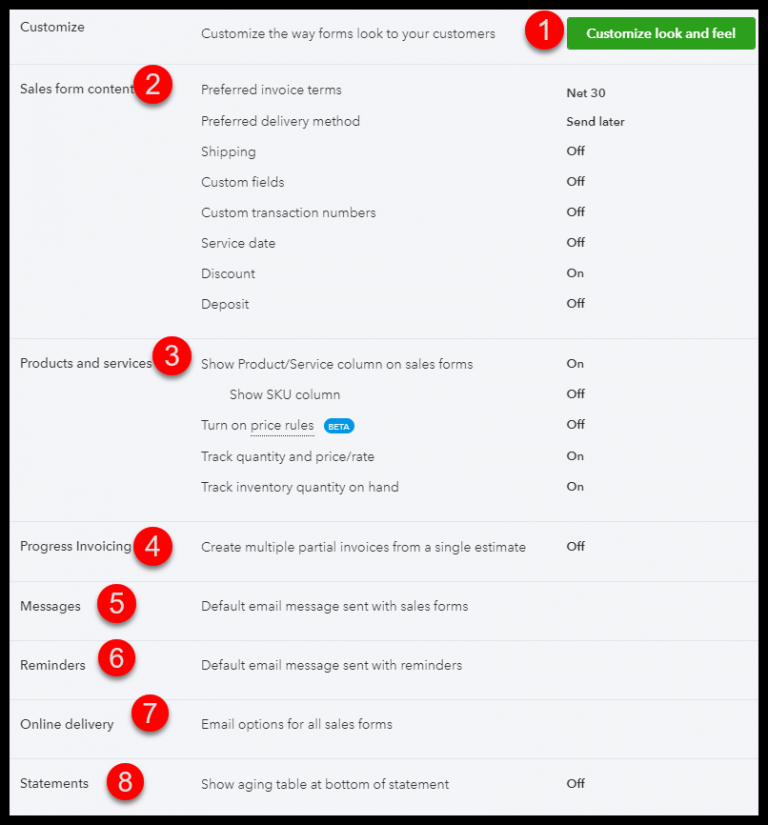
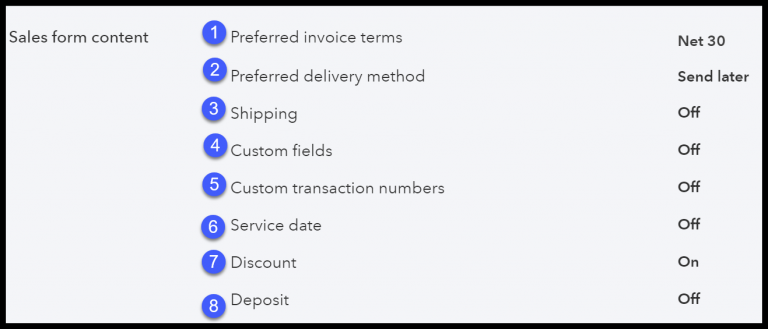
Sales Form Content
- Edit default Invoices term: Set up terms that you use frequently in the Invoice. You can always edit it later manually but it will be great if you set most of them initially.
- Preferred Delivery Methods: None
- Shipping: If your business is related to the Wholesale or a product-based business, then you can provide a shipping address.
- Custom Transaction Number: This feature will allow you to use your own Invoice numbering system if don’t want to use QuickBooks default numbering system.
- Service Date: Tick the option if you want to show the date of your service to the customers. The date will be mentioned on the Invoice.
- Discount: By checking this, you allow your customers to see the discount field on Invoice.
- Deposits: By checking this, your deposits will be mentioned on the Invoices.
Product and Services
- Check on the ‘Show Products and Services’ list on the Sales Form.
- If you use Shop-keeping Unit (SKU) code in your invoice then you can check on the ‘Show SKU’ option.
- Track Quantity and Price rate- If you are in a business where you charge per hour or per item then check on.
Progress Invoicing
Check this option if you provide the installment payment method. The feature allows you to send different invoices for each installment.
Messages
Here you can customize the message which is sent with the invoice to the customer or you can select the default QuickBooks template.
You can select an option in which a copy of the invoice will be automatically emailed to you.
Reminders
You can choose to insert a personal line every time when you send the reminder.
Or you can also edit while setup QuickBooks Online. For that, edit the default invoice reminder or use your own template which is emailed to the customers.
Online Delivery
Check this option if you want to send invoices and Sales forms in PDF format so that they can easily open these files in their browser.
Statements
Check on this option so you can easily see your aging table at the bottom.
Expenses
Bills and Expenses
Assuming that most people who are reading this post are already subscribed to QuickBooks Simple Start and will see an upgrade button.
Payments
You can apply here for the Intuit’s Payment Processor if you want to use online payments for your invoices.
Advanced
Accounting
- First month of Fiscal year: Select ‘January’ unless you use a different one.
- First month of Income Tax year: This should be the same as the fiscal year.
- Accounting Method: Select your preferable accounting method.
- Close Books: Off
Company Type
Tax Forms: Select which type of Tax Form your company uses.
Charts of Accounts
Enable Account Number: Off
Automation
These settings are best in default. Leave them as it is.
Currency
Home Currency: Choose the currency you use in business transactions.
Other Preferences
- Date Format: Choose the date format if you want to use other than the default.
- Number Format: Default number format is with commas you can select other options too.
- Customers Label: Select according to your business for example if you provide any kind of service then go with Clients or if you sell some sort of products then select Customers.
- Warn if Duplicate check number is used: Yes
- Sign me out if Inactive for: Whichever suitable for you.
Connect your Bank Account with QuickBooks
Here you need to Reconcile your bank account in QuickBooks so that all the transactions can sync with the QuickBooks account.
- On the Dashboard, select the ‘Bank Account’ from the top right corner.
- Then select the ‘Connect Account’ option.
- After that, a new window will appear in this you need to select the Bank.
- Then, sign in using the bank username and password.
- After Signing In, a list of all accounts which are connected with this username will be shown on screen. You only need to select business accounts.
- Match these bank accounts with Charts of Accounts using the drop-down menu named as Enter Account Type and selecting the account.
- After the matching is done, click on ‘Connect’.
NOTE: If you setup QuickBooks Online first time then it will only sync those transactions which are 90 days old from the date of the connecting account. For the transaction Prior to this period you need to do it manually.
Add Products and Services
In this section, you need to enter the products and service that you offers to your customers.
(This is for only those who send sales receipts to their customer other users can skip this part.)
Open Products and Services
- At the top right in the navigation bar, click on the Gear icon.
- Then, In the second column click on the ‘List’ option and after that select ‘Product and Services’.
Add a new product or service
- Click on the ‘New’ option.
- Depending upon the version of QuickBooks you are using there are different types of products and services available.
- Inventory: These are the physical or digital items you offer to customers and track them as inventory.
- Non-Inventory: These are the physical or digital items you offer to customers and do not track them as inventory.
- Bundle: As the name suggests these are the products that you sell in bundles.
- Service: These are the service provide by your business.
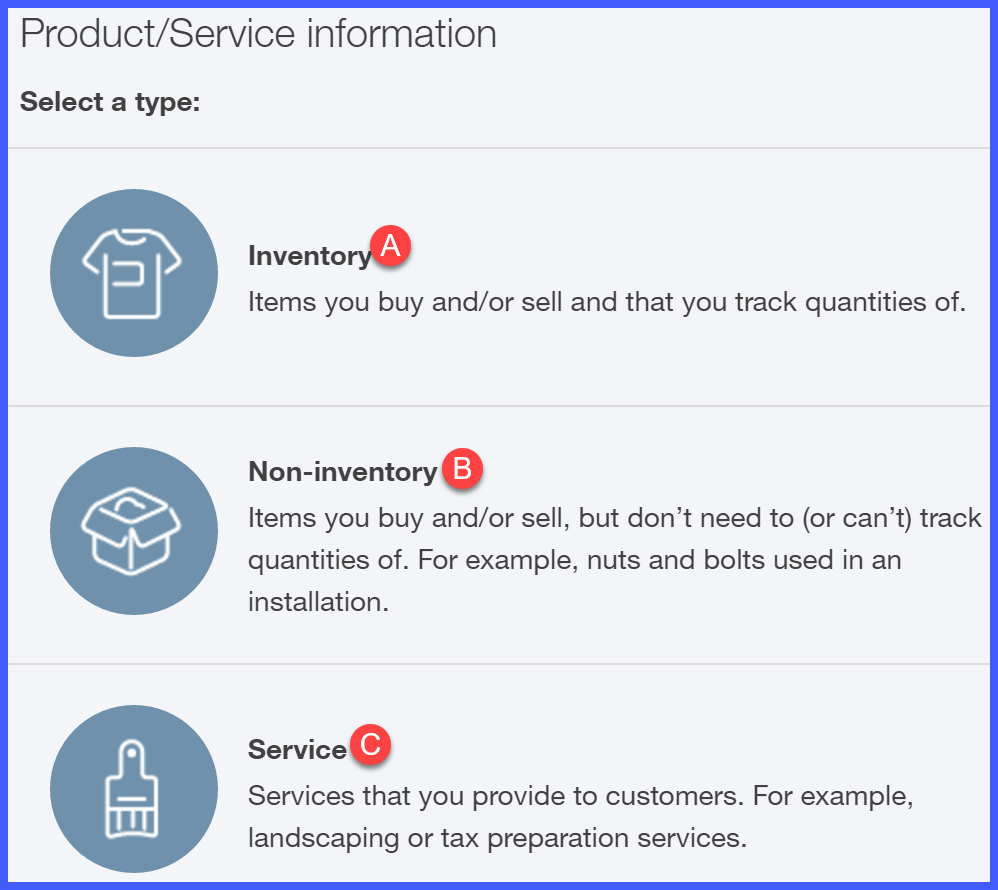
- Select any one of the above-mentioned products or services.
- Fill the required information related to the products and services.
- Name: Type the name of a product or service that you provide. Your customers can see this name on the invoice.
- SKU: If you use Shop-Keeping Unit (SKU), then mention it.
- Photo: Here you can add a photo of your product.
- Category: You can use sub-categories for your own convenience if you have different types of products. It will help you to keep tracking of your products.
- Sales Information: This is a brief description of your product and service to your customers. They can see this on the Invoice. You can write something, leave it empty or you can write while issuing an Invoice.
- Sales Price/Rates: This depends on the type of service you provide. For example, if you charge hourly then enter per hour price or if you have a product then enter the product price.
- Income Account: Select the Income account which is linked to this product or service.
- If you want to add another product or service then select ‘Save and New’ otherwise choose ‘Save and Close’.
Customize Invoice in QuickBooks Online
In this option, you can edit the layout, font styles, and customize details columns of your invoice while you setup QuickBooks Online for the first time.
Open the Invoice editing window
- Click on the gear icon at the top of the navigation bar.
- After that, a drop-down window will open and then click on the ‘Company’ option.
- Select ‘Custom Form Styles’ to edit the Invoice.
Edit Invoice Template
There is a pre-designed template by QuickBooks which you can edit. By simply clicking on the edit button the Invoice editing window will appear.
Design
- There are 5 different layouts for Invoice you can select one of them.
- You can edit a pre-designed logo or edit the existing one.
- There are plenty of different colors options are available you can select whichever you want.
- Select fonts for your invoice. There are 4 different font styles are available.
- Edit printing margins of your invoice.
Content
There are 3 sections in the content. You have edit each one of them separately by clicking on the pencil icon at the bottom of every section.
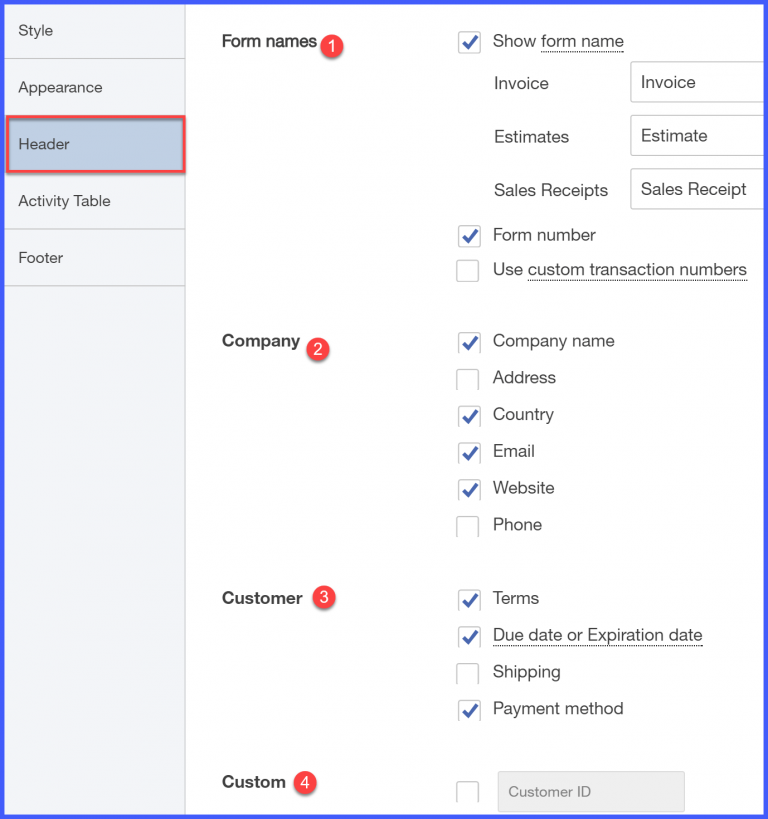
Header Section
- Header: Check those fields that you want to show in your invoices.
- Form Name: By default, your form name says ‘INVOICE’ you can change it if you want.
- Form Number: You can give numbering to your invoices with this option.
- Custom Transaction Number: Check ‘Yes’, If you don’t want to use the QuickBooks Default Transaction system.
- Display: Check those fields that you want to show in your invoices.
Activity Section
- Account Summary: By ticking this field, your customers will able to see not only the current invoice but the entire account balance.
- Tick the columns you wish to show on the invoice.
- Rearrange the columns by drag and drop using the mouse.
- Click on ‘Edit tables and Widths’. A slider will appear that will help you to adjust the widths of columns.
Footer Section
- Tick to show ‘Discount and Deposits’ field on invoice.
- Message to Customer: In this section, you can write something like payment policies, terms and conditions, etc. You can select on which sales form this message should appear from the drop-down menu.
- Footer text: You can add some additional information like the product reference number here.

Emails
Standard Email
- From the drop-down menu select the sales form for which you are editing your Email. There are options like Invoice, Sales receipts
- Enter the subject line of the Invoice.
- You can use greetings in your emails or you can uncheck them if you don’t want to use it.
- Type the message for the Emails or you write them at the time when you send the email.
Reminder Email
- Enter the subject line.
- Use greeting a message or uncheck them if you don’t want to.
- Enter the reminder message or use a customized message at the time when you send the email.
Payments
If you setup QuickBooks Online for the first time and want to use QuickBooks online bill pay methods then you need to tick on the square grey box at the right of that option.
NOTE: You have to apply for using this payment method through Intuit Payments. After you finished editing clicking on the preview pdf button at the bottom of the window, here you can see the preview of the invoice. If you are satisfied with your work, click ‘Done’.
Setup QuickBooks Online Chart of Accounts
The Charts of Account is one of the most integral parts of the financial system. This is the list of all accounts in the general ledger of a company. For running a business swiftly and smoothly it is important for you to set up this correctly.
Open Charts of Accounts
- Go to the left side panel and select ‘Accounting’.
- Now you can see your Chart of Accounts.
QuickBooks will automatically fill in most of the information. There are some categories which you’ll be needed and some are not useful to us so we have to delete those.
Before setup QuickBooks Online, make sure you don’t do any mistakes while editing the categories. For this, you’ll need to plot all accounts on paper first that you want to add in Charts of Account.
Bank Accounts
Make a list of all business bank accounts
- Business Checking
- Business Saving
- Any virtual bank account
- Cash
You can add as many as business accounts you want to. So, there is no issue if you have plenty of them.
Credit Card Accounts
Here you can mention all your Business Credit card accounts. You can import Credit Card Transactions in QuickBooks Online.
Assets
Assets are those things that add value to your business means you can earn a significant amount of money after selling it. For example Machinery, High-end equipment, inventory, etc.
Liabilities
Liabilities are something that needed to be repaid after some time by the business. For example business loans from the bank.
Income
In this make a list of your all sources of income. You don’t need to mention all the names of your product and services you offer you can just write Product and Services.
Cost of Goods Sold
It is a direct production cost of the products and services you sell. It consists of all expenses from the cost of raw materials to the cost of packaging including labor cost.
Expenses
All of your business-related expenditures, as well as tax deductions, will fall under expenses. You can look for Section-C in your previous year’s tax return file to see the categories of taxes.
Now the list of all your accounts is completed you can add them to the QuickBooks Charts of Account.
Here are the following steps to do it.
- In the ‘Chart of Account’ window, select the green ‘New’ button after that a new window will appear.
- Category Type- From the drop-down menu select the category of your new account. There will be categories like Fixed assets, Liabilities, Cost of Goods, Income, Expenses, Credit card account, etc.
- Detail Type- Select from the drop-down menu.
- Name- Select a name for your account. The name should be unique and easy to remember so that you can identify it later.
- Description- It is not mandatory to fill this.
- Subaccount- If the account you are adding is a subaccount of another account then from the drop-down menu you can select a parent account.
- Balance- Enter the opening balance as of 1st January. But if you opened the account after the 1st January for example on April 14 then fill the balance as of this date.
- Save- Save as New by clicking on the green save button.
You can delete those default accounts category which is not useful to you. Otherwise, bookkeeping will be going to mess up.
In the Category Type, select the account which is not useful. Then on the far right click on the triangle to delete it.
Frequently Asked Questions
Here we will discuss some most frequently asked questions. Have a look at this and get answers to these questions.
Is QuickBooks online good for small businesses?
QuickBooks Online is the best accounting software for small businesses. It offers a wide range of features, affordable pricing, and is used by thousands of small businesses. QuickBooks offers different versions to different types of businesses according to their needs.
What information do I need to set up QuickBooks online?
You need to collect some information before setting up QuickBooks Online. Here we are going to discuss what you need to collect. company name, address, phone number, email address, business structure, tax ID, cash basis or accrual-based accounting, bank account numbers, statements, all previous tax forms, all tax account numbers, state and local tax %, taxing entity name for payments, chart of account names, logo’s for company, payment terms for customers, existing customers information, existing vendors, and business location.
Is QuickBooks Online difficult to learn?
QuickBooks Online is easy to learn. If you have an accounting background it becomes very easy to learn for you. It completely depends on your knowledge and performance.
Above we’ve mentioned each and every single step you need to follow to setup QuickBooks Online. There are so many advanced settings in QBO accounting software if you want to master all of these features, then we can help you in achieving this. Our QuickBooks ProAdvisor team will assist you in every issue related to QuickBooks. For this, you need to call at our toll-free number+1-844-405-0904