Want to create invoices in QBO and QBD then we are here to suggest and assist you with an article. The invoice shows the customer’s information, date and time of the transaction, product information, and the amount of product that the customer has to pay. These are used to request payment from buyers, keep track of sales, help control inventory, and facilitate the delivery of goods and services. In this article, you’ll learn how to create an invoice in QuickBooks Online and Desktop. Still, having an issue contact our QuickBooks ProAdvisor toll-free: +1-844-405-0904
Depending on the type of transaction there are a few different methods by which you can easily create invoices for vendors and customers.
Advantages of Creating Invoices in QuickBooks
These are a few benefits of creating invoices in QuickBooks software.
- It helps in managing the (A/R) Account Receivables.
- Both the buyers and the sellers can track the payment.
- You can easily Email the Invoice to the customer.
- You can also create a custom template for your invoices.
- It also serves as a legal record of the transaction between buyer and seller.
- Recording all the sales transactions helps in filling the right amount of tax at the end of the fiscal year.
How to Create an Invoice in QuickBooks Online
Follow the below steps to create invoices in QuickBooks Online or bills for vendors and customers in QuickBooks Online.
Create a New Invoice
- Open QuickBooks Online, click on the +NEW button, and then select the ‘Invoices’ option.
- In the customer drop-down menu, select the customer for whom you want to create the invoice.
- Then in the column on the right side, enter the customer Email ID.
- Enter the Billing and shipping address in their respective boxes.
- Fill in the Invoice Date and from the term drop-down menu select the due date. (NOTE: Net 30 means payment due in 30 days or Net 45 means payment due in 45 days from the date invoice was issued.
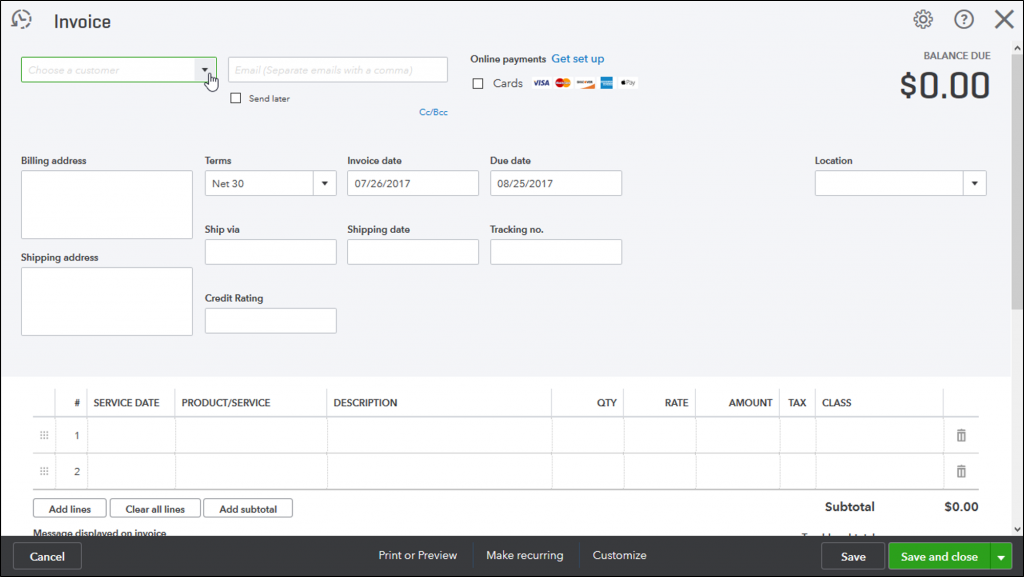
- Then provide the shipping method (If used), shipment date, and tracking ID.
- Now in the Product/Service column, select the product or service you sell to the customer. You can also add a little description of the product.
- Enter the quantity, rate, and tax options of the product.
- If you want to send the invoice now select ‘Save’ and continue further or you can also select ‘Save and Close’ if you want to send the invoice later.
If you want to send a paper invoice click on ‘Print or Preview’ or you can also schedule recurring Invoice by clicking on ‘Make recurring’.
Review the Unpaid Invoices
To review the invoices you have to follow the given instructions.
- You have to go to Get paid and pay or you can go to Sales & expenses.
- After that, you have to choose Invoices and then check the status that you want to see.
- You haven’t emailed the invoice yet; it’s due in [days].
- Due in [days] Sent: The customer received the invoice through email from you.
- Due in [days] Viewed: The invoice was opened by the client.
- Deposited: The invoice payment from your client.
- The invoice is past due and underpaid. Overdue [days].
- Overdue [days] Viewed: Your consumer opened the overdue invoice but failed to make payment.
- Undeliverable invoice, Re-send after checking the email address this is a delivery issue
- Voided: QuickBooks voided the invoice.
- To review the invoices of a specific customer, Select the Customer menu and then open the Customer profile to see their all invoices.
Receive & Record Invoice Payment
You need to record invoice payments manually if you are using external payment methods or use QuickBooks payments like ACH payments or credit cards, etc.
QuickBooks will put the invoice in the account payable until you get paid and after receiving payment, your invoice will automatically move to the account receivable.
How to Create Invoice in QuickBooks Desktop
Follow these steps to create a new invoice for the customers and vendors QB Desktop.
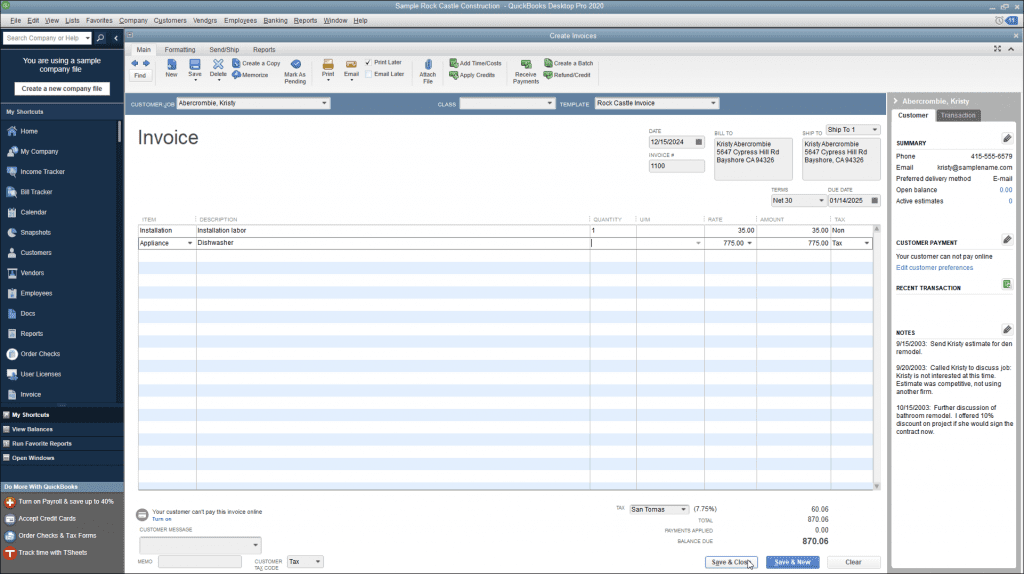
Create an Invoice From Scratch
If your business does not need to create a sales order or estimate, then your A / R workflow starts with creating invoices.
- Choose to Create Invoices from the Home screen or you can also find it under the Customers menu option.
- Choose a customer or customer job from the Customer Job drop-down, If in case the customer or job is not shown in your list, then click on Add New.
- Enter all the appropriate information at the top of the form like Date Invoice, Bill to/Sold to, and Terms.
- In the Expand area, choose the item. Note: When you choose or add an item, the description and amount are automatically populated based on the description and unit cost when it was set. When creating an invoice you can delete or modify it.
- This is an optional step but if you desire to apply for a discount then you have to create a discount item.
- Go to the Lists menu, from the Home screen
- Choose Item List.
- Right-click any place on your screen, then click on New.
- Choose the Type drop-down, then click on Discount.
- Insert an Item Name/Number and a short Description.
- In the Amount or % box, insert the discount amount or percentage. If your discount amount varies, you desire to leave the amount or % field blank and fill in the amount immediately in your sales form.
- Select the income account you need to use to track discounts you provide to customers, from the Account drop-down,
- Choose a proper Tax Code for the item.
- Choose OK.
- Click on Save & Close.
Create an Invoice for a Sales Order
A sales Order is used to confirm a purchase, therefore, it is mandatory to create an Invoice for that sales order. There are methods to do this, let’s discuss both.
From the Sales Order Tab
- Open the Sales Order tab and then click on the ‘Create Invoice’ on the top right corner.
- Now a pop-up window will appear with two options.
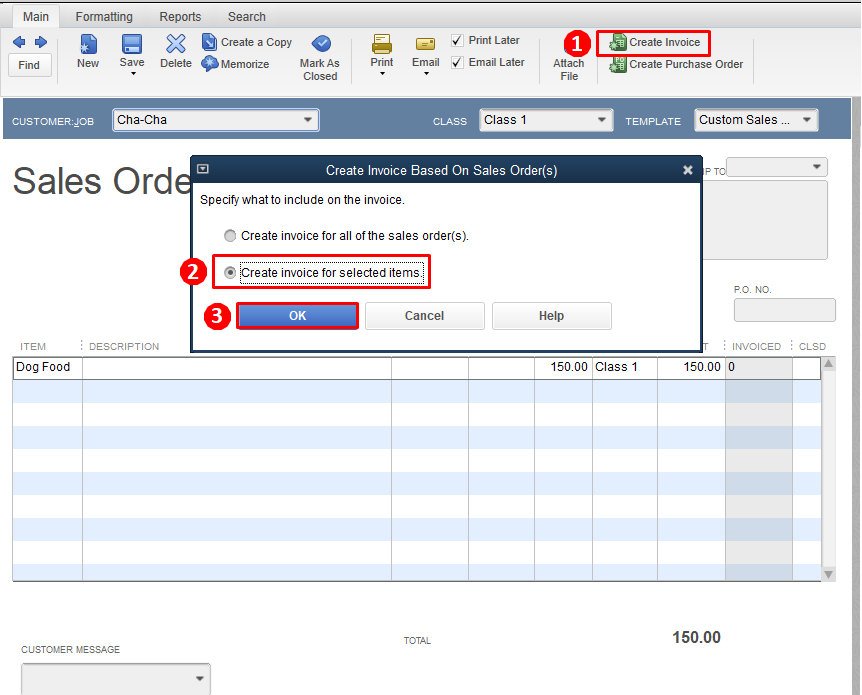
- Create Invoice for all the Sales Order(s): Select this option if you want to add all items in the invoice.
- Create Invoice for the selected items: Select this if only want to add some particular items.
- Now enter the quantity of each item in the ‘To Invoice’ box. Enter ‘0’ if you don’t want to add that item in the invoice.
- Lastly, select ‘Save and Close’.
From the Invoice Tab
- Open the QuickBooks Home screen and select the ‘Customers’ option on the top menu bar.
- After that click on the ‘Create Invoice’ option.
- In the create Invoice tab, select the customer from the Customer: Job drop-down menu.
- After that, when the sales order window will appear, select the sales order for which you want to create the invoice.
- Now enter the quantity in the ‘To Invoice’ box and then ‘Save and Close’.
Create an Invoice for an Estimate
When a customer accepts your estimate and is ready to pay a fixed amount mentioned on that estimate then it needed to be converted into an invoice.
From the Estimate tab
- Open the Estimate tab and click on the ‘Create Invoice’ in the top right corner.
- After that, a pop-up window named ‘create Progress Invoice based on Estimate’ will open with three options.
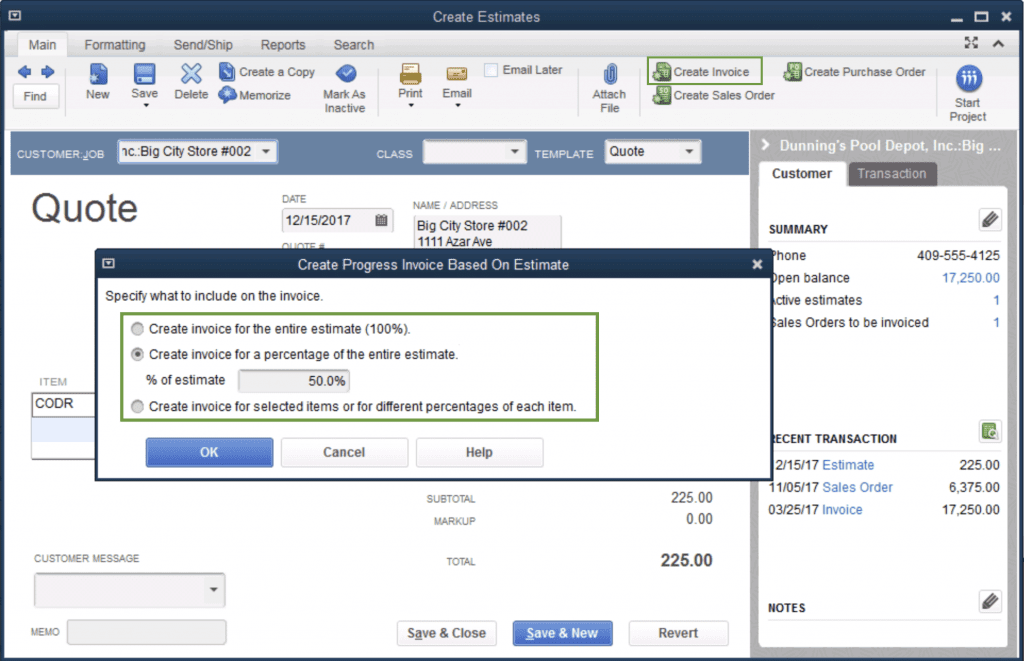
- Create an Invoice for the entire Estimate
- Create an Invoice for a percentage of the entire estimate like 50%.
- Create invoices for selected items or for different percentages of each item.
- Edit the quantity and information of items when the invoice appears.
- At last, Save and Close.
From the Invoice tab
- Go to the QuickBooks home screen and then select the ‘Customers’ option on the top menu bar.
- Here select the customer and after that, a window with all estimates will pop up.
- Then select the estimate for which you want to create an invoice.
- After that fill in the required information and then ‘Save and Close’.
Ending Words
We’re hoping that you found this blog on how to create invoices in QuickBooks very useful. There is no doubt that using accounting software like QuickBooks will surely help in the growth of your business.
Our team of Intuit’s Certified QuickBooks Proadvisor can also help in achieving your goals. We offer to help you with accounting or financial services and any other QuickBooks software-related problems. If you want to know more about the service we offer call us at our 24*7 toll-free customer service number +1-844-405-0904.