In this article, we are going to show you how to set up and pay liabilities (scheduled, custom, or unscheduled) in QuickBooks Desktop. In addition to this, you’ll also learn to set reminders for upcoming payroll tax and liability payments as well. The article is to provide you with a complete guide, read this one to get all your answers. Dial the toll-free number +1-844-405-0904 for further support related to QuickBooks Desktop Payroll.
This feature is very useful when you need to fix the discrepancies in the Payroll Liability Report or the Balance Sheet Reports in QuickBooks Desktop. So let’s see how you can do this in very simple steps.
Things you need to understand before proceeding further
- You need to update your QuickBooks Desktop to the latest version available.
- You need to download and use the latest QuickBooks payroll tax table.
- You should be QuickBooks Desktop in the Single-User Mode.
- If you have QuickBooks Desktop Payroll Assisted subscription then Intuit will automatically deduct and pay your payroll tax liabilities to the appropriate tax authorities. You should check out Assisted Payroll Tax Guide to learn what taxes Intuit pays on your behalf.
NOTE: For employee benefits such as child support garnishment Intuit doesn’t pay for these kinds of liabilities on your behalf.
Set up Reminder Notice
Using this option in QuickBooks Desktop Payroll, you can easily set reminders for the upcoming payroll tax and liability payments as well. There are two options to set the calendar reminder, let’s discuss both ways one by one.
OPTION 1: Add a reminder to your Calendar
- From the top menu bar, go to Employee> Employee Center.
- In the Employee Center window, click on the Payroll tab and then go to the Payroll Liabilities tab.
- From here, you can choose multiple liabilities to add to your reminder at the same time.
- Then, click on the Set Reminder drop-down menu and choose the Add reminder to Calendar option from here.
- Next, confirm that you want to add a reminder to the calendar by clicking on OK.
- If you have installed multiple calendars then a list of the calendars will pop up.
- You can add some info by editing the reminder notice here.
- Once all things are in place, select the Save option.
OPTION 2: Export reminder in the calendar file
- From the top menu bar, go to Employee> Employee Center.
- In the Employee Center window, click on the Payroll tab and then go to the Payroll Liabilities tab.
- From here, you can choose multiple liabilities to add to your reminder at the same time.
- Then, click on the Set Reminder drop-down menu and choose the Export Reminder in Calendar file option from here.
- Click on OK.
- After that, choose a location on your system where you want to download the file and select the Save option.
- Now, choose the software from which you want to open the file.
- You can also make changes to the reminder notice as per your requirement and select Save.
Assign a Payee Name
In order to pay your payroll taxes and other types of liabilities, first of all, you need to assign a payee name to each liability. Normally, most of the payees in such cases are Tax agencies but there could be some other financial institutions like banks, insurance company, etc.
Follow the instruction to assign a payee name.
- From the top menu bar, go to the List> Payroll Item List menu.
- Select the payroll item.
- You need to hit the Next button till you don’t reach the Agency for the company-paid liability window.
- After that, you need to select the Payee (Agency) from the “Enter name of the agency to which liability” drop-down menu.
- If all fields are correct, click on Save.
Follow the same procedure to assign a payee’s name to the other liabilities.
Set Up Schedule Tax Payments
- From the top menu bar, go to the Employees> Payroll Center menu.
- In the Payroll Liability tab.
- Under Other activities section, you need to select the Change Payment Method option.
- Here, go to the Schedule Payment section and then select the tax liability for which you want to set up the Scheduled Payment.
- To enter the information, click on the Edit option.
- If you are using a QuickBooks Desktop Payroll Enhanced then:
- From the drop-down menu, you can choose the payment frequency. If you don’t find the frequency you need then you can checkmark the box stating Let me use a different payment frequency. Now, you can set up the custom payment schedule.
- IRS doesn’t allow you to make a weekly liability payment schedule. But, if you make payment a few days after running payroll then IRS will consider it as a semiweekly basis. From the Payment Frequency drop-down menu and then select the After Each Payroll option.
- Finally, click on Finish and then Finish Later.
Set up Benefits and Other Payments
- From the top menu bar and then go to Employees> Payroll Center.
- Head to the Payroll Liabilities section.
- Then, under the Other Activities section and then select the Change Payment Method option.
- Next, go to the Benefits and Other Payment> Schedule Payments, from here you can edit the other liabilities option or you can schedule a payment.
- If you want to enter the information and the payment frequency, click on the Edit option. NOTE: Every provider has a different payment frequency, therefore, you may want to verify it with your provider.
Set Upcoming, Due, and Overdue Liabilities
You will be able to see all of your upcoming, due, and overdue liabilities, but before that, you’ve to finish setting up your liability schedule. To check your due, follow the below steps.
- From the top menu bar and then go to Employees> Payroll Center.
- Head to the Payroll Liabilities section.
NOTE: All the users of QuickBooks Desktop 2018 or later will be able to see a reminder under payroll liabilities on the home screen.
Pay a Scheduled Liability
- From the top menu bar and then go to Employees> Payroll Center.
- Head to the Payroll Liabilities section.
- Go to the Pay taxes and Other Liabilities section and then here you need to mark the liabilities that you want to pay and select the View/Pay option. (NOTE: All the payroll items that you have selected at the same time will be converted into one liability check but only when if all those items are paid to the same agency. More than 1 liability check will be made if paid to different agencies. Before paying, make sure that amount and item list under payroll liability are correct.)
- Before printing, make sure that the date and amount are correct. After that, if you want to print the check, click on the Print option. If you are willing to choose another payment method then leave this field empty. NOTE: Liabilities are accrued on the date the paycheck is issued rather than the payment date of the check.
- From the Expense tab, add liabilities/expenses, to do so.
- Click on the Account field drop-down menu, you need to select the account that you use to track the payroll expenses and penalties, in the Amount you need to enter the amount.
- Once you add the expense and penalty amount to the liability check, you need to select the Recalculate option.
- If you want to print this check then click on To be Printed option. If you are using a handwritten check then in the No. field enter the check number or any other reference number. If you pay liabilities by the Electronic Fund Transfer (EFT) then uncheck the To be Printed box and in the NO. field enter EFT.
- Either select Save & Next or Save & Close.
Create an Unscheduled and Custom Liability Check
- From the top menu bar and then go to Employees> Payroll Center.
- Head to the Payroll Liabilities section.
- Then, select the Create Custom Payments option from under Other Activities.
- Select the date range for the Liabilities window and then select OK. NOTE: Liabilities are accrued on the date the paycheck is issued rather than the payment date of the check.
- Checkmark the To be Printed box if you want to print the liability check. Leave this field empty, if you are willing to use a handwritten check.
- After that, choose a date, this date will appear on the liability check, and then select the Bank Account.
- Then you either need to select the Review your liability check to enter expenses/penalties option or Create a liability check without reviewing option.
- Next, you need to select the payroll item that you are willing to pay and then select the Correct option. (NOTE: All the payroll items that you have selected at the same time will be converted into one liability check but only when if all those items are paid to the same agency. More than 1 liability check will be made if paid to different agencies. Before paying, make sure that amount and item list under payroll liability are correct.)
- In the previous step, if you have chosen the Review your liability check to enter expenses/penalties option then a liability check will appear on the screen otherwise you need to view the liability check in the check register.
- After correctly filling the date and amount field, if you want to then you can print the check by selecting the To be Printed option. However, if you are willing to use a handwritten check then you need to enter the check number or any other reference number in the No. field. If you use the Electronic Funds Transfer (EFT) to pay the liabilities then uncheck the To Be Printed box and in the No. field enter EFT.
- From the Expense tab, add liabilities/expenses, to do so.
- Click on the Account field drop-down menu, you need to select the account that you use to track the payroll expenses and penalties, in the Amount you need to enter the amount.
- Once you add the expense and penalty amount to the liability check, you need to select the Recalculate option.
- Select Save & Close.
Common Problems User might encounter
- Scheduled Liabilities are appearing as Overdue or marked in red.
- When selecting the View/Pay option for the Payroll Liability Check, QuickBooks Desktop stops responding. One of the reasons for this issue is that the Payroll Liability Check window is open but due to the position of the window it is not visible. When you accidentally drag the window out of the viewable area of the display this can happen. Follow the steps to fix this:
- Restart QuickBooks Desktop software.
- From the top menu bar and then go to Employees> Payroll Center.
- After that, highlight the liability from the Payroll Liability tab.
- This is an important step. You need to press and hold the Shift key from the keyboard and while doing that select the View/Pay option. By doing so, Payroll Liability Check Window will perfectly appear on the screen.
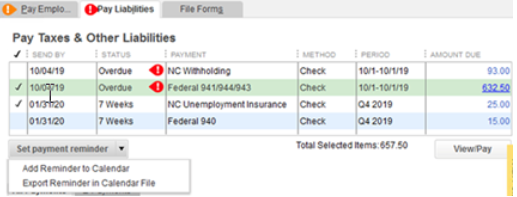
Add Payroll Liability Payment Reminders to Calendar Programs
If you are using the QuickBooks Desktop Payroll 2020 R5 or newer version then you will have an option to add payroll liability payment reminders to the customer Online calendar such as Outlook, Google Calendar, iCalendar, Windows Calendar, and others.
Follow the instructions mentioned below carefully to save a liability payment reminder to a calendar program.
- Head to the Payroll Liabilities section.
- Then, select those Liability payments(s) for which you want to set the reminder by checkmark the box.
- Click on the Set Payment Reminder drop-down menu.
- Now, select anyone from below.
- Add Reminder to calendar: If you choose this option then it will open the default calendar program on the user’s computer.
- Export Reminder in Calendar File: If you choose this option then you’ll have a calendar reminder file that can either open on the user’s computer or you can also send this to other users as well so that they can add this to their computer program.
NOTE: If you are using the QuickBooks Basic and Enhanced Payroll then you will be able to set the payment reminder for the payroll tax payments as well as other payroll liabilities such as garnishments or benefit payments too. Since for the Assisted Payroll users, Intuit pays the Federal Taxes and State Taxes on the behalf of the user, therefore, Assisted Payroll users can only set payment reminders for the other payroll liabilities.
The Bottom Line
We hope that now you have learned how to set up and pay liabilities (scheduled, custom, or unscheduled) in QuickBooks Desktop Payroll. In addition to this, we have also discussed how to add payroll liability payment reminders to the calendar program.
If you find any difficulties while performing any of the above procedures then you should call an expert. You can have assistance from Intuit Certified QuickBooks ProAdvisor for an instant solution by simply calling on the 24/7 toll-free support number +1-844-405-0904.