If you are looking for the step-by-step procedure to set up advanced settings in QuickBooks Online then you are in the right place. Keep on reading to learn in detail about it. QuickBooks advanced settings will be used as the default setting for financial reports such as profit and loss statements and balance sheets, and cash flow statements. So, go through the article and find the steps to set up advanced settings in QBO. For more info contact our QuickBooks ProAdvisor toll-free: +1-844-405-0904
Also Read: How to Set Up Vendors in QuickBooks Online
Why Advance Company Settings In QuickBooks Are Important?
The Advanced company setting in QuickBooks are most important because what’s here is used as a default setting for the functional reports, including the profile and loss statement, balance sheet, and cash flow statement. There are additional includes here that decide how client credits are connected and how you need QuickBooks to oversee charge installments.
If you are not able to set up this area, then your reports will run using the default information for revenue year accounting methods like cash or accrual and chart of the accounts.
Suggested Read: Fix login problem in QuickBooks Online
Steps To Set Up Advanced Settings In QuickBooks Online
- First of all, login to the QuickBooks Online Advanced and then click on the Gear icon at the top right.
- After that, click on the account and settings.
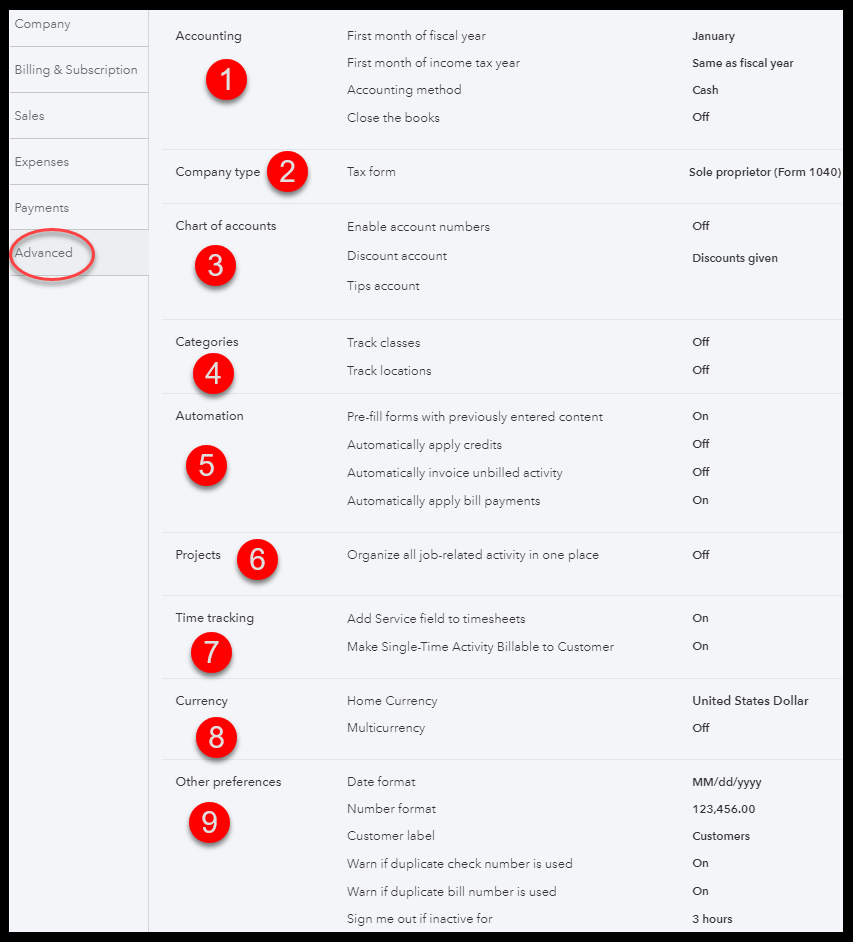
- Then, click on Advanced and then click edit
- After that, change the accounting setting according to your preferences and then save.
- After that, Click on edit Company Type and Change tax form according to your choice and then save.
- Then, Click on edit Chart of accounts and then change Discount Account setting according to your choice and then save.
- After that, Click on edit Categories and then change Assign Classessetting according to your work and then save.
- Then, Click on edit Automation and then tick Pre-fill forms with previously entered content and automatically apply credits and then save.
- After that, click on edit Other preferences and then change Customer label according to your preferences and save Other Preferences.
Also Read: How To Set Up Statements in QuickBooks Online
Description Of Each Feature
- Accounting: This feature helps you to store the fiscal year for your business. There are only two types of accounting methods in QuickBooks: cash and accrual. So many small businesses like the cash method. If you don’t know which method you use, check your tax return document or contact your tax professional.
- Company Type is very important in QuickBooks. There are options you have to choose from are as follows:
- Sole Proprietor: A business that is completely owned by one person and who files form 1040 and Schedule C.
- Partnership or LLC: A business that runs by the partnership of two or more persons. These types of businesses file tax using IRS form 1065.
- S Corporation: It is a small business or enterprise with two or more owners. They pay taxes using IRS Form 1120 – S.
- Nonprofit: These are the companies that are formed to provide services in the public interests and benefits. They are not formed to make profits unlike other businesses.
- Chart of Accounts: It allows you to enable the following features:
- Accounting numbers: Most accountants tend to use these features but it is not commonly used by non-accountants.
- Discount Account: If you use these features, then you should be sure you enter a discount account here. If you didn’t set up a discount account, you can do so from this screen.
- Tips Account: You can create an individual account for tracking the tips that you have paid to your employees. This feature will be quite useful for businesses that pay tips to their employees.
- Categories: This feature allows you to enable the following features:
- Track classes: These features allow you to categorize income and expenses by department or product line. Once you enable these features, it will add a class field to all sales and expense forms.
- Track locations: This feature allows you to categorize income and expenses by location like stores or sales regions. Once you enable these features on, it will add a location field to all sales and expense forms.
- Automation:
- Pre-fill forms with previously entered content: this feature helps you to automatically complete the field on any form in QuickBooks based on the latest saved transaction for that customer, vendor, and employee.
- Automatically apply credits: this feature helps you to automatically apply credits to the next invoice you create for the same customer.
- Copy estimate to invoices: this feature helps you to quickly create an invoice by copying the items from an estimate that your customer has approved.
- Automatically apply bill payments: This feature helps you to automatically apply your payments to the oldest existing bill that you have entered into QuickBooks for a vendor.
- Projects: If your business works on the project basis then this feature can help you to keep tracking of all incomes, expenses, and timesheets of all of your projects.
- Time Tracking: It helps you to easily manage the hours that they work and makes it easy to bill your customers back for that work if you need to.
- Multi-currency: It helps you to track transactions in foreign currencies. In addition to this, you can convert financial reports into the US Dollars with the help of QuickBooks exchange rate calculation.
- Other Preferences:
- Date Format: It helps you to select what format of data fields you like in QuickBooks.
- Number Format: It helps you to select what format of number fields you like in QuickBooks.
- Warn if duplicate check number is used: this features helps you to checks that were previously used is being entered again.
- Warn if duplicate bill number is used: this feature helps you to checks that were previously used vendor bill/invoice is being entered again.
- Sign me out if inactive: In these features, QuickBooks automatically log out if you are not using QuickBooks.
Also Read: How can Set Up the Products and Services List In QuickBooks Online
I hope you find this article useful. If you have any queries related to this or any other topic, you can call QuickBooks Online Support Number +1-844-384-1327.
Watch this video to learn more about How to set up Advanced settings in QuickBooks Online.
Related Articles: