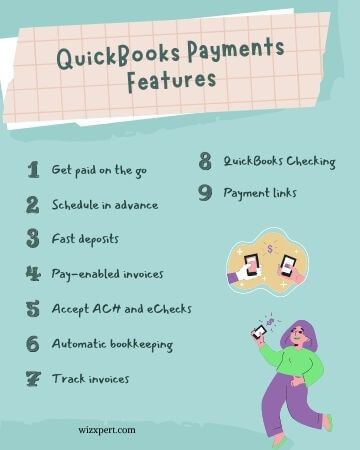
Here we will discuss how to accept and process payments with QuickBooks payments for any QuickBooks products. If you are using QuickBooks Payments then you are not only limited to tracking your accounting only, you can do much better than it, and it also enables you to process customer payments. You can accept credit and debit cards, invoices sent by you, and ACH bank transfers for sale with QuickBooks Payments. Here you have to take payment anywhere and whenever you need it. Go through the article for detailed knowledge or dial the toll-free number +1-844-405-0904 for the QuickBooks Payment support.
Let’s proceed further, and discuss the steps to accept and process payments with QuickBooks products. With QuickBooks Payments, you can do more than just track your accounts. You can process customer payments and accepts all major debit, credit cards, and ACH bank transfers.
Steps To Accept and Process Payments with QuickBooks Payments
Learn in detail how to accept and process payments with QuickBooks Payments.
Step 1: Analyze What Products Are Right For Your Business
Every QuickBooks product provides unique payment facilities and features. It is also an add-on feature available for payment processing.
You can also use other external payment processing apps such as Square. There are many apps available that can easily sync your data with QuickBooks. But, QuickBooks Payments is the easiest way to process payments and track accounting.
In both QuickBooks Online and QuickBooks Desktop, you can email your invoices to your clients with the pay now button so they can pay you online. If you want, you can also accept in-person payments. Whenever you request to process a payment, QuickBooks itself manage accountings and classifies it on your chart of accounts.
QuickBooks Online and QuickBooks Desktop are excellent for invoicing and for some in-person payments also. But, usually, it concentrates on accounting. They are not intended to create a point of sale system.
Note: If you do too many personal transactions, then we advised you to use QuickBooks Point of Sale or any other point of sale system.
Let’s discuss both options in detail.
QuickBooks GoPayments
The QuickBooks GoPayment app allows you to accept payments on the go. The invoices and payments you send automatically process in the app and sync with QuickBooks Online.
Note: GoPayment is best suitable for QuickBooks online but it doesn’t sync with QuickBooks Desktop.
QuickBooks Point of Sale
If your business deals with too many in-person payments, then we will recommend you to use QuickBooks Point of Sale. It is a robust solution that directly connects to your digital register, it has the features like bar code scanning, inventory tracking, payment processing, and many more.
Note: Always remember, If you are using QuickBooks Point of Sale then you do not need QuickBooks Payments processing.
Comparison chart of both options
| Process Method | Available in | Additional hardware needed |
| Facility to Swipe a credit card or enter a chipped card | QuickBooks Online, QuickBooks Desktop GoPayments, QuickBooks Point of Sale | A card reader (or point of sale system).Magtek card readers for QuickBooks Online and QuickBooks Desktop, and QuickBooks Point of Sale hardware. |
| Online invoices For customers to make payment online | QuickBooks Online, QuickBooks Desktop | None |
| Enter a credit card Manually | QuickBooks OnlineQuickBooks DesktopGoPayments | None |
| Set up recurring credit card charges | Merchant Service Center | No |
Step 2: Sign up for Your QuickBooks Payments Account
If you do not have an account, then go with the below steps to sign up for different versions of QuickBooks.
Step to Sign up in QuickBooks Online
- First login to your QuickBooks Online with all admin credentials.
- Choose Settings (Gear Icon) and click on Account and Settings.
- Later, In the QuickBooks Payment section, click on Payments. And now click on Learn more.
- Now, you have got a signup window with three sections.
- Go to the Business section, and click on Start. Enter all the info in the form and describe your business. After completing this, click on Next.
- In the second, Owner/Proprietor section, click on Start. Enter all the info in the form and describe your business. After completing this, click on Next.
- If you have been approved for both QuickBooks Payments and QuickBooks Cash, you can skip step 5. Choose Start in the Bank section and click on Add a new bank account and find your bank.
- Now go with the account that you need for customer payments to go. Fill out all the log-in information that you can use for your bank. Later, click on Connect.
- When you are done with all of the sections, click on Get Set Up.
You will get an email about your nomination in a working day. you can order things such as a mobile card reader directly from email, once you are approved.
Steps to Sign up By the GoPayment Mobile App
Download the app from the application store and fill out all important info to sign up for GoPayment.
Steps to Sign up In QuickBooks Desktop
- Open QuickBooks Desktop and click on the Customers menu and choose to Add Credit Card Processing.
- Later, go with all the onscreen instructions and enter all the info in the form to apply.
Steps to Sign up in QuickBooks Desktop Point-of-Sale (POS)
- Click on the File menu and choose Setup Interview.
- Now go to the Payments tab. Click on Yes, when you get the option “Would you like to accept credit and debit cards?”.
- Click on Activate Now and learn more about all payment plans that are available in QuickBooks.
- If required, call the given number to complete applying.
Steps to Sign up Through Web
- Open any browser and try to sign up directly on the QuickBooks Payments website.
Step 3: Connect a Current Payments Account to other QuickBooks Products
Once you sign up with your QuickBooks payment processing account, it will automatically connect to the platform you signed up for. We recommend you do not use any other QuickBooks product if you signed up with QuickBooks Online and it will be good to go for you. Now you can continue to step 4.
If in case you need to process payments in a different QuickBooks product, you have to connect your current QuickBooks Payments account.
Step 4: Take and Process Customer Payments
After connecting the payment account to QuickBooks, now you will need to accept and process the customers’ payments. Look at the process below for the different QuickBooks products.
Steps to Processing Payments in QuickBooks Online
In QuickBooks Online, your customers can easily pay with a credit card, debit card, and ACH payments or bank transfers on online invoices. If you want to process payments in-person manually or through the phone, follow the below steps.
Process in-person Payments
If any new or existing client comes to your business, you have to create a sales receipt instead of sending them an invoice.
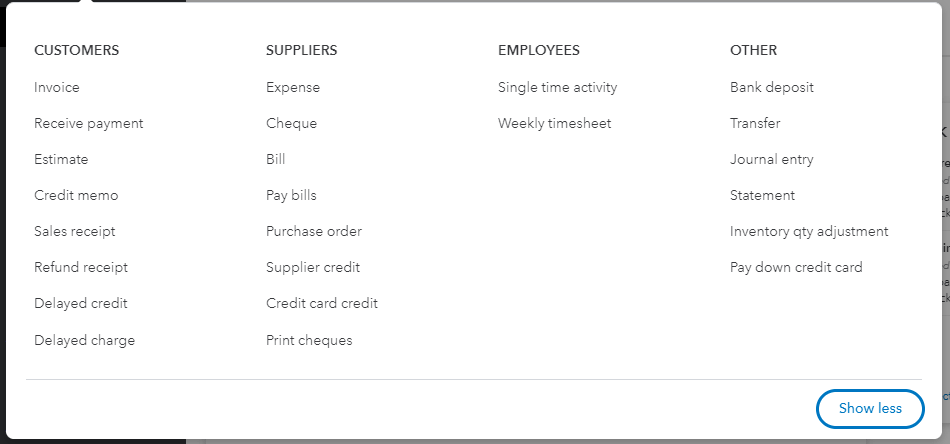
- Go to + New and click on the Sales receipt or Make a sale.
- From the Customer dropdown, click on the Customer
- Now, add all the products and services which you are selling.
- Fill in all the required fields in the given form.
- Choose the payment method under the Payment method dropdown.
- Click on Save and close, when you are done with the above steps.
Process payments for open invoices
In case, if you have already sent an invoice to the customer but now you want to pay in person, then you have several ways to do this. You can send them an invoice over email and ask them to pay the invoice online. You can also process the payment and match it with the existing invoice.
- Go to + New and choose to Receive payment or Receive invoice payment.
- From the Customer dropdown, click on the Customer
- Click on the Open invoice you need to apply for the payment, under the Outstanding Transactions option. Important: you need to change the amount in the Amount Received field to apply for a partial payment.
- Choose the payment method under the Payment method dropdown.
- Click on Save and close when you are done with the above steps.
Steps to Process Payments for QuickBooks Desktop
In QuickBooks Desktop, your customers can easily pay with a credit card, debit card, and ACH bank transfers on online invoices. If you want to process payments in-person manually or through the phone, follow the below steps.
Process in-person payments
If any new or existing client comes to your business, you have to create a sales receipt instead of sending them an invoice.
- First, click on the Customers menu and then look for Create Sales Receipts.
- From the Customer: Job dropdown, click on the Customer.
- Now, add all the products and services for which you are selling.
- Fill in all the required fields in the given form.
- Choose the payment method under the Payment method dropdown. Cash, check, or Visa (use Visa for credit cards).
- Click on Save and close, when you are done with the above steps.
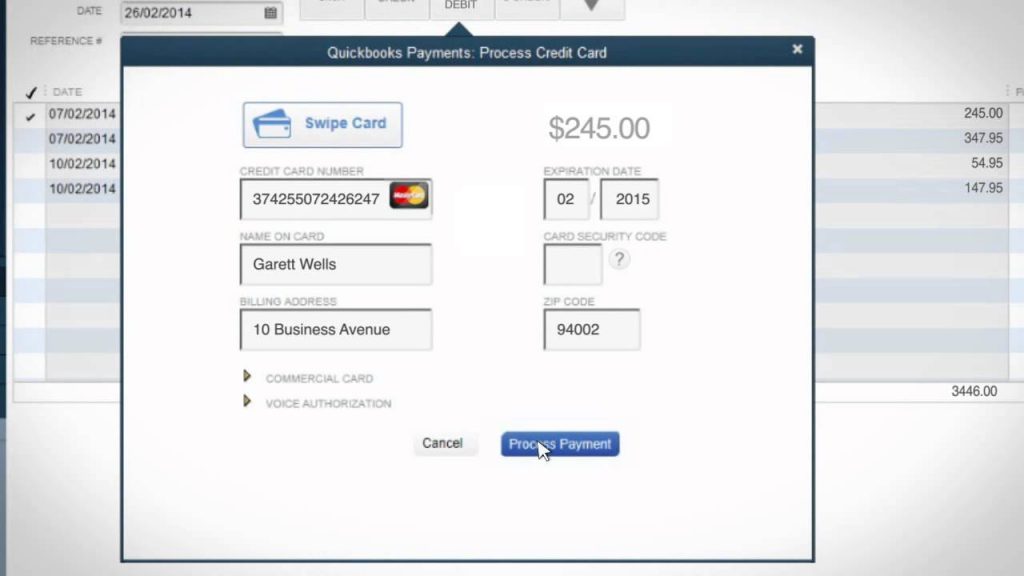
Go with the below steps if you choose the Visa card for the payment method:
- Insert all the credit card details in the pop-up window, then click on Done. In case you want to use the Magtek card reader for payment, then click on Insert/Swipe Card. Later swipe the card.
- Now, click on Process Payment.
If you are using a check for the payment method then don’t forget to get an authorization form with the signature of the authorized person. This will allow your customer to permit to debit their account.
Process payments for open invoices
In case, if you have already sent an invoice to the customer, but now you want to pay in-person, then you have several ways to do this. You can send them an invoice over email and ask them to click on the pay now button and complete the online payment. You can also process the payment and also match it with the existing invoice.
- First, click on the Customers menu and then look for Receive Payments.
- From the ▼dropdown option. Click on the Customer.
- Click on the checkbox that is near the invoice that you have to apply to the payment. This must be the invoice that you have already sent them.
- Now, choose your payment method: Cash, check, or Visa (use Visa for credit cards) for which you want to make the payment.
- Click on Save and close, When you are done with the above steps.
Go with the below steps if you choose the Visa card for the payment method:
- Insert all the credit card details in the pop-up window, then click on Done. In case you want to use the Magtek card reader for payment, then click on Insert/Swipe Card. later swipe the card.
- Now, click on Process Payment.
If you are using a check for the payment method then don’t forget to get an authorization form with the signature of the authorized person. This will allow your customer to permit to debit their account.
Steps to Process Payments with the GoPayment App
You can use a Bluetooth card reader to swipe credit cards or EMV chipped cards. You can also accept Apple Pay, Google Pay, and Samsung Pay. If you don’t have a card reader, no problem. You can manually enter credit card transactions and accept cash and checks.
Go with the steps to receive an invoice payment using GoPayment
First, you have to create an invoice in QuickBooks Online and this invoice will automatically sync with your GoPayment so that your invoices are ready easily.
- Open the GoPayment and look for the Plus (+) option
- Later, click on Invoice payment and enter the customer’s name.
- Now, click on the invoice your customer is paying.
- Click on Charge, and later click on the payment method.
Go with the steps to receive payment without an invoice using GoPayment
- Open the GoPayment and look for the Plus (+) option
- Later, click on Invoice payment and enter the customer’s name.
- Click on the Payment amount and insert the payment amount, later click on Done.
- Click on Charge, and later click on the Payment method.
Steps to Process Payments with QuickBooks Point of Sale
Here is the step-by-step process of how you can process payments with Point of sale. First, you need to connect your QB POS system with QuickBooks payments integration and then process customer payments.
Step1: Connect your QuickBooks POS system to QuickBooks Payments
As we discussed above, it is not compulsory to use QuickBooks Payments account with QuickBooks Point of Sale. You only get the benefit of an extra credit card and other payment options if you connect your account with your point-of-sale system.
- Open your QuickBooks point of sale system, look for the File menu and click on Setup Interview.
- Now go to the Payments tab.
- If you get this option “Would you like to accept credit and debit cards?” then click on Yes.
- Click on Sign in and fill out the QuickBooks Payments info.
- Click on Edit settings in the Payments Preferences option.
- Click on the Accept debit/ATM card payments checkbox. It is optional to click on Allow my customer to include tips on credit card payments to allow tips.
- Now, re-examine all the other settings options.
- Click on Save and close, when you are done with the above steps.
Step 2: Process customer payments
- Go to the home screen of the point of sale and click on Make a Sale.
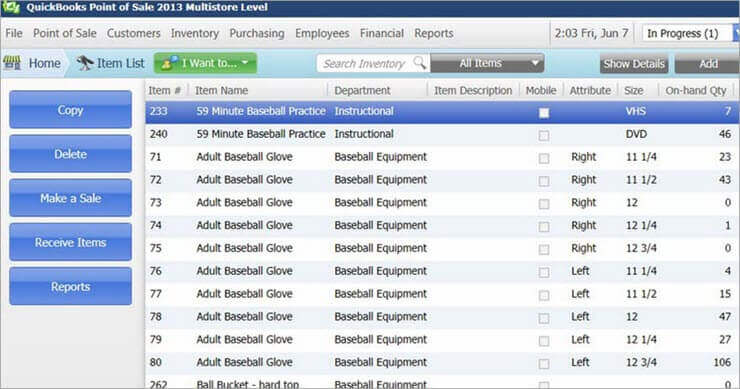
- Now, you have to scan your item. Click on Scan and fill out all the item information and manually add the products or services.
- By doing this, your system will automatically fetch the total amount due in the charge field. If required, then adjust the amount.
- Later, choose the Payment Method. Click on the Credit button, if you want to do a payment with a credit card. Note: The Debit card option is only available when you install the PIN pad.
- After choosing the payment method, like credit or debit card, now you need to choose how you will process the payment from the below options:
- Choose Swipe and later swipe your credit card.
- Choose Manual, if you want to enter the credit card manually on the screen.
- Choose a PIN pad and later insert the debit card number on your PIN pad.
- Choose Voice, if your customer is paying via phone.
- After choosing one option to process payment, click on Authorize Now.
- Click on the Save button to save all your receipts
Step 5: Learn About Deposit Times for Customer Payments
After processing your payment, QuickBooks adds money to your bank account. It uses the bank account you selected while signing up for QuickBooks payments processing fees. The time it will take to receive money in your bank account depends on your product and payment plan.
Note: If you first time using QuickBooks payments, then it is totally fine if your first payments take a little longer when setting up your accounts. After the first payment your payment process is faster than before.
Frequently Asked Questions
Here we are going to discuss some more frequently asked questions by our QuickBooks users. Read them out.
Does QuickBooks have payment processing?
Yes, QuickBooks processing has the payment processing. Once your Merchant account is approved in QuickBooks, you can begin to process credit cards payments. It offers credit card processing, online payments gateways support, and more.
What types of payments do QuickBooks Payments support?
You can accept payments for your invoices and the sales you made with credit cards, debit cards, and ACH bank transfers. You can also process the payments manually over the phone or in-person.
How long do QuickBooks payments take?
The first payments on QuickBooks Payments take a little more time to process the transaction. QuickBooks set up your merchant account, so it can take up to 5 business days. But your next payments will take up to 2 business days.
Are QuickBooks payments safe?
QuickBooks Payments is a secure way to accept and made payments. You can also find the information on any website. Right-click on the payment page of a site, click properties, and then details. If it shows “SSL”, it means it is secure. The credit card provides a high-security level. In online payments, PayPal is considered the safest form of payment.
We hope, you understood how to accept and process payments with QuickBooks Payments. But still, if you have any issues or have any doubts regarding the QuickBooks Payment, feel free to contact our Intuit certified QuickBooks ProAdvisor. Get in touch by dialing our toll-free number +1-844-405-0904.