Navigation in a faster way has always been an important factor for online platforms. By navigation, you observe the sites easily and maintain compatibility with the business. We will discuss here How to Navigate QuickBooks? This Navigation helps you where to find everything you need to use QuickBooks. It shows a basic overview of Quickbooks, you can easily understand it. Go through the article and learn all 9 steps to navigate easily. For More info Contact us toll-free; at +1-844-405-0904
QuickBooks fit medium and small-sized businesses and it offers many version designers to fit the accounting needs of the business. QB is a simple start, easy to use, and also provides tech support for any problems.
The user would not be confused with the working procedure of QuickBooks, you will learn easily where to go to create things like Invoices and receipts, where to see all your customer information, and where to find your company settings. Once you know the location of everything in QuickBooks, you can do work more efficiently and quickly.
9 Easy Steps to learn how to Navigate QuickBooks
Here we will provide steps on how to navigate QuickBooks. you can follow these steps and navigate QuickBooks easily.
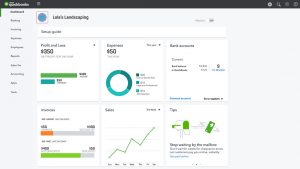
1. Know the Dashboard
After login to QuickBooks, you will see your dashboard. It will show a quick overview of your business in front of you to see how your business is doing, the location of the Dashboard in the navigation bar is first left. You can click on the dashboard and read information about your business. Dashboards tell the most important information which is mandatory for any user.
2. Learn about Profit & Loss
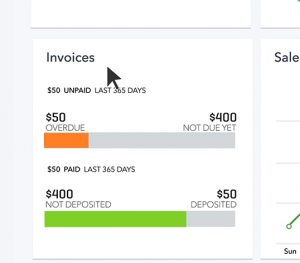
- QuickBooks shows most of the information on the dashboard such as bank account-related information,
- How much you spent,
- Sales summary,
- If you connected your account with QuickBooks you can Download your transaction.
- Check bank balance day to day,
- Check customers’ or clients’ overdue reports.
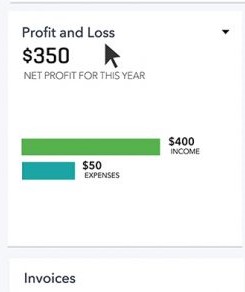
- Easy to understand your profit and Loss.
3. Create Your First Invoices:
There might be a question in your mind How do I create an invoice in QuickBooks? You easily create and add new invoices by following the steps,
- First, you click on the Invoices tab and click the blue button New Invoice
- Enter all information of the client for whom you are creating invoices, now click on save a customer, this saved customer will show up in a drop-down menu and will autofill if selected when you create invoices.
- Enter the details of your product amount and prices and also choose the tax percentage you wish to exclude or include.
- Add more products if you wish.
- Invoices options include total gross area net, a currency which you’d like to use for invoicing, and, a discount, you can select the option invoices according to your convenience.
- You can add any special conditions such as payment on delivery in the Terms Box.
- Click on the Save button, if it’s ready to send if the invoice is incomplete save it in the draft, but first double-check your accounts before you scroll up and click Save.
Note: You save your invoice and you can always do it later.
4. Add with the Plus Menu
By using Plus sign you add a new thing,
- You can create a customer
- Add transactions
- Vendor
- Sales receipts or Invoices

You can do anything in QuickBooks that can be found under the plus menu. Create Estimates, manage your pay bills, and save time by scheduling and sending invoices automatically.
5. Using the Search Bar
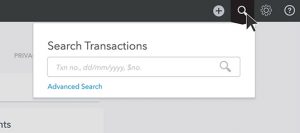
Click on search, you can easily find which is saved previously you can also search check by entering the cheque number, date, or amount. Because you have created many invoices and cheques, you might need to find one.
6. The Left Navigation Bar
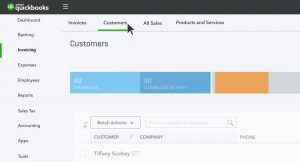
Under the navigation bar, QuickBooks has lots of good stuff. You can see your customer’s report under Invoicing you can see your customers, sales, and the product you are selling for your Business, and also see many reports to review.
7. Reports
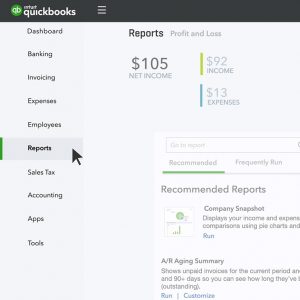
Reports are available on the left which is below on Invoices, you can click on and get to QuickBooks combine reports.
8. Learn the use of the Gear Menu
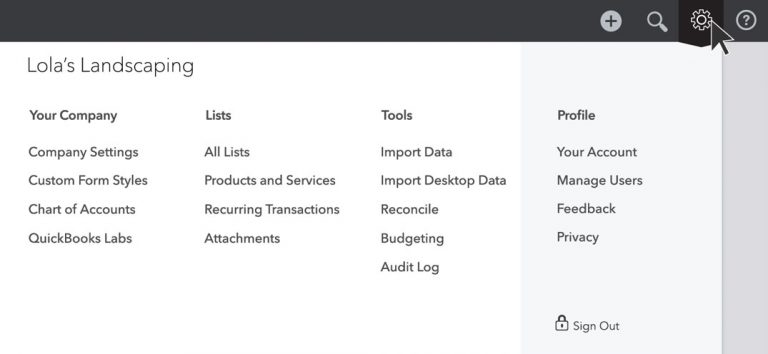
This icon has many useful features, giving you knowledge of company settings and profile information, Gear icon is available at the top right and it’s the right place where you can manage users to make changes to the chart of accounts
9. Advanced Accounting tools
This place shows you accounting tools like:
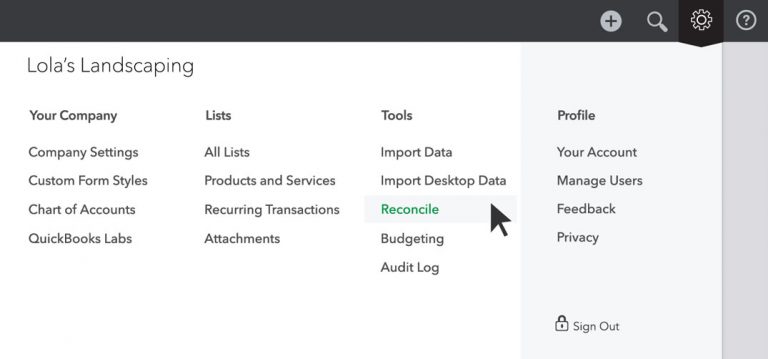
- Reconcile
- Budgeting
- Audit Log
We hope the above-discussed Navigation steps help you to navigate QuickBooks. If you have any queries related to QuickBooks Desktop, you can dial our toll-free QuickBooks Support +1-844-405-0904, and our expert team will surely assist you.