Do you want to share a proposal for work with your client over QuickBooks Online? If yes, then you should create an estimate in QuickBooks Online, and send it to the client. If the client accepts your proposal, and the work is done, then you’ll get the invoice in return instead of an estimate. In this article, we will discuss the detail of this process and will know the creating, and setting up procedure of the estimate. For more info contact our QuickBooks ProAdvisor toll-free: +1-844-405-0904
When & Why to Create Estimate in QuickBooks Online
You need to create an estimate when you have to deal with your customer, you need to create a quote, bid, or proposal for the work that you wish to do. The estimate seems very similar to an invoice, but this is used for different purposes, estimates help you start explaining details with your customer.
It is very important to create an estimate. Here we have discussed, why should you create an estimate. Read the following to know the reason;
- This can help customers to decide if they want to purchase the goods or services.
- It can perform duties as written approval to start a job.
- Click on the button to turn the estimate into an invoice in QuickBooks Online when you are ready to bill your customer for work completed.
- You can run reports in QuickBooks that will help you compare your estimates to actual income and costs after the work is completed
Check the Estimate Version
There are 2 completely different methods to create an estimate and to convert the estimate into an invoice. The methods vary between the old version and the new version. So it is very important to know, which estimate version you are using, before creating the estimate in QuickBooks. Follow the steps to ensure the estimate version;
- Go to the QuickBooks Online.
- Click on the ‘+New’ (Create) option.
- Select the ‘Invoice’ option or the ‘Estimate’ option.
- Now notice the top-left corner of the form.
- If you see ‘New’ in the form title, then the estimate version is new.
- If you see the only form title, then the estimate is in the old version.
Now, you got the information of the estimate’s version. Follow the appropriate procedure to create an estimate and convert it to an invoice in QuickBooks Online.
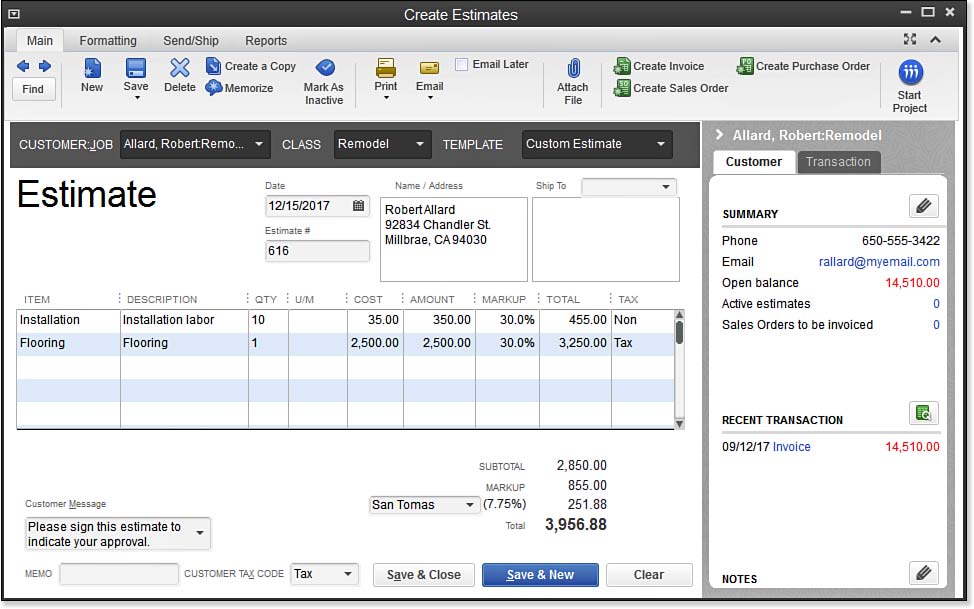
How to Create an Estimate in Older Version
If you have the older estimate version then here is the procedure to set up the estimate;
Step 1: Create an Estimate in QuickBooks Online
In the first step, create an estimate in QuickBooks Online;
- Sign in to QuickBooks Online.
- Click on the ‘+ New’ option.
- Then select the ‘Estimate’ option to create a new estimate in the old version.
- Go to the ‘Customer’ drop-down menu, and select a customer from the list.
- After that, set up the Estimate Date, and then enter the Expiration Date (optional).
- Fill out the detail in the fields; Product/Service, Description, Qty, Rate, Amount, Tax, Message (optional), and Discount (optional).
- At last, click on the ‘Save‘ option to save all the changes.
Step 2: Update the Status of Estimate
This is an important step to update the estimate status. If in case, a customer doesn’t want to continue working with you, you can change the estimate status. This will keep your accounts up to date.
Follow the steps to update the estimate status;
- Visit the ‘Sales’ menu.
- And select the ‘All Sales’ option from the ‘Sales’ menu.
- Then find the estimate, and go to the ‘Action’ column.
- Click on the ‘Update Status’ option from the ‘Action’ column.
- Select the status as ‘Accepted’, and then the ‘Ok’ option.
Note: The estimates will not affect your books, because it is a non-posting transaction. But when you will convert the estimates to invoice, it may affect your books.
Step 3: QuickBooks Convert Estimate to Invoice
If you want to bill your customer, then convert the estimate to invoice, by following the below step;
- Visit the ‘Sales’ menu, and click on the ‘All Sales’ option.
- Find out the estimate.
- After that, go to the ‘Action’ column, and select the ‘Create Invoice’ option.
- If you are using the progress invoicing then click on the link ‘how much you want to invoice’.
You can skip this step if you are not using the progress invoicing. Follow the steps, if the process invoicing is turned on; - Create an Invoice for the entire estimate amount: Click on the ‘Remaining total of all lines’, and select the ‘Create invoice’ option. Create an invoice for one part of the estimate: There are 2 options enter the amount, enter a percentage for each line or enter a custom amount. Choose any one of the options, and click on the ‘Create Invoice’ option.
- Make changes in the invoice, and choose the ‘Save and send’ option, if you want to send it now. Or select the ‘Save and close’ option, if you want to save it only.
To Add an Estimate to an Existing Invoice
If you don’t want to convert the estimate to an invoice then there is an alternative for you. You can add the estimate to an existing estimate. Follow the steps to perform this;
- Click on the ‘+ New’ tab, and select the ‘Invoice’ option.
- Go to the ‘Customer’ drop-down menu, and select the customer from the list.
- QuickBooks will take to the ‘Add to Invoice’ Window.
- Click on the ‘Add’ option in the Add to Invoice window. You have to do it for each estimate, you want to add to the invoice.
- QuickBooks will ask the same question, that has been asked during the conversion of the estimate to invoice, how much do you want to invoice. If your progressing invoice is turned off then skip this step.
- Create an Invoice for the entire estimate amount: Click on the ‘Remaining total of all lines’, and select the ‘Copy to Invoice’ option.
- Create an invoice for one part of the estimate: Choose any one of the options; enter a percentage for each line, or enter a custom amount. After that, click on the ‘Copy to Invoice’ option.
- Do editing on the invoice, and click on the ‘Save’ option.
Step 4: Review the Estimate
Follow the steps to review the estimate;
- Go to the ‘Sales’ menu, and click on the ‘All Sales’ tab.
- Choose the ‘Filter’ drop-down, and select the ‘Type’ one.
- After that, select the ‘Estimates’ option from the ‘Type’ drop-down menu.
- Then click on the ‘Apply’ option.
If you want to run a report to get more detail, then follow the procedure;
- Select the ‘Report’ menu, and search for the ‘Estimates by Customer’ report.
- Click on the report, and choose the date range.
- At last, click on the ‘Run Report’ option.
How to Delete an Estimate in QuickBooks Online
If a customer doesn’t want to continue working with you then it is recommended to change the estimate status instead of deleting it. This will prove, you are recording the accounts with honesty.
But sometimes, users create an estimate mistakenly, in that case, they can delete the estimate by following the below procedure;
- Select the ‘All Sales’ option from the ‘Sales’ menu.
- Search, and open the estimate.
- Click ‘More’, and then ‘Delete’.
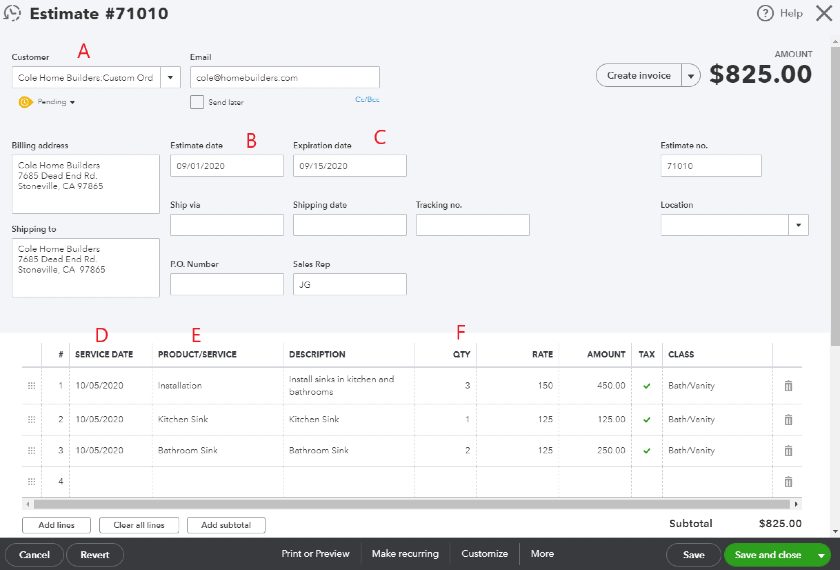
How to Create an Estimate in New Version
If you have the new version of QuickBooks Online estimate then follow the complete procedure to set up it properly;
Step 1: Create an Estimate
Follow the steps to create a new estimate;
- First of all, go to the ‘+New’ option, and click on it.
- Select the ‘Estimate’ option, and click on the ‘+ Add customer’ option.
- Choose a customer to add a customer in the estimate. You can create a new customer by clicking on the ‘+ Add New’ option.
- Open the ‘Amount’ column, here you can see the rate for product or service. The rate will display only if you have saved it before. Just adjust the quantity as needed.
- Click on the ‘+ Request a deposit’, and enter an amount, if you have a QuickBooks payment subscription. This will add an electronic deposit payment link directly on the estimate email.
- Now you can see the status of the new estimate as pending. If you want to edit the status, then visit the ‘Pending’ drop-down, and select another status.
- Customize the estimate, and visit the ‘Estimate Settings’;
- Click on each section to get expand the details.
- Then turn on the options, that you want to display on the form.
- Click on the ‘Save’ option, and complete editing.
- If you want to email the estimate to your customer then visit the ‘Email’ tab, and click on the ‘Send Estimate’ option.
Step 2: Update Estimate’s Status
Mostly QuickBooks updates the estimate status automatically when a customer accepts or declines directly from the email. This feature is only available in the new version.
If you want to update the estimate manually then follow the steps;
- Select the ‘Invoicing’ option from the ‘Sales’ tab.
- Click on the ‘Estimates’ option, and find the estimate.
- Go to the ‘Action’ drop-down column, and select the ‘Update Status’ option.
- Click on the ‘Accepted’ option, and click ‘Ok’.
Step 3: Convert the New Estimates to an Invoice
QuickBooks convert the estimate to an Invoice automatically, if you have a QuickBooks payment, and you request to deposit the payment on your estimate.
You can also do it manually. Here is the procedure to convert the estimate to an invoice;
- Select the ‘Invoicing’ menu or the ‘Sales’ menu.
- And choose the ‘Estimate’ tab to find the estimate.
- Go to the ‘Action’ column, and click on the ‘Convert to an invoice’ option.
- You can customize the invoice field in the ‘Manage’ settings and can customize the options, that will display on the invoice.
- After doing changes, click on the ‘Save’ option, and click on the ‘Email’ option, if you want to send it to your customer.
Step 4: Review the Estimate
Follow the steps to review the estimate;
- Visit the ‘Estimate’ tab through the ‘Sales’ menu.
- Find the estimate, and continue the process, if you want to run the report.
- Go to the ‘Reports’ menu, and search for the ‘Estimates by Customer’ report.
- Choose the date range, and click on the ‘Run Report’ option.
If the estimate is completely converted to invoice then, you can see the customer name, the estimated number, the status, and the invoice number in the running report.
To Delete the Estimate (Optional)
If you did a mistake by creating an estimate by mistakenly then follow the steps to delete it;
- Visit the ‘Sales’ menu.
- Choose the ‘Estimate’ tab, and find out the estimate in the list.
- Click on the ‘More Actions’ option.
- Then the ‘Delete’ option.
- Select the ‘Ok’ option to confirm the delete process.
Frequently Asked Questions
Can we do estimates in QuickBooks Online?
Yes, QuickBooks Online allows the users to do estimates and gives the feature to convert the estimate to an invoice. It is very easy to create an estimate, and send it to your customer through email. The estimate status will be shown in 4 types; Pending, Accepted, Closed, Rejected.
What are the 4 types of estimate statuses in QuickBooks Online?
The 4 Quickbooks Online estimate statuses are, Pending, Accepted, Closed, Rejected.
Pending: If the estimate is not accepted by the customer, and the invoice has not been created by the estimate.
Accepted: When a pending estimate, accepted by the customer then it is marked as ‘Accepted’ automatically.
Closed: you can use this status when the estimate is closed, and you are not able to create an invoice by using the estimate.
Rejected: It will be used, when the customer will reject the estimate, sent by you through the mail.
Can a customer accept an estimate in QuickBooks Online?
Yes, a customer can accept an estimate in Quickbooks Online. If you have created an estimate, send it to your customer through email. The customer can accept the estimate directly through email. The estimate status will show ‘Accepted’, if the customer will accept it.
Hopefully, now you can easily create and manage estimates in QuickBooks Online. Although it is not a complex procedure, sometimes the user might encounter an unexpected QuickBooks error. You can have assistance from the Intuit certified QuickBooks ProAdvisor who can instantly solve these kinds of issues. To know more about the accounting services we provide call us at our 24/7 toll-free support number +1-844-405-0904.