Want to resolve network and connection failure issues using QuickBooks File Doctor/QuickBooks File Doctor won’t open error or is not working? Then you have to read this article since we have provided all related information in this article. Quickbooks file doctor tool has lots of time-saving features and is easy to use. So, go through the article to understand the error better and follow the steps of the solution to fix the error, learn the solutions, and implement them in the same way. For more info contact our QuickBooks Proadvisor toll-free: [quickboks]
QuickBooks file doctor is an updated version of the QuickBooks connection diagnostic tool which previously is used to help solve some of your network issues like qbdbmgrn not running, QuickBooks cloud hosting mode being off, network connection failure, network access from the workstation is very slow, etc.
QuickBooks File Doctor Won’t Open Error or QB File Doctor is not Working
QuickBooks file doctor is developed by Intuit for fixing errors and some glitches so that it brings accurate accounting data. While working with Quickbooks users may face many errors like QB error 6000, Error h101, Error H202, etc. that can easily be solved through the QuickBooks File Doctor. So QBFD is a useful application for users that helps to diagnose files and repair errors easily. So what happens if QuickBooks File Doctor is not working or It won’t open or may stop or crash during the repair procedure? If you confront the same thing, it indicates that the file has been corrupted and you need to repair it.
Reason Behind QuickBooks File Doctor is not Working
There are many reasons that QuickBooks File Doctor won’t open. Here are some common reasons discussed below:
- If you try to use an outdated version of the QBFD then it might not work properly.
- If your files are corrupted, damaged, or lost.
- Sometimes, firewall settings or security software available on your computer can block QuickBooks File Doctor from accessing necessary files.
- Make sure that you are not using QuickBooks File Doctor in multi-user mode, otherwise, network issues can prevent it from working properly.
- If the files are infected then it also be the cause of QBFD not working or won’t open error.
- Make sure that the Database Server Manager is installed correctly and running on the server where your company file is stored.
- Ensure you install correctly all the necessary QuickBooks files.
Steps to Fix QuickBooks File Doctor Won’t Open error or File Doctor is not working
Here we’ll try to list the best possible solution to fix QuickBooks File Doctor won’t open error:
1. Try to Launch QuickBooks File Doctor Manually
- The very first thing you should launch the QBFD application and wait until a message of ‘No Company Open’ pop-up on your screen.
- Next, you have to go to Files> Utilities> Click on Repair File and Network Problems.
- Then a dialog box is open on your screen, you have to click on OK. Now with administrator rights, the QuickBooks file doctor started the application.
- Next, again a dialog box is open, you have to click on YES.
- Now you have to click on the wrench icon to open the QBFD application. Then you have to click on Continue.
- After this, you need to enter your ID password to log in. This will start QuickBooks File Doctor to repair your files.
- Now you see the Advanced Setting from where you have to select the File Diagnosis Only.
- Then the final step is to click on Next.
- Open the file when the system prompts and see if the problem is still present.
2. Try to Restore the Backup of the Damaged File
Now follow the steps to restore the backup of the corrupted files:
- Firstly, you need to restore all the backups of damaged files.
- Next, you have to open the QuickBooks and then click on the File menu.
- Then you will see the option Open or Restore Company click on it.
- Then a dialog box opens where you need to select Restore a backup copy and then click on Next.
- Now again a dialog box is open where you need to choose Local Backup and then click on Next.
- After this, you have to choose the location of the backup file from the ‘Look In’ drop-down.
- Then select file with .QBB extension and tap on the Open button.
- After this, you have to click on Next.
- Now Save from the drop-down menu where you want to restore the file.
- Then finally save the file that will take .QBW extension automatically.
3. Use the Auto Data Recovery Option
There is also an alternate method to examine and analyze your file which is ADR(Auto Data Recovery). After analyzing by the ADR that the file has no errors then the copy is saved as a backup in the ADR folder. ADR will take a backup of the file every 12 hours. The QuickBooks Data Recovery Support staff can restore your files with the use of these backup files. You can also contact our QuickBooks Data recovery support team to restore your files on our helpline number +1-844-405-0904.
Solutions to resolve various network issues
When Hosting Mode is Off
You can easily access the company file from the host system or server system by QuickBooks. If QB hosting modes are off then things will not only become difficult but they will create another problem. So it is compulsory to turn on the hosting modes and if you did not face this situation, you would need to follow these requirements.
- Firstly, you will have to map the server.
- Kindly check if your system is set in the multi-user mode or not. If not then set up QuickBooks Online Multi-Users mode.
- Save your QB company file in a shared folder.
Accessing your Quickbooks files when the network requires Quickbooks Hosting turned on.
Important: If you are on the workstation computer then you should ignore this warning.
Turn on hosting
QuickBooks company data files in multi-user mode
Hosting simply means allowing multiple systems (workstations) to access files from the main system over the network. QuickBooks Desktop has a range of services to manage company file access:
- QuickBooks Desktop 2020 uses QuickBooks DB30
- QuickBooks Desktop 2019 uses QuickBooks DB29
- QuickBooks Desktop 2018 uses QuickBooks DB28
- QuickBooks Desktop 2017 uses QuickBooks DB27
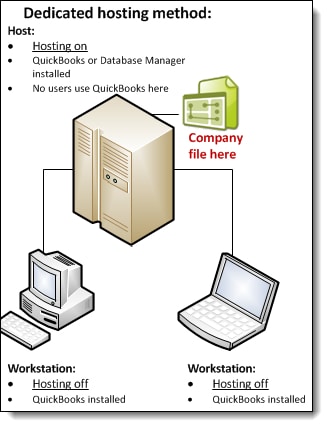
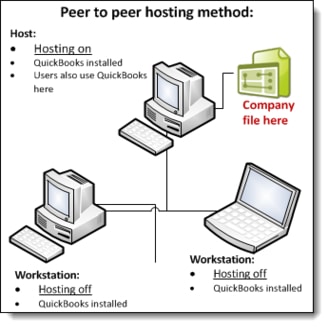
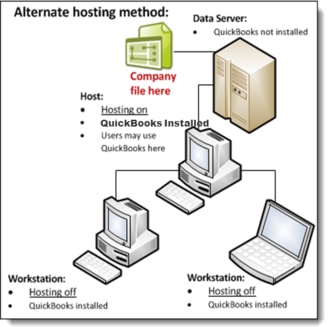
Here is the list of QuickBooks hosting modes:
Dedicated hosting diagram
Peer-to-peer hosting diagram
Alternate hosting diagram
How can you access the company file
Before accessing the company file. Remember these conditions:
- Windows File Permissions: The login user has full control over the system, including permission to look at the data, open it, and modify data.
- Database server mode: Database Server Mode can open the company file successfully.
- QuickBooks Online User login: Before accessing the system every user must have the QuickBooks login username and password.
Hosting modes
Hosting mode is available for every version of QuickBooks Desktop and for each system. It is not installed for QuickBooks installation or company files. Hosting mode settings for each version of QuickBooks 2017 and later versions independently.
Three types of hosting modes: 1. Not hosting (also known as hosting Off), 2. Hosting local files only, and 3. Hosting local and remote files.
1. Not hosting mode:
- QuickBooks Database Manager runs always in a normal process: As a Windows User running QuickBooks.
- Not hosting mode does not support multi-user mode. In this mode, memory is distributed between the users to communicate with QuickBooks. The important thing to remember is in this mode, only local system QuickBooks users can use a database server to access a file.
2. Hosting local files only mode:
- In Hosting local files only mode QuickBooks Database Server Manager runs on a Windows service named QuickBooksDBXX (where XX is a number from 27 to 30 defined by the version of QuickBooks, as specified under “Hosting defined,” above) and as the Windows user QBDataServiceUserXX (with XX being the same 2-digit number from 27 to 30 that the Windows service uses).
- As long as the system is on, QuickBooksDBXX service always running.
- In hosting local filesMulti-user mode is supported and using TCP/IP to reach out with QuickBooks. QuickBooks users who are on the remote systems can access company files using access company files with a database server running in Hosting Local Files only mode.
- A system in Hosting Local Files Only mode can host only those files that are located on that system.
3. Hosting Local and remote files
- QuickBooks Database Manager works as a normal process, the user is currently logged on as a Windows user. The process goes on until the user logs out of the system.
- In Hosting Local & Remote system can support multi-user mode, using TCP/IP to data transfer with QuickBooks. QuickBooks users on the remote system can access company files on the local system using the database server.
- In this mode, the local system can host files stored in it and also stored on the remote system and open on the local system.
How does QuickBooks Desktop decide which database server to interact with?
- QuickBooks Desktop search for .nd file. The .nd file has the same name as the company file but with a different QuickBooks file extension (.nd file extension). And place it in the same directory whose extension is .qbw. The directory also stores the information to reach the server, like IP address and port.
- QuickBooks Desktop check .qbw file is in use or not.
- After searching .nd file and verifying that the company file is in use, QuickBooks tries to reach out to the server:
- Then communicating QuickBooks opens the company file.
- But if it is not successful, and it shows errors likeH101,H202, H303, orH505 while opening the company.
A folder including the file is not writable or not shared
The company file folder must be shared with every other user. And Set up folder and Windows access permissions to share company files to share them, other users.
No network connectivity
One working TCP/IP adapter and the hostname of the local machine is resolvable.
Run IPConfig
IPConfig is very important in verifying the TCP/IP configuration of your system. This help helps to solve network issues using QuickBooks. Some IPConfig commands are:
| Command | Description |
| ipconfig | basic TCP/IP information |
| ipconfig /all | detailed TCP/IP information |
| ipconfig /renew | Renew the IPv4 address for all network adapters |
| ipconfig /release | Release the IPv4 address for all network adapters |
To run ipconfig:
- Choose the Window start option.
- In the search field, choose CMD.
- Select Command Prompt in the list results.
- Mention ipconfig in the command prompt and then Enter.
If you want to know more about the IPConfig, insert ipconfig/? in the command prompt.
Network problem: IP reverse lookup has failed
Search that windows can produce an IP address from the hostname and modify the process.
QBCFMonitorService/QBDBMgrN not running or Firewall is Blocking QuickBooks
You may also face networking issues if the firewall blocked internet access for particular QuickBooks files or programs. Issues may also be resolved if you are updating your firewall to the latest release. Or also need to configure firewall ports manually.
QBCFMonitor Service not running:
- To open 8019 configure your firewall and QuickBooks applications on the client and server for the tool.
- Make sure server hosting is turn on.
- Verify the server: A ping should receive from the client and the server.
QBDBMgrN not running:
- To open the Dynamic database port for QuickBooks File Doctor and all QuickBooks applications configure the firewall. Configure firewalls on all the client systems and on your main server.
- Make sure hosting is turned on your server.
- Assured that able to ping the server with both IP and hostname on the server and client systems.
Firewall software is Active may be preventing QuickBooks:
Third-party apps like anti-virus and firewall may also be the reason for this issue. You can make an exception for your version of QuickBooks by configuring the Firewall settings.
For QuickBooks Enterprise Solution
Below is the list of files that needs access on the firewall ports 80, 8019, 56725-56728, and 55363 through 55382. These are the ports for both incoming and outgoing traffic & for the QuickBooks 2018 to QuickBooks 2019.
- AutoBackupExe.exe located in C:\Program Files\Intuit\QuickBooks Enterprise Solutions XX.X
- FileManagement.exe located in C:\Program Files\Intuit\QuickBooks Enterprise Solutions XX.X
- Dbmlsync.exe located in C:\Program Files\Intuit\QuickBooks Enterprise Solutions XX.X
- FileMovementExe.exe located in C:\Program Files\Intuit\QuickBooks Enterprise Solutions XX.X
- DBManagerExe.exe located in C:\Program Files\Intuit\QuickBooks Enterprise Solutions XX.X
- IntuitSyncManager.exe located in C:\Program Files\Common Files\Intuit\Sync
- QBGDSPlugin.exe located in C:\Program Files\Intuit\QuickBooks Enterprise Solutions XX.X
- QBCFMonitorService.exe located in C:\Program Files\Common Files\Intuit\QuickBooks
- QBLaunch.exe located in C:\Program Files\Common Files\Intuit\QuickBooks
- QBDBMgrN.exe located in C:\Program Files\Intuit\QuickBooks Enterprise Solutions XX.X
- QBServerUtilityMgr.exe located in C:\Program Files\Common Files\Intuit\QuickBooks
- QuickBooksMessaging.exe located in C:\Program Files\Intuit\QuickBooks Enterprise Solutions
- QBW32.exe located in C:\Program Files\Intuit\QuickBooks Enterprise Solutions XX.X
- OnlineBackup.exe located in C:\Program Files\QuickBooks Online Backup
- QBUpdate.exe located in C:\Program Files\Common Files\Intuit\QuickBooks\QBUpdate
To allow internet access to the above mentioned QuickBooks files, you need to configure your firewall settings. You can follow the instructions mentioned in the above QuickBooks Files. Here XX denotes the version of your QuickBooks i.e. Enterprise 19.0, in addition to this, you may also need to visit your Firewall software’s website for detailed information on how to make the exception of these files.
Some Popular and common firewall systems
Since there are hundreds of Firewall applications are available in the market therefore we won’t be able to provide information on each and every firewall software. Below we have explained the procedure for the most popular and common firewall systems. If you are not able to find your firewall software here then we recommend you to visit the software developer website or contact their customer assistance.
| Firewall Program | Steps |
| Norton Firewall Software | For detailed information, you need to visit the Norton Search Solutions Library. There you need to find the detailed procedure for configuring the firewall. After going to their website, you have to: 1. Select the drop-down menu and then search for the firewall product that you are using. 2. After that, choose the version of the firewall installed on your system. 3. In the Search bar, type creates firewall rule and then press enter. Here from the list of knowledge-based articles, you have to find the Creating a new firewall rule in Norton Product. Then, follow the instructions as mentioned in the article carefully to configure the firewall. |
| McAfee Personal Firewall | First of all, visit the McAfee official website, and here find an article named How to configure Firewall settings to allow the inbound connections through the specific ports. Here, you’ll find a detailed instruction article by the McAfee support on how to configure firewall ports. If you want a more specific option then go to mcafee.com & select the type of your business and from the drop-down menu select the support option. |
| Trend Micro PC-cillin | For the detailed information on how to configure the Firewall ports visit the official Trend Micro Support website. Once you open their site: 1. First of all, choose the product that you are using. 2. And then click on Search. |
| Avast On-Access Protection | If you are using the Terminal services of Avast as well as Avast On-Access protection is also enabled then you have to find how to exclude a file from on-access protection? You have to exclude all the files mentioned in the above table to have the internet access to them and also you need to exclude the QuickBooks Company File (.QBW file) |
| Microsoft Windows Firewall | Go to the Microsoft Support official website and then follow the instructions: 1. Click on the drop-down menu and then select the product that you are using. 2. Go to the Search bar and type opening ports in the firewall and then press enter. |
Update QuickBooks Desktop
These issues also occur due to problems related to updating. So, you should also examine for any software updates. To make daily update schedules go to the Help menu in QuickBooks Desktop and select for Update QuickBooks Desktop. Continue updates daily and verify & rebuild QuickBooks data files to help get ahead of errors.
The Bottom Line
We hope this article is helpful to you but if you are still facing the issue then you can dial our helpline number +1-844-405-0904 to get immediate help from our team of Intuit certified QuickBooks ProAdvisors.
Reference: https://quickbooks.intuit.com/learn-support/en-us/data-utilities/resolve-network-issues-with-quickbooks-file-doctor-test-results/00/201283