QuickBooks Desktop Enhanced Sales Order Fulfillment is the most important and powerful feature. Enhanced Sales Order Fulfillment Worksheet can now be used with scanners, android applications, and even manually. Read the article here to understand the usage of enhanced sale order fulfillment in QBD. Go through the complete article and get the process to fulfilling the sales order in QuickBooks Desktop. For more info contact our QuickBooks ProAdvisor toll-free: +1-844-405-0904
It also allows us to plan which sales order needs to be fulfilled by selected those orders to be picked in an updated version of the order fulfillment worksheet, as shown in the image below.
Use Sales Order Fulfillment Worksheet in QuickBooks
The process of fulfilling sales orders in QuickBooks can be complex, with the help of a sales order fulfillment worksheet you can have all the insights and aspects of all the processes under one hood.
With the enhanced sales order fulfillment worksheet feature of QuickBooks Desktop Enterprise solutions 18.0 and 19.0, you can experience better and easier workflow than ever, and also you can add a mobile scanner.
First, you have to set up the Advanced inventory preferences in order to use this worksheet option.
- Open QuickBooks, then go to the Edit menu and then select the Preferences option.
- From the left side navigational panel, select the Items and Inventory option and then open the Company Preferences tab.
- In the company preferences tab, click on the Advanced Inventory Settings button.
- Then, click on the Site Operation tab and then checkmark the box stating that Sales Order Fulfillment Worksheet.
Once you finish setting preferences, you can start managing and fulfilling your sales order by selecting the Customer menu then the Sales order fulfillment worksheet.
In QuickBooks Desktop Enterprise Solution 19.0
In QuickBooks Desktop Enterprise solution 18.0, you will find three tabs in the sales order fulfillment worksheet. The first is Dashboard, second is Pick, and last is Pack.
Dashboard: Here, in the central section, you can view and manage the sales orders. Here, you will be able to see all of your sales orders and their status (All, open, picked, and packed) as well. From here, you can perform any of the following options.
- Send for Picking
- Send for Packing
- Printing shipping label
- Marked as shipped
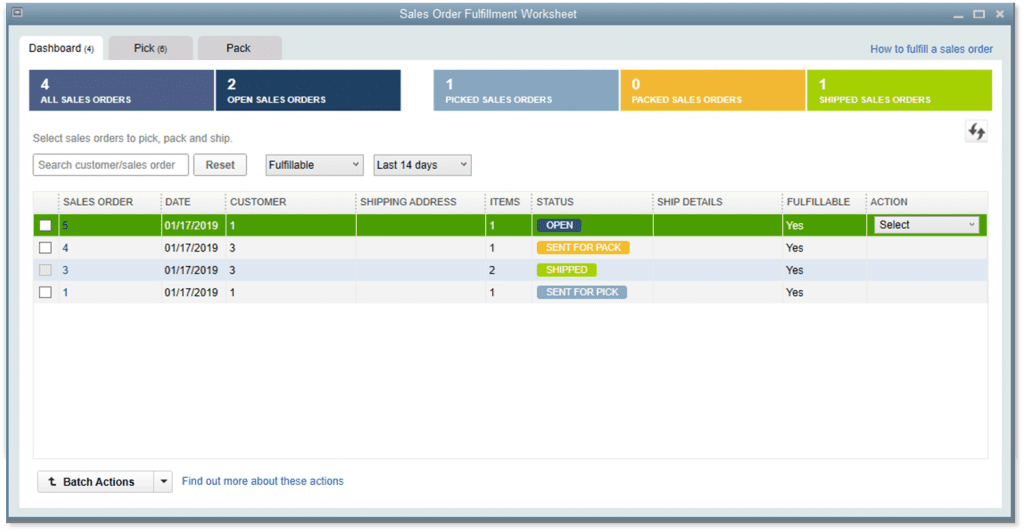
Note: If you want then you can sort each column. Remember that, ship date column is only available in the QuickBooks enterprise 18.0 version.
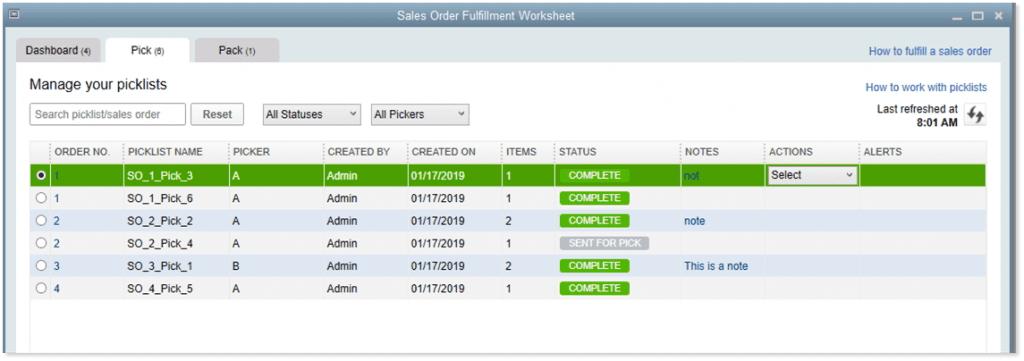
Pick: In the Pick tab you can manage your picking list.
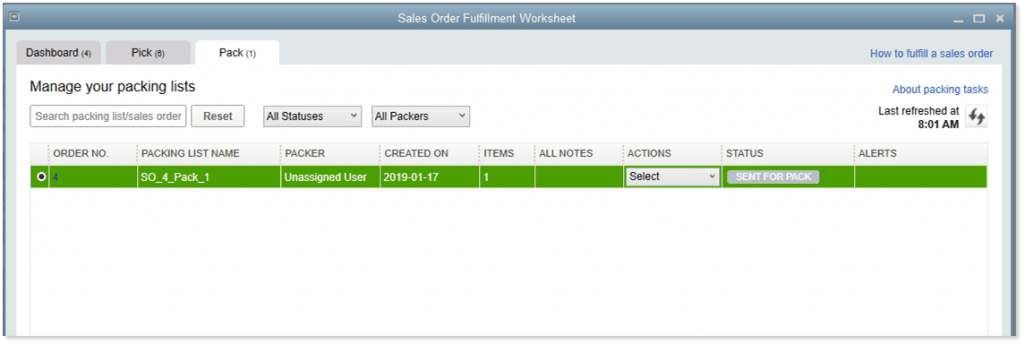
Pack: In the Pack tab you can manage your packing list.
Fulfilling Sales Order
The procedure of fulfilling sales orders consist of three main processes. According to the size of your company, types of your operations, or volume of sales orders, these processes might be slightly different from each other and should be held in a sequential manner. Firstly, orders should be picked then sent for packing, and finally shipped as soon as they are packed. You can customize the sales order fulfillment process according to your business.
You can use any of the following workflows according to the needs of your business to start your sales order workflow.
- Workflow No.1: Pick>Pack>Ship
- Workflow No.2: Pick>Ship
- Workflow No.3: Ship
Pick
- First, go to the Dashboard, then select the sales order that you want to send for picking.
- If you want to send one sales order then click on the Action column and then select the Send for Picking option.
- If you want to send multiple sales orders then click on the Batch Action drop-down menu and then select Send for picking option.
- Now, open the create picklist window, you need to select the items that need to be picked. If you want then you can also enter To Fulfill Qty and Update site.
- After that, click on Next.
- Then, you can add an optional note if you want and then add a picker.
- If you use mobile scanner, then select the Connect to a device option.
- You can print the Sales Order list if you want to update it manually.
- Once, you finish making changes you will be redirected to the confirmation page.
Status update for picked items
In the mobile scanner, you can check the real-time status from the warehouse on the Pick tab. If there are any updates from the warehouse you can check it via mobile scanner, in the Alert column you can see the orange notification arrow in picklist update. To update the status of the sales order, you only need to select the sales order and then click on the Update Sales Order option.
To manually update the quantity that have been picked and also update the status on the Pick tab.
- First, double click on the line item that you want to update.
- According to the Pick quantity, you enter the pick status will be automatically updated.
- In the confirmation window, click on the Update Sales Order and then OK.
Pack
- Go to the Dashboard and then choose the sales order that you want to send for packing.
- If you want to choose one sales order then click on the Action column and select Send for Packing option.
- If you want to choose multiple sales orders then checkmark the box in front of the sales orders that you want to send for packing. Then, click on the Batch Action menu and then select the Send for Packing option.
- If you want then you can assign a packer. (Optional)
- Select any one of the following options.
- If you are using a mobile scanner select Send to Device option.
- Once you create packing slip then you will be redirected to the confirmation page.
Status Update for Packed items
With the help of a mobile scanner you can track the real-time status from the warehouse in the Pack tab. Once you receive any updates in the mobile scanner from the warehouse, in the alert column you will be able to see an orange color arrowed notification that indicates a pack list update. Such a colored arrow will be visible for every updated sales order item. To update the status, select the sales order, and then click on an Update sales order from the Pack tab. By doing this, the status will be updated to latest information.
You have to manually update the list item if you are using a printed packlist.
- Update Quantity: As soon as you enter the packed quantity, the pack status will be updated automatically according to that.
- Once you entered the pack Qty, click on the Update sales order option and then click OK for the confirmation.
Ship
In Shipping Manager, you can easily create the shipping labels as you want them with the help of the sales order fullfilment worksheet.
- Go to the Dashboard and here find the sales orders that you want to ship.
- Then from the Action column, select the Print Shipping Labels option.
- After that, select the method of shipping you want.
- FedEx Package
- USPS Package
- UPS Package
- Click on Next, on the confirmation page.
- Then, choose the package(s) that you want to ship and then select the Next option. NOTE: Remember, you’ll be only able to print only one shipping label for one site at one time. If you select None of the above then you can choose to print shipping labels for packages, not on the screen. By doing this you’ll be able to create shipping labels manually and also print them.
- If you are printing shipping labels for the first time, then you need to login to the shipping manager using your carrier service account credentials (FedEx, UPS, etc.) and then you need to set up the account.
- Most of the information that has been saved in the system will be filled automatically in the Shipping Manager form. You can add other additional information.
- After that, select the Ship option.
- Once you completely finished filling the information, you will be redirected to the confirmation page of the Shipping cost and details.
- If you opt to print form in the Shipping Manager window, then you can update the tracking number and shipping cost in the original sales order too.
- After that, you’ll be redirected to the confirmation page. You can view the updated shipping details in the View Details link from the Dashboard.
Mark Sales Order as shipped
- Go to the Dashboard and then select the sales order(s) you want to be marked as shipped.
- To mark only one sales order, click on the Action column and then select the Mark as shipped option.
- To choose multiple sales orders, checkmark each box in front of the desired sales order(s) and then click on the Batch Action drop-down menu and then select the Mark as Shipped option.
- Select Yes, on the confirmation page. Select No if you want to go back & make some changes.
- Click OK, when you receive a message of confirmation that sales order(s) is shipped.
NOTE: At any point in the workflow, you can mark any sales order as shipped. You don’t have to proceed through all the three steps mentioned above.
Generating a Pick List For Enhanced Sales Order
The QuickBooks Enhanced sales Order Fulfillment feature is based on sales orders. If you aren’t using sales orders, this won’t be useful to you. I like sales orders in QuickBooks, they are a key component to many important workflows.
We’ll start with a sales order
- There are two new columns for the sales order, picked status and picked quantity. The column to pick is visible in the template but not active with this feature.
- The information in this worksheet can be a bit confusing. There are several concepts to keep in mind here, and they overlap:
- A sales order will have three “stages”: creation, picking, pack & ship.
- Sales orders have a status value, and the new system adds several values here.
- We now have a separate pick list transaction, as far as I can tell.
- Picklists to have their own status value, independent of the sales order.
- You can open the sales order window by clicking on the sales order number in the first column.
- To pick order you can only select one order at a time for processing. Select one that has a Fulfillable status of Yes or Partial, then click the Next button to view the details of the order.
- The detail lines are available here in alphabetical order, not in the sequence in which they are visible in the original sales order.
- The next step is to select the items for the picklist. You can remove items from the list by unchecking the box on the left, you can filter out some items using the Status and Fulfillable drop boxes at the top, and you can change the value in the To Fulfill Qty column if you don’t want to ship all of the available items.
- Click Next to send the picklist to the scanner.
- You have options for Create & Send, which will send the picklist to the scanning device, or Create & also Print if you are not using a scanning device.
If you aren’t using a mobile device for picking, you can print the picklist. And If you’re using a registered mobile device you don’t need to print this pick list, mobile devices will receive information directly.
Picking With Android device
- To request an order fulfillment and to add notes also. The back office team will assign a “Picker”.
- Furthermore, Confirmation will be given by the picker about the picking of order and its shipment as shown in the image.
- Finally, Quickbooks will be updated with the most recent status.
The Bottom Line
If you have any more queries related to the QuickBooks software, you can contact our support team via 24/7 toll-free number +1-844-405-0904.