Want to set up multiple users in QuickBooks Online? In this article, we have provided you the complete setup for setting up multiple users in QB. To set up multiple users in QuickBooks, you need to follow this step-by-step procedure. Read the article to get the steps to set up for multiple users or How do I give My accountant to my QuickBooks online account. If You have a problem contact our QuickBooks Support team and get help from Intuit certified ProAdvisor at a toll-free number +1-844-405-0904 to save your time and effort.
One of the major benefits of QuickBooks Online is that you can share your QuickBooks data with other people. It is commonly used to give your accountant, bookkeeper or tax professional access to your data. In which firstly you log in for QuickBooks account then see your business and financial data, and do your bookkeeping for you from their office without having to bother you.
Users can access their QuickBooks online accounting software anywhere and anytime.
Steps to set up multiple users or How Do I Give My Accountant Access To My QuickBooks Online Account
Let’s discuss how to give my accountant to my QuickBooks online account. QuickBooks allows you to invite up to two accountants to access your QuickBooks data.
STEP 1:– Navigate To Manage Users
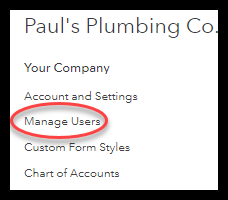
- Firstly click on the Gear icon to the left your company name.
- Then select the Manage Users which is located under your company.
STEP 2:– Send Invite To Accountant
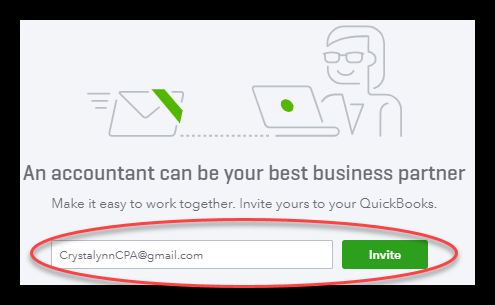
- Secondly, click on the Invite Accountant button as indicated.
- Then Enter Your Account E-mail address.
STEP 3:- Set Up Is Complete
- After that, you can send the invite message through the following steps.
- When your account receives an email that contains a link for signing into your QuickBooks Online account.
- Firstly your accountant has to create a new user id before signing for the first time.
- If your accountant signs in then the status shown on the manage user page is “invited”. After accepting the invitation through the sent message, Then the message shows a confirmation “Active“.
- By default, your accountant will have “Company Administrator” privileges for performing like closing your books for prior periods.
- Note: The Invite Could Go To Their Spam/Junk Folder.
Why Is Important To Give Other Users (Beyond Your Accountant) Access To Your QuickBooks Data
- After then we discuss why it’s important to give other users access to your QuickBooks data. If you can certainly benefit from giving your accountant access to your QuickBooks data. So this software may not only one person, you would like to share your account with.
- For Example:- If you want to share your data with a business partner. You also want to give your tax professional access to your QuickBooks data so she or he can obtain the financial reports that they want to have to prepare your tax return without you having to drive over to their offices or run the report to your self.
How To Give Other Users Access To Your QuickBooks Online Data
- Finally, we discuss how to give other users access to your QuickBooks online data. Once you have decided who to give access to your QuickBooks data.
- If you need to decide when the information they need access.
- Then QuickBooks allows you to grant limited access to users who need to see everything.
- Below you find the steps to give other users access to your QuickBooks data in just a few minutes.
- Then following some steps.
STEP 1:- Navigate To Manage Users
- Firstly you click on the Gear icons to the left of your company name.
- Then select the Manage Users which is located under your Company name column as indicated.
STEP 2:- Create A New User
Click on the New button.
STEP 3:- Select User Type
There are four types of users that you can choose from.
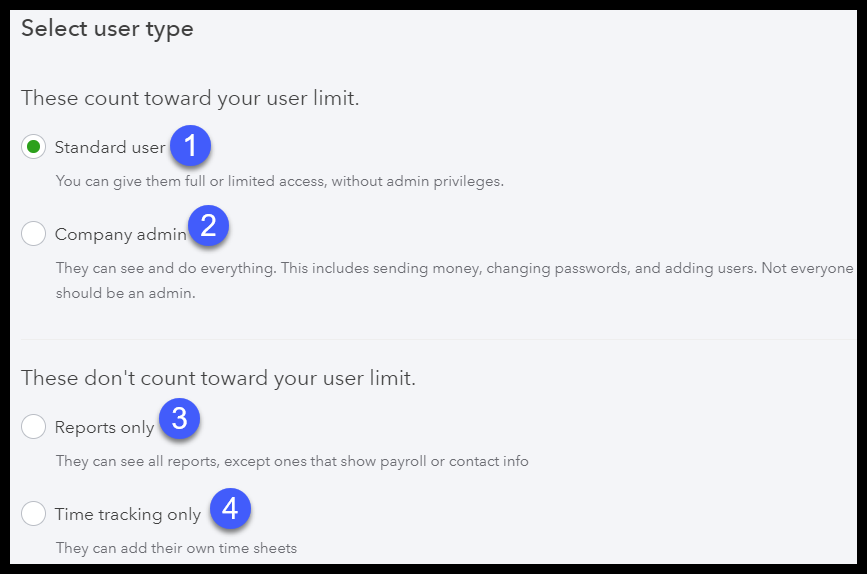
- Regular Or Custom User:- In which you specify which areas of QuickBooks online plus this user can access. It is great for someone who does not need access to everything in QuickBooks, but just a specific area.
- Company Administrator:- The company administrator has all access rights within QuickBooks online. They also have all access right for every other service your company too. It accesses the additional services you may have through QuickBooks such as payroll or payments. This level of access should be limited to decision-makers only.
- Reports Only:– In which the user signs into the special version of QuickBooks online plus that shows report only. This type of user can access virtually all reports, except payroll reports, vendors or employees. This type of user does not count towards your current user limit.
- Time Tracking Only:- This type of user signs into a special version of QuickBooks online plus. They use a special version that only timesheet. The time tracking the only user can fill out and change his or her own timesheets but not other users timesheets. This type of user does not count towards your current user limit.
There are four types of user access rights you can set in QuickBooks online.
- All Access Rights:- In which all access rights will give the user unlimited access to all of your QuickBooks data. In which the only access that is not included here is administrative rights.
- No Access Rights:- It is the complete opposite of all access rights. The no access right does not include access to any of the QuickBooks data. So it will allow the user to manage other services as you may subscribe to such as payroll and payments. It is the only access that is not included here is administrative rights.
- Limit Customers And Sales Access Rights:- It allows you to grant access for just customer and sales.
- Note:- You do need someone to perform any of the tasks listed under what they can not do section, you will not be able to select limited access for this user. Then instead you will have to grant them all access. Then you can perform all these tasks.
- Limited Vendors And Purchase Access Rights:- Its allows you to grant access to just vendors and purchases.
- Note:-You do need someone to perform any of the tasks listed under the what they can not do section, you will not be able to select limited access for this user. Then instead you will have to grant them all access. Then you can perform all these tasks.
STEP 5:- Set Up Multi-Users Administrative Rights
- In which step you are given the option to grant administrative privileges for a regular or a custom user.
- Anyone who has administrative rights can make the following changes without your permission.
- Firstly you add or delete and change access right for users.
- Secondly, you change company information like company name, tax id, etc.
- The third one adds new services.
- You can cancel your QuickBooks subscription.
- You also have the option of giving the user View Only access if necessary.
STEP 6:– When you have selected the access rights, you need to enter an e-mail address for the new user.
STEP 7:– Set Up Is Complete
- After that, you can send the invite message through the following steps.
- In QuickBooks online, the new user receives an e-mail that contains a link for signing into your QuickBooks account.
- The new user has to create a new user id before signing for the first time.
- Then new user sign in the QuickBooks Online account then the QuickBooks online account shows the status on the manage user page is”Invited “.
- After accepting the invitation their status changes into “Active“.
The Bottom Line
Learn everything you need to know about setting up multiple users in QuickBooks Online. QuickBooks Online Multiple users is one of the best feature of this software. It can be proven very useful for businesses.
We have tried to provide a clean and easy representation of all steps. However, If you are unable to perform any action or need support; you can call on our QuickBooks Support +1-844-405-0904.