When we face installation, updates, and technical issues during the use of QuickBooks, there we need to repair the QuickBooks Desktop. This article is all about QuickBooks Desktop repair. Here we will discuss, how to repair QuickBooks Desktop in different ways to solve the problem. In the meanwhile, you can contact the experts through the toll-free number +1-844-405-0904 for further assistance.
The QuickBooks repairing procedure can be done in two different ways. One is by repairing the QuickBooks in a manual process, and the second one is by using different QuickBooks tools. First, try to fix it manually, if still, the problem exists then you can go to the second method.
Method 1: Update or Repair QuickBooks Desktop
Follow the solutions to update or repair the QuickBooks Desktop;
Step 1: Begin Process with the Repair Message
If you got a repair message, during the use of QuickBooks then you can solve the issue at that time. But, if you haven’t got any repair message then you may encounter a missing installation file message, during the time of accessing QuickBooks Desktop 2022. Now let’s know, how to repair the QuickBooks with its message;
- In the repair message, you can find the option of ‘Next‘.
- Click on the ‘Next‘ option to start the repairing process.
- And after the complete repairing process, click on the ‘Finish‘ option.
This repairing process will keep your QuickBooks version to the latest released version if you turned on the automatic updates. If your QuickBooks is not in the latest version then go to the second step.
Step 2: Ensure QuickBooks Desktop is in Latest Version
Make sure that, your QuickBooks version is in the latest released version, if not then follow the procedure to update to the 2022 version.
- In QuickBooks Desktop, go to the ‘Help‘ menu.
- There will be option of ‘Update QuickBooks Desktop‘ option, just click on that.
- It will show you the latest released version of QuickBooks Desktop.
- Click on the ‘Update Now‘ option, and then the ‘Get Updates‘ to start the download process.
- After the complete download of QuickBooks Desktop 2022, restart the QuickBooks.
After repairing, and updating the QuickBooks to 2022, you may have some queries like, should you uninstall the current or previous QuickBooks Desktop version or the processor. So here we have considered 2 scenarios, where you can find your answer, what to uninstall, and what to not uninstall.
If you have a 32-bit QuickBooks version and want to uninstall the QuickBooks Desktop 2022;
Intuit will ask you to repair the older QuickBooks version, at the end of the uninstall process. There you need to follow the below steps;
- Click on the ‘Finish‘ option.
- And allow the uninstaller to complete the repair process of 32-bit version of QuickBooks.
- Do not cancel the repair process. A missing installation file message may appear during that time.
- Turn off the automatic update, and do update manually.
If you have QuickBooks Desktop 2022 and want to uninstall the 32-bit QuickBooks version;
- First of all, uninstall the older QuickBooks version, and open the QuickBooks Desktop 2022.
- Intuit will ask you to repair QuickBooks.
- Click on the ‘Continue‘ option and follow the instructions to repair QuickBooks Desktop 2022.
Method 2: Repair QuickBooks, Using Different Tools
Use different types of QuickBooks tools to repair QuickBooks Desktop, and to fix the installation issues.
Run the Repair Tool
If you face any errors while using QuickBooks, then this is the easiest way you can try to solve issues. This is an in-built feature for QuickBooks Desktop windows that can repair QuickBooks quite easily.
The only thing you need to do is follow instructions step by step.
- Restart your system, this will close all the programs that are affecting the performance of the software.
- In the start menu, search for the ‘Control Panel’. Then click on it.
- In the Control Panel, select the ‘Programs and Features’ option.
- Next, choose the ‘Uninstall a program’ option.
- After that, you’ll be able to see the list of programs choose ‘QuickBooks’ from that list.
- Select ‘Continue’ and then ‘Repair’.
- Diagnosing will start as soon as you select ‘repair’. This will take some of your time to complete the process.
- Once the repair process is complete, you may have to restart your computer again.
NOTE: While repairing is in the process, you may encounter a pop-up message ‘File in Use’. The only thing you need to do is select ignore or close. This might happen a few times, So don’t worry.
Install Diagnostic Tool to Repair QuickBooks
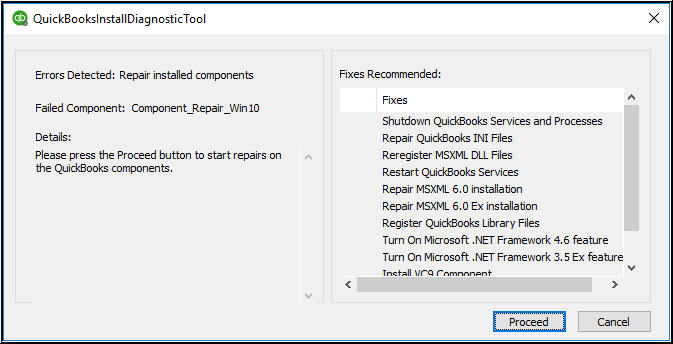
This tool comes very handy when you unexpectedly run into QuickBooks errors like Error 1935, 1903, 1722, 1603, 1402 or if messages like ‘QuickBooks Stop working’ frequently pop-ups.
Follow the below instructions on how to use QuickBooks Install Diagnostic Tool.
- Close all the QuickBooks related programs.
- From Intuit official site download and install the ‘QuickBooks Tool Hub’.
- Follow the installation steps, then read and agree to the terms and conditions.
- After installation is complete, open the program by double-clicking on the icon from desktop or you can search for ‘QuickBooks Tool Hub’ in the Start button.
- Now open the ‘Installation Issues’ tab in the Tool Hub.
- Then, select the ‘QuickBooks Install Diagnostic Tool’. This will take a short period of time to find and fix the issues.
- Restart your computer, after the tool finished its troubleshooting process.
Let’s hope that, your errors and issues will be fixed with the help of QuickBooks Install Diagnostic Tools.
Run QuickBooks Connection Diagnostic Tools
QuickBooks software is best optimized when used in Multi-users mode. But while using it some technical glitches affect the fluent performance of the software. You may face errors due to some QuickBooks corrupted company files, problems in sharing files across the network, and some other related issues.
QuickBooks Connection Diagnostic Tool is a free tool provided by Intuit which you can download from their official website. This will help you to easily repair QuickBooks Desktop problems instantly on your own without any help from experts.
Here are the instructions on how you can download, install and use the Diagnostic Tool.
- Before approaching further, Let’s make sure you do not have an older version of the QB diagnostic tool is installed on your computer.
- Close the antivirus or window firewall before downloading the tool.
- Visit the official website and download the ‘QuickBooks Connection Diagnostic Tool’ file.
- Now, install the QB connection Diagnostic Tool.
- And then double-click on the QB Desktop software icon and open it.
- Close all the company files before start the troubleshooting process.
- Select the ‘Utilities’ option and then click on ‘Repair File and Network Problem’.
- Now the tool will ask for permission to access the information and personnel data related to the Quickbooks. Allow the tool for collecting your data.
- Select the company file you want to fix from the folder and then click on ‘continue’.
- Open the ‘Show advance setting’ option and from the drop-down menu select the issue which you think is most related to your error.
- After that enter the QuickBooks Online Login ID and password to the respective boxes.
- Open the QB Connection tool and run the diagnose process.
- Wait for a while because this process might take some time depends on the size of the files.
- Now you can open the repaired files to check whether repairing has done or not.
This is a powerful and versatile tool that can surely help you resolve a number of errors and issues that affect the effectiveness of the tool.
Repair QuickBooks with File Doctor Tool
QuickBooks File Doctor is a high-end repair software designed by Intuit. It is a tool that offers features of both QuickBooks Network Diagnostic Tool as well as QuickBooks File Diagnostic Tool and resolves the errors instantly.
Built-in File Doctor is pre-installed only on the QuickBooks 2016 and the later versions of QuickBooks and for the older users, a stand-alone version is also available on the official website.
QuickBooks File Doctor can resolve all the issues like QuickBooks 6000 series errors, empty vendors or customer lists, Multi-user errors (H101, H202, H303, or H505), and repair some severely damaged files quite easily.
There are some things you should know before using QB File Doctor
- You should have administrative authority i.e., Login ID and password.
- A high-speed internet connection is necessary to upload files.
- The size of the company files that need to be diagnosed should not exceed more than 2GB.
- Only one QuickBook Software should installed on the system.
- Update to the latest version of QuickBooks software.
- And last QuickBook FD is only working with the Windows OS and is not available for the QuickBooks Desktop MAC users.
Follow the guidelines below to successfully fix errors using QB File Doctor.
- Visit the official Intuit website and download the ‘QuickBooks File Doctor’ file.
- Install the File Doctor by following the recommended steps.
- After that run the QuickBooks File Doctor program.
- Now search for the file you want to fix in the drop-down menu or you can also browse your file by going through folders.
- Once you select the file select ‘Check the damage’ and then ‘Diagnose File’ option. (NOTE: Now two options will appear, First will ask if the problem is related to any 6000 series error or second Multi-user error. Select accordingly.)
- After providing the QuickBooks admin Login ID and password tool will ask you to update the company file but we recommend you to skip that part and continue.
- Now after all that file doctor will run it’s diagnosing process. This might take some time depending upon the size of the file.
- You can open your repaired file directly from the tool to check whether the issue is resolved or not.
Run QuickBooks Component Repair Tool
There are some Microsoft components like Framework, MSXML, MS Visual C++, and .NET Framework which are needed to operate perfectly for the best optimize of QuickBooks software but there are some conditions where these components don’t perform well or cause problems in the swift working of QuickBooks software.
Therefore, Intuit comes up with a tool named QuickBooks Component Repair Tool that can be download free from their official website and help in repairing QuickBooks Desktop problems to a great extent.
Sometimes if Windows is not up to date to the latest version there will be some issues regarding the QuickBooks installation. But even after the updated window if you face the same issue then you need QuickBooks Component Repair Tool to do its work.
These are two easy steps through which the QB Component Repair Tool can fix problems.
Rebuild .NET Framework
Microsoft .NET framework is a program developed by Microsoft that helps Quickbooks to connect with other web applications. It is an integral part of the Windows operating system.
Therefore, it is necessary that it always works in its best condition.
- First, download the QuickBooks Component Repair Tool file.
- Save the file on your computer local disk.
- Close all the programs running in the background for this, you can use Task Manager.
- Open the file with the name of ‘QBInstall_Tool_v2.exe’.
- After the diagnosis of Microsoft.NET is finished. Restart your computer.
Reconstruct the Microsoft MSXML
QuickBooks will not give its optimum performance when any MSXML files are hampered. Therefore the first thing we should do is repair these files for this, you need to do the following things.
- Register MSXML DLL files.
- You can try Uninstall MSXML 6.0 file and then clean install it again.
- Download and install MSXML 6.0 SP1
- Repair MSXML 6.
QuickBooks PDF Repair Tool
QuickBooks PDF repair tool as its name suggests is used when any technical error arises during the printing of invoices, bills, or any other problem related to printing documents.
It is easy to download, install and run the tool to diagnose the various QuickBooks Printing problems, simply just follow the given instruction and your tool will be ready to use.
- Update your QuickBooks software to the latest version before installing the PDF Repair Tool.
- From the Intuit site download the ‘QuickBooks PDF Repair Tool’ file.
- Now you need to open the downloaded file and follow the installation steps.
- Run the troubleshooting process to diagnose issues related to printing.
- Once your error is fixed, try to print a receipt or invoice to check whether it worked or not.
There are some points you should also check if you face problems while printing.
- Check the wire connections of the printer.
- Restart your computer and look if the problem is solved or not.
- Try to print using other programs and if it’s not working even with others then your printer may be faulty.
Even after all the above-mentioned methods to repair QuickBooks Desktop cannot help you in resolving your issue then the only best way is left to ask for help from the QuickBooks experts ProAdvisor.
Our team consists of a number of experienced and certified Intuit experts who are capable of repair QuickBooks and fixing any error in just a short span of time. You can contact them through their 24/7 toll-free number +1-844-405-0904 and get answers to your queries.