This article will teach you how to set up accounts payable workflows in QuickBooks Desktop. If you have any doubts related to the topic, all doubts will be cleared by reading the article until the end. Before setting up accounts payable workflows, you must be aware of how to download and install the QuickBooks Desktop with simple and easy steps. All the details related to setting up accounts payable workflows in QuickBooks Desktop are well arranged here. For more details contact us. +1-844-405-0904
Account Payables defines the record of outstanding bills for your business. It is used for tracking the money you owe from your vendors. When the first time you have entered the bill, QuickBooks adds the account payables to your Charts of Accounts. Then, when you are ready to enter or pay a bill, To your account payable account, QuickBooks records the transaction.
Learn About Accounts Payable workflows in QuickBooks Desktop
Here you will know about accounts payable workflows in QuickBooks Desktop. Mainly, there are two Accounts Payable workflows in QB Desktop. For recording your account payable transactions, you have to click on the workflow that suits your business and refer to the steps for creating each particular transaction. Below we have discussed both the workflows you will use in QuickBooks Desktop.
Workflow 1: Pay Bills that have a Purchase Order
If your business tracks the goods and services you have ordered then you have to refer to this workflow.
Note: Purchase Orders will only be available in the QuickBooks Desktop Enterprise, QB Desktop Pro, and QB Desktop Premier.
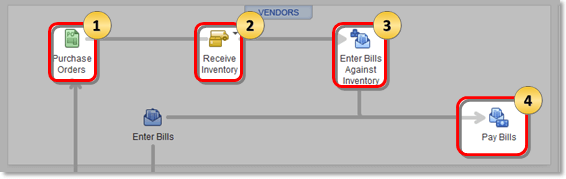
1. Create a Purchase Orders
From here, you will learn about how to create purchase orders in QuickBooks Desktop. Purchase orders will help to tell vendors about your orders’ preferences(what you want to order). Through this, you can track the items you order and receive and also be aware of expenses that are coming up.
Steps to Create a Purchase Orders in QuickBooks Desktop
Refer to the below steps if you are willing to do this manually. These steps are:
- If you are not already turning on the Purchase order. Do it now by going through the steps listed below.
How to Turn on Purchase Orders in QuickBooks Desktop[Steps]
Here you will learn about all the steps will help you to do this:
- To begin, you have to visit the Vendors and then click on the Create Purchase Orders option
- Choose the vendor for which you would like to create the purchase orders, go for it inside the Vendor drop-down menu.
- To add a new vendor, you have to click on the Add New option
- Then fill out all the fields lefts, and manually add all the items you are willing to order
- In the end, click on the Save and Close option to end it.
Note: Purchase Orders are the basic part of Accounts Payable(A/P) workflows in QuickBooks Desktop.
2. Receive your Inventory
Inventory can be received with or without in QuickBooks Desktop. You are eligible to receive Inventory with or without a bill after you record a purchase order. Either you are working with or without a bill in QuickBooks Desktop for Windows and Mac, you have to follow the separate steps if you want to successfully receive your inventory.
Do you want to know the complete procedure of it then refer to the received inventories on the QuickBooks desktop.
Note: Receive Your Inventory is the part of Account Payable Workflows in QuickBooks Desktop
3. Enter your Bills against the Inventory
Here we have discussed it completely, entering your bills against the Inventory is part of account payable workflows in QuickBooks Desktop. You will get to know about the complete list of workflows and other vendor-related transactions through this article.
After youreceive inventory without a bill, you can easily enter the relevant bill against the inventory. It will help you to record the corresponding bills for the item receipts in QuickBooks Desktop.
How To Enter a Bill for an Item Receipt
For performing this, go through the steps which we described below:
- First, from the Home page, you have to click on the Enter Bills against inventory
- On the select Item Receive window, refer to the following:
- You have to pick the correct vendor name from the Vendor drop-down menu.
- Now choose the Use Item Receipt date for the bill date checkbox, if you are willing to keep the original inventory availability date.
- After that, click on the Item Receipt corresponding to your bill
Note: If you have multiple Item Receipts, then we suggest you convert each bill separately instead of together.
- Click on the OK option, All the Items Receipts are converted into a bill through QuickBooks.
- When you are ready to pay all your bills, then choose the Pay bills in QuickBooks Desktop, which will help you to pay all your bills through Cash, debit card, or ATM card, Paypal, or EFT.
4. Pay your Bills
In QuickBooks Desktop, after recording what you owe, you can easily use pay bills to settle your payables for multiple vendors. You are eligible to apply corresponding discounts and credits for every payment you made. You can make your payments through the Cash, debit card, or ATM card, Paypal, EFT, Direct Deposit, and Online bank payment.
Note: Paying your bills is part of your Account Payables (A/P) workflow in QuickBooks Desktop. Here you will know everything that helps to check out the complete list of workflows and other vendor-related transactions.
To know about it completely along with the steps for Online bank payments, Direct deposits, and Cash payments refer to thepay bills in QuickBooks Desktop.
Workflow 2: Pay Bills that don’t have a Purchase Order
If your business doesn’t track the goods and services you have ordered then you have to refer to this workflow.
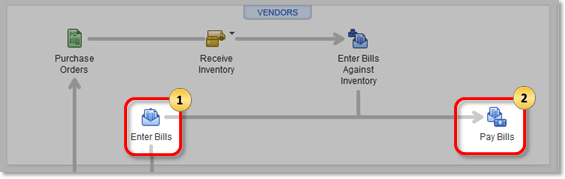
1. Enter Bills
In QuickBooks Desktop, recording your payables is very easy to enter bills. Recording of the transaction will be done willingly that you will have to pay at a future date, including incurred expenses, materials purchased, or services provided by a vendor.
Steps to Enter your Bills
To do this, follow the steps listed below:
- On the Home page, you have to click on the Enter Bills
- Now pick the vendor
- Select the date
Note: Bill’s due date is totally based on your Bill preference and will be populated automatically. Go through the Edit>>Preferences>>Bills>>Company Preferences
- Now choose the appropriate tab:
- Expense: If you are willing to record a bill for expenses incurred by the business such as utilities, rent, and phone/cable service.
- Items: If you want to enter the bills for anything which your company brought, sold out, or sold again in the course of business including products, shipping and handling charges, discounts, and sales tax(only if it is applicable).
- Now select the expense account or the item.
- Manually enter the amount
- Choose the customer job and also put a checkmark in the billable column, if you want to track billable expenses
- In the end, click on the Save and Close option to end it
Note: Enter Bills is part of your Account Payables (A/P) workflow in QuickBooks Desktop. Here you will know everything that helps to check out the complete list of workflows and other vendor-related transactions.
2. Pay your Bill
In QuickBooks Desktop, after recording what you owe, you can easily use pay bills to settle your payables for multiple vendors. You are eligible to apply corresponding discounts and credits for every payment you made. You can make your payments through the Cash, debit card, or ATM card, Paypal, EFT, Direct Deposit, credit card, and Online bank payment.
Note: Paying your bills is part of your (A/P) Accounts Payable workflows in QuickBooks Desktop. Here you will know everything that helps to check out the complete list of workflows and other vendor-related transactions.
The Bottom Line
Hopefully, we have successfully covered all the parts that come inside the accounts payable workflows in QuickBooks Desktop. But if doubts and queries still arise, don’t waste your time immediately contacting our QuickBooks ProAdvisors, they will help by offering a variety of solutions according to your query.
Our dedicated team expertise will always be with you in all the phases of QuickBooks, QuickBooks Online, and QuickBooks Desktop(all versions and editions support).