Are you looking for the steps on how to install updates for Intuit Data Protect to backup QuickBooks files? Here we are with an article to let you understand the installation process of Intuit Data Protect and deliver all related information. In this article, you will learn to set up Intuit Data Protect, backup your data files, and steps to install the updates. Go through the full article, and learn the methods and steps to make it done. If you need any help or suggestion contact us by toll-free number +1-844-405-0904.
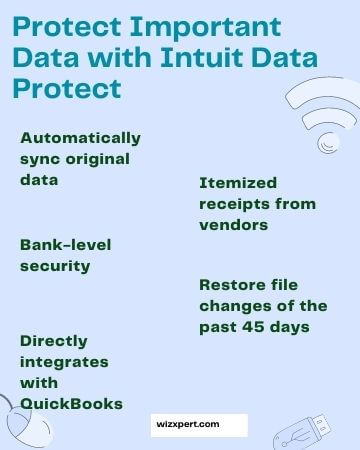
Your clients depend on you for their financial data safety. They put their important data in your hand and the cloud accounting software of your choice. So, data should be protected. Sometimes data is lost or corrupted. For data protection, you need to install Intuit Data Protect.
Intuit Data Protect is a backup service that backup your entire system or just QuickBooks. It backup the on a daily bases you just need to set a time for once. It provides you with the service to secure your data files from issues like; corrupted company files, viruses, or malware infection.
Conditions for Financial data loss:
- Human Error: There may be a new transaction that is not working according to the plan, a transaction may fail, data may be deleted unconditionally, or wrong accounting or general entry has been posted. Sometimes, your client tries to do some changes without discussing them with you.
- Malicious Attacks: Data may be hacked by hackers. Because sometimes we click on spam or malicious emails, which damaged the data. Malicious attacks are like disgruntled employees or contractors.
- Software Glitches: Third-party apps are a major issue in QuickBooks data protection. Most of the offenders are integrated with third-party apps, for example, a document management app and CSV imports. These types of issues make big and unwanted changes in your QuickBooks accounting data.
Here we will learn how to install updates for Intuit Data Protect. You can turn on the automatic update option. As to make your data more secure. QuickBooks Desktop automatically makes new updates for you. You can also do manual updates.
This article is for Intuit Data Protect users. You should need to sign up first. For that:
- Sign up for Intuit Data Protect to access it.
- Set up Intuit Data Protect in your system to back up files.
Table of Contents
Intuit Data Protect System Requirements
Before setting up Intuit Data Protect, you must know its system requirements. Here is the helpful information given, let’s check it.
- Must have the Windows 7 or higher version of the operating system.
- Make sure to have the admin rights in the system on which the user setting up the Intuit Data Protect. The user needs full access to all the folders.
- Where you set up Intuit Data Protect, install the full version of QuickBooks Desktop on that system.
- QuickBooks doesn’t support Google Sheet, Box, and OneDrive. So, store the files on your local area network.
- QuickBooks doesn’t support network drives you map. Always use a local file path on your system.
- Make sure to update your Norton Life lock certificate every six months. Once updated, log out and back into Intuit Data Protect.
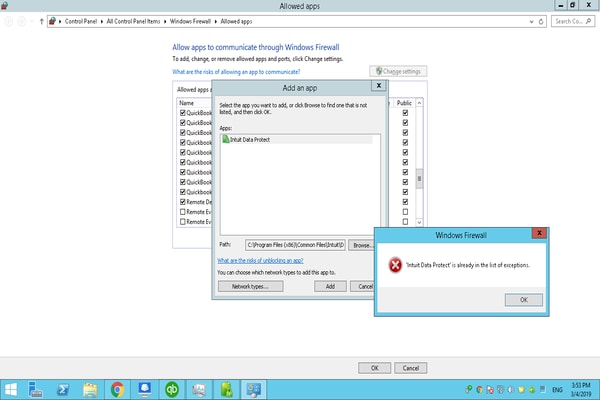
- Allow access to the Intuit Data Protect secure sites in Internet Explorer.
- Open Internet Explorer and click on the Gear icon.
- Click Internet Options and then select the Security tab.
- Choose Trusted Sites and click Sites.
- Add all secure websites that mention Intuit Data Protect and hit Close.
Set up Intuit Data Protect in Your System to Back up Files
Here are the simple steps to setting up Intuit Data Protect in your system to back up files. Back up your data and get help to secure your files and folders. Your data and files are backed up every day. Follow the steps to set up and schedule your backups.
Set up Intuit Data Protect
After signing up, set up Intuit Data Protect on the system where you save your files.
- Open the QuickBooks on the system in which you store your company file. If you are not getting that then, press F2 in QuickBooks.
- Click on the file menu, choose Back up company, and the Set-Up/Activate Online Backup
- Sign in with the email id which you used at sign-up time. It is not the same as your QuickBooks login.
- After completing, choose the Continue option.
- Then select your QuickBooks file and click Continue. But if you have an entire PC plan, choose the folder for backup. Choose Continue.
- Mark the checkbox Back up local selected documents, and click Continue.
- Select the files and folder in which you like to backup and click Continue.
- Make a schedule of your regular backup, and select Continue.
- Set up notifications settings, and go to Continue.
It is your first back up so it may take several hours. It all depends on the number of files and their sizes. Don’t worry, after the first backup, it will take a few minutes for the rest.
Manage Your Backups with Intuit Data Protect
If you choose an automatic backup schedule with Intuit Data Protect then your data will save once a day on a daily basis. You can also choose the manual option to backup your data.
Back up your files and folders manually
- Choose Open Intuit Data Protect by right-clicking the Intuit Data Protect. Its icon appears like a green padlock on the Windows toolbar.
- Click on the Backup now option.
- Then choose the file and folder you want to backup and select Continue.
- While selecting Back up now. You will receive a message with the backup is successful.
- And select OK.
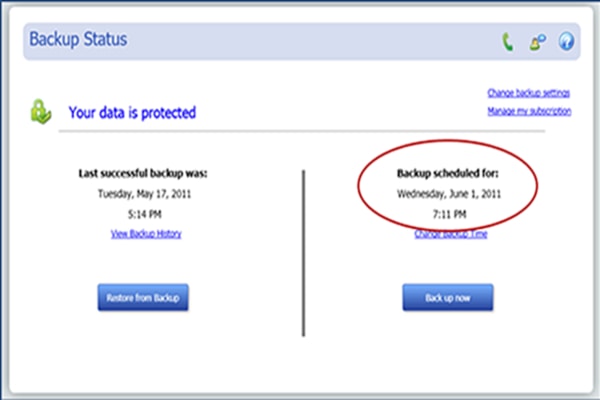
Open Intuit Data Protect to check Backup Status, view Backup History, or change Backup Settings
Steps to open Intuit Data Protect to see the backup status, view backup history, and change the backup settings.
Open Intuit Data Protect
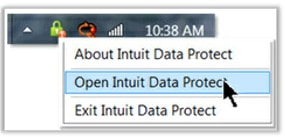
- Find the Intuit Data Protect (IDP) icon (green padlock) in the Window System Tray (typically located at the bottom right of the screen).
- Choose Open Intuit Data Protect by right-clicking on the IDP icon.
View Backup History
In History Backup the data list is in chronological from oldest to newest. You need to scroll in the history according to the date and timestamp in the backup history you are looking for.
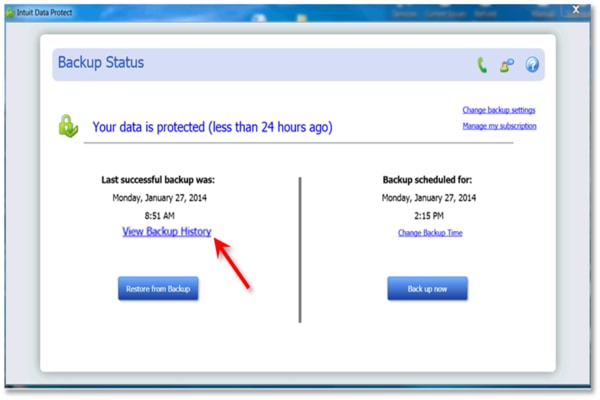
- First, open Intuit Data Protect.
- Choose View Backup History in the main Intuit Data Protect window.
Change Backup Settings
While choosing Change Backup Settings you have the access to add or remove from the backup set and change your email notification preferences.
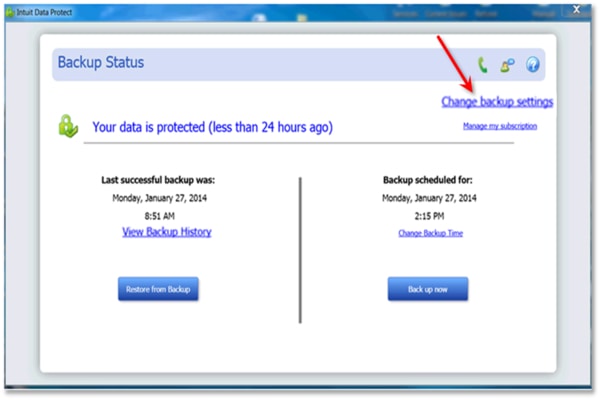
- Go to Intuit Data Protect.
- Choose Change backup settings.
- On the Select QuickBooks Data Window, select the file or folder for backup, and click Continue. For Entire PC Users, choose the additional folder where you want to backup. Then Continue.
- In the notification email settings, select the option you notified or not. And choose Continue.
- Need to choose Continue again, then select backup timing.
- After doing Continue to save all the changes, then Exit from the settings window.
Update Intuit Data Protect
If you turned on the automatic update, QuickBooks will automatically download the updates. You can also download it manually with the following steps.
Step: 1 Download the latest update for Intuit Data Protect
- In the Help menu, click on the Update QuickBooks.
- Then select the Update Now tab
- Don’t forget to select Data Protect from the list, and click the Get updates option.
Step: 2 Install the Update
- Click on the up ^arrow in the desktop toolbar. Usually, you see this arrow lower-right corner nearby the clock in the system.
- After that right-click on Intuit Data Protect tab and click About Inuit Data Protect. You will see the icon like a green padlock.
- Then select Update.
- When the update is finished, click OK.
If Intuit Data Protect Schedule Backup Does Not Work
There are steps if Intuit Data Protector scheduled backup does not work:
If You Access QuickBooks Desktop and Intuit Data Protect Locally
First, we need to verify the windows user profile logged in has administrator-level access. For first-time access, set up IDP. Access as a window administrator or you have all the privileges to access the IDP and QuickBooks.
Follow the steps for verification:
- Press Ctrl+R on the keyboard to open the Run command.
- Search for the Control panel and then click Ok.
- After opening the Control panel, go to the User Accounts.
- You will see the Administrator in the User Account. It means users have all the access rights to IDP and have permission to make necessary changes to create a backup to run smoothly.
But if you want to create a new Admin account or want to give rights to another user. Then you need to do some changes and create Windows users with Admin rights to allow configuration.
| Admin-level privileges: Make sure your Windows accounts with admin-level privileges must remain logged in during the scheduled backup. If you logged off or leave the system, IDP will not have admin-level privileges. It must need your login for the scheduled backup to run. |
Create Windows Users and Give Them Administrator Rights
Follow these steps to create a new Windows admin account and provide them with all the access to perform changes in the QuickBooks.
If you are working in a multi-user QuickBooks Desktop mode, so you need to sign up as an admin user in QuickBooks. Here is the need to make some changes like in your firewall settings and folder permissions. Also, we need to give program rights like database manager admin rights.
Here you can learn how to create a Windows user account with the admin rights:
Step 1: Add a Windows user with admin rights
Follow the steps from Microsoft to create Windows users and give them admin rights:
For Window 11
Create a local user account
- Select the Start button in windows, then go to the Settings. Select Accounts and then Family & other users. (Note: In some versions of the Windows you will see other users).
- Next to Add other user, click Add account.
- Click I don’t have this person’s sign-in information. From the next page, click Add a user without a Microsoft account.
- Choose a security question or enter a user name, password, or password hint. At last, select Next.
Change a local user account to an admin account
- Click Start and then Settings.
- Select Accounts. Select account owner name under Family & other users and select Change account type.
- In the Account type, click Administrator, and click OK.
- Sign in with the new admin account.
For Window 10
Create a local user account
- Select the Start button in windows, then go to the Settings. Select Accounts and then Family & other users. (Note: In some versions of the Windows you will see other users).
- Choose to Add someone else to this PC.
- Select I don’t have this person’s sign-information option, and on the next page, select Add a user without a Microsoft account.
- Insert a user name, password, hint password, or choose security questions, and then select Next.
Change a local user account to an admin account
- Go to the account option in Settings, select Family & other users, choose the account owner’s name, and click Change account type.
- Select Administrator under Account type and then OK.
- Now, sign in with the new administrator account.
Windows Small Business Server 2011 and 2008 R2
- Go to the Start menu in Windows.
- Choose All Programs. Open Window Small Business Server and then choose Windows SBS Console.
- Choose Users and Groups. And click on the Add a new user account tab.
- Enter all the user info, and follow Add a New User Account wizard.
- Provide new admin access rights.
- After finishing, click the Finish option.
Step 2: Give administrator access to the QuickBooks Program
Some QuickBooks programs need admin rights to access. When you install QuickBooks Database Server Manager, automatically QuickBooks create new windows users. So, you need to give admin rights to run on your network.
Given below are the steps to give Windows users and programs admin rights:
Note: If the system is set up as a domain controller, don’t follow these steps. Contact an IT professional who has the knowledge of how to add the Database Server Manager user as a Domain Administrator.
- First, closed the open QuickBooks Desktop.
- Open the Control panel in the Window start menu.
- Then select a User Account.
- Search for QBDataServiceUserXX in your QuickBooks Desktop version. For example, for QuickBooks Desktop 2020 search for QBDataServiceUser30. For the 2019 version of QuickBooks Desktop look for QBDataServiceUser29. The last provided numbers go down for each version.
- Choose to Change the account type and go to the Administrator. Then click Change Account Type.
- Click on the Apply option to save all changes.
- These steps are the same for each version of the QuickBooks Desktop Server Manager.
If You Access QuickBooks Desktop and IDP Remotely
Check your server settings and make sure that the remote session is running properly and doesn’t close during or before the scheduled backup time.
- Click on the Control Panel, and click on System and Security.
- Choose Power Options in System and Security. Adjust your system setting to not let it sleep before or during the scheduled backup time.
The above-given steps will allow you to update the Intuit Data Protect. Sometimes, there can be some circumstances when you need to update Intuit Data Protect or the QuickBooks software. But these situations may be worse because it damages the entire database which may not be recoverable.
If you need any further QuickBooks support, you can contact our QuickBooks ProAdvisor by dialing our toll-free number +1-844-405-0904. Thanks for visiting.