Want to learn how to create a backup or restore Quicken data? In this article, we are here to provide you all the details to backup or restore Quicken data. Quicken also provides a data access guarantee and 256-bit encryption security. But Backup or restore Quicken data is necessary otherwise you face the problem so you create the Backup or Restore Quicken Data. Read the complete article to get your query resolved, stay connected with us to learn more and new. For more info contact us toll-free: +1-844-405-0904
According to today’s demand, continued support and help are needed. But many software might be weak in handling your queries or problems. Quicken is best for handling your queries, easy to use, and manages your money from anywhere with Quicken’s new mobile app.
Accounting software programs market continues to show steady growth over the past years as more business is realizing its advantages. The global market growth of accounting systems is to grow from $3.06 billion in 2016 up to $4.10 billion by 2021.
Here is the summary of why Quicken is best suited for accounting.
- Use Free Tax Help
- Pay For Financial Software
- Take Advantage of Online Records
- Keep Diligent Files
- Being Own Accountant
- Provides Digital Invoices
- Automated tasks
- Helps to cuts Costs
- It takes cares of the math for you
- Enables wide accessibility
- It oversees cash flow
Why we need backup or restore Quicken data ?:
Quicken data preserve your financial information including:
- Reports
- Passwords
- Accounts
- Attachments
Backup is a way to safeguard your records in case of computer failure or as a means of moving your data from one computer to another.
5 Simple Steps To backup or restore Quicken data For Mac:
Here are five steps to backup or restore data for Mac:
Step 1: Backup in Quicken for Mac:
- First Select File > Save a Backup
- Now you choose a place on your Mac to save the file. You can save it anywhere or your desired place.
- Click Save
Note: The Quicken backup file will have the extension .quicken2017backup or .quickenbackup.
Step 2: Backup to the USB thumb drive, CD, DVD, etc:
- First, Select File > Save a Backup
- You save a file in your Mac in the desired place and you can save to a flash drive by selecting it in the where drop-down.
- Now you Click Save.
Step 3: Restore Quicken Data:
- First, Choose the file > Restore from Backup.
- Search in your computer or external media to find the backup file you want to restore.
Note: Backup file extension .quyicken2017backup or .quivcckenbackup
- Click or select the file restore.
- Click Choose.
Step 4: Restore an automatic backup:
Quicken has a copy of your program files and stores five of these copies in a backup folder. In case your backup created files are damaged so you may be able to restore an automatic backup and save yourself data.
To ensure your automatic backups are turned on:
- Select Quicken > Preferences
- You will see file backup at the bottom
- Check the mark next to Automatically backup data file
- Their backup folder button is available, it links directly to your BACKUP folder.
Restore an Automatic Backup:
- Select File > Restore from Backup.
- Quicken > Backups > Automatic > Backups , Select Automatic backup.
- Click the file to restore.
- Click Choose.
Step 5: Backup Using Dropbox
To Backup or Restore Quicken data For Windows:
Step 1: Backup in Quicken For Windows
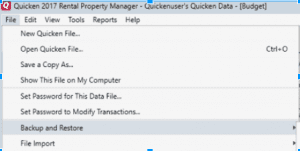
- Select on file > Backup and Restore > Backup Quicken File.
- For backing up your data two options will available their:
- You can back up to your Computer or an External drive.
- You can use Dropbox.
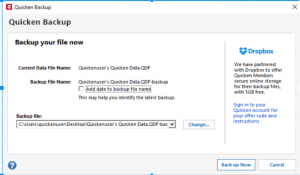
- To help recognize your latest backup easily so you can put a check next to add data to the backup file name.
- Saved file location will show by Quicken
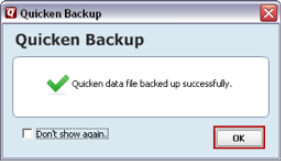
- Select Backup Now.
Step 2: Backup to the USB thumb drive, CD, DVD, etc:
- Insert the CD/DVD, you want to use for your backup.
- Open Quicken.
- Select the File > Backup or Restore > Backup Quicken File.
- Click Backup on my computer or hard drive.
- Select Backup for starting the backup process.
Step 3: Restore Quicken Data:
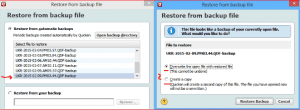
- Choose the file > Backup and Restore > Restore from Backup File.
- Now Choose to Restore your backup.
- After Click Browse.
- Browse your computer to search the backup file you want to restore.
- Select the file to restore and click to open then Restore Backup.
- When you create a copy, first you choose the location to save the copy to after this you will also need to give the copy a different file name. Now you click the save button, after click Yes to open the restored file.
- If you want to overwrite the file, click on the button OK to overwrite the current file then click Yes to open the restored file.
Step 4: Restore an Automatic Backup:
Quicken has a copy of your program files and stores five of these copies in a BACKUP folder. In case your backup created files are damaged, you may be able to restore an automatic backup and save yourself data.
Check to see if automatic backups are turned on
- In Quicken, Select Edit > Preferences.
- Choose Backup by Under Setup on the left.
- Check the mark next to Automatically backup data file.
- Their backup folder button is available, it links directly to your BACKUP folder.
- Select to back up your Quicken data file after running Quicken X times.
- Now choose how many backup data files you would like to save.
Restore an Automatic Backup:
- Choose File > Backup and Restore > Restore from Backup file .
- Choose Restore from automatic backups
- Select the file to restore.
- Now click Restore Backup.
- You will be given the option to overwrite the file you have open.
- If you want to create a copy, First you select a location and give the unique file name. The filename is must be unique because many files in the system have the same name and it creates confusion. After selecting a name and selecting the location, click Save, then Yes to open the restored file.
- If you want to restore the file over the current file, you overwrite the file and click save.
Step 5: Backup Using Dropbox.
Conclusion:
Wrapping this all! We have discussed above how to Backup or restore Quicken data? Thus we hope this article will help you. If you want to know more so visit our Quicken Support page. If you liked this article, share it with others and keep in touch.