Scheduling an automatic backup is one of the most effortless ways to prevent your data from any sudden loss. But sometimes, unfortunately, your QuickBooks scheduled backup not working, or you are getting some “Error messages”. If you are also facing the same problem, and don’t know how to deal with this error, then this article will help you resolve your problem. Here, first, we will discuss what are the main causes of QuickBook’s scheduled Backup not working and then talk about the different methods to resolve this problem. If you want help from our QuickBooks ProAdvisor, then call us on +1-844-405-0904
Automatic Data backup allows users to automate the backup of company files and other company-related data to prevent accidental loss.
Under this functionality inQuickBooks, you can schedule your backup like, at what time or what date your data will be backup according you.
Main Reasons That Cause “QuickBooks Scheduled Backup not Working” Error
- QuickBooks is set to run for a different version of Windows, For instance: you are using Windows 10, and QB is configured for Windows XP or any version of windows.
- You are using an outdated QuickBooks Desktop application, this is also one of the major problems for this error.
- Maybe it happens because of the improper setup of scheduled backups in Qb.
- Any damage in the QuickBooks company file or data also leads to errors in scheduling automatic backups in QuickBooks.
Solutions to resolve the “QuickBooks Scheduled Backup not working” problem
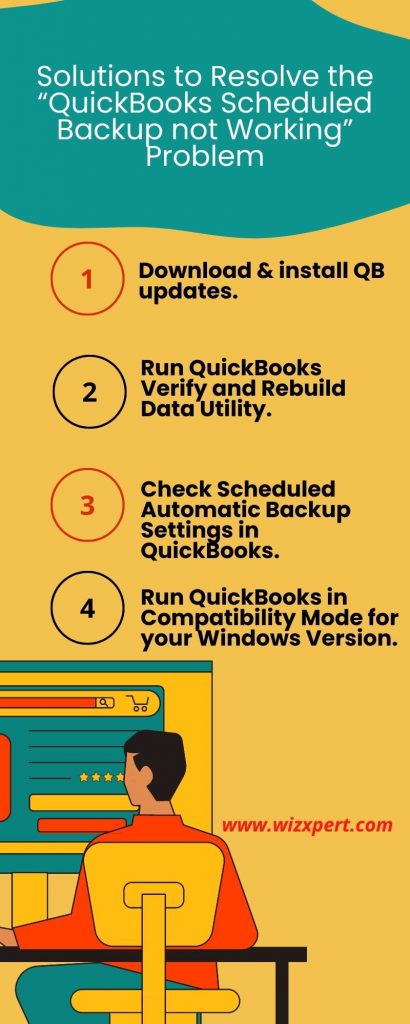
Solution 1: Download and Install QuickBooks Updates
At very first, download and install a new update of QuickBooks Desktop
Solution 2: Run QuickBooks Verify and Rebuild Data Utility
It is an inbuilt QuickBooks tool that checks the integrity of company files and data that are saved in the QuickBooks while running this tool if any damage occurs, it automatically repairs that damage.
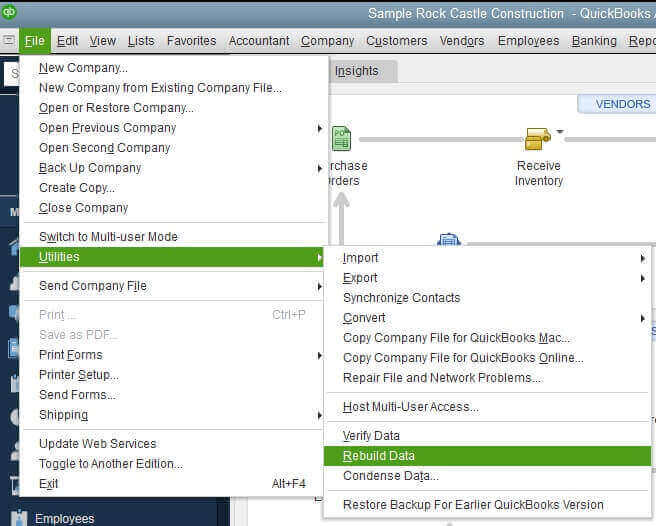
How to run QuickBooks Verify and Rebuild Data Utility
- Open QB Desktop, under the file tab< Select Utilities< Choose to verify Data option.
- Next, select this option, QB scan all the company files and data, and try to fetch out damage.
- After scanning is completed, If QuickBooks displays “Your Data has Lost Integrity” then close this message, again click on the file tab.
- Select Utilities and this time, under the utility section, choose Rebuild Data.
- Now click on the backup company data popup window and get a backup of your data on your desktop, Click OK
- Now, the QB Rebuild Data tool will repair all the damage in your company file.
- Once you got the “Rebuild has Completed” message on your screen then click OK and then try to schedule the automatic backups once again.
Solution 3: Check Scheduled Automatic Backup Settings in QuickBooks
- Open QuickBooks, choose the File menu and pick Save Copy or Back Up.by clicking the Save Copy or Backup window opens.
- Select Backup Copy and agree on Next.
- If you haven’t already set your backup defaults, then click on Options to set your backup defaults (where you want to keep your local backup), and then click on Next.
- Select Change Location or Use this location(as your choice), Click on Next.
- Now, click on the several options save it now and schedule future backups, or only schedule future backups and click Next..
- Select the Save backup copy automatically when I close my company files every [number] times box. Enter the number in the [number] field. And click on Finish.
Solution 4: Run QuickBooks in Compatibility Mode for your Windows Version
- Open your computer, right-click on the QuickBooks icon on your desktop and click on properties
- Search for the Compatibility tab and check the “Run this program in compatibility mode for” option.
- By clicking the drop-down list, select your Windows version.
- Simply, click on apply and then hit OK.
- Now, check your problem, hopefully, it is not there.
NOTE: To check the version of your Windows, press Windows + R at the same time on your keyboard, type winver command in the Run box, and press Enter. This will show a popup with your windows version-related information.
After all the above solutions, if QuickBooks’ automatic backup is still not working then you might need to reinstall the QuickBooks Desktop application using the QuickBooks Clean Install Tool.
Frequently Asked Questions
What’s the main reason for failing QuickBooks Backup?
The main reason for this error is the unavailability of the storage device that stores the backup file. Sometimes setting up a wrong backup path can also create a QuickBooks backup failed error for the user.
Is QuickBooks backup online?
Yes, QuickBooks Online Backup is a service that allows you to automatically back up your important files to secure, remote locations using the Internet. You can easily regain your data from any computer with the help of an internet connection.
Where is the QuickBooks backup file located?
The location of the QuickBooks backup file is:C:\Users\Public\Documents\Intuit\QuickBooks\Company Files
How can I change the default backup location in QuickBooks?
- Go to the File Menu< select Backup data.
- Specify the backup location here:
- If you want a backup in the default folder on your hard drive, select Default Location.
- If you want a backup in any other folder or removable disk, select an alternate location and enter the path or you can directly browse to the backup location
Hope, that after getting several solutions to the “QuickBooks scheduled backup not working” error, now you absolutely get rid of your problem. Might be some users are still disappointed with the same problem, so don,t worry just pick up your cell phone and dial our toll-free +1-844-405-0904. Our support experts are just a call away from you or you can also contact directly to our certified ProAdvisors for any instant assistance.