Tracking the inventory has always been a tiresome task until QuickBooks did not provide the inventory tracking feature. But this feature is disabled by default. So, we have an article where you will learn how to enable, add, edit and create the QuickBooks inventory tracking feature. Also, read the features of QuickBooks inventory, so you’ll understand better why it is needed. For expert support, contact our QuickBooks ProAdvisor by dialing our toll-free number +1-844-405-0904.
Tracking and maintaining inventory is a really hard nut to crack, but crucial thing is to assure that you have sufficient stocks to make your customers satisfied. QuickBooks Desktop Pro, QuickBooks Desktop Premier, and QuickBooks Desktop Enterprise editions provide QuickBooks inventory tracking, but this feature is disabled by default.
If you enable and use the inventory tracking function, then you are not only limited to managing inventory, but also you can get alerts at the time of reordering and creating purchase orders.
To enable, add, edit, and create a QuickBooks inventory tracking, the tutorial is simple and you’ll be adding products or services almost instantly. QuickBooks allows you to track 4 types of items. It offers to enable, add, edit, and create QuickBooks Inventory Tracking.
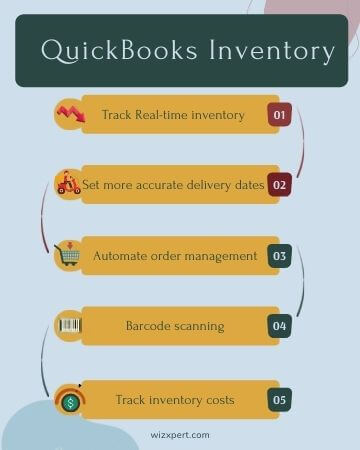
Features of QuickBooks Inventory
- With custom images, it’s easy to see your inventory at a glance.
- It creates organized product lists that help you to find exactly what you’re looking for and finish your reporting faster.
- Whenever you purchase and sell products, your inventory quantities get automatically updated making it easy to see what’s selling and what you need to reorder.
- An inventory tracking provides real-time inventory valuation to keep all your financial statements up to date.
- It also helps you stay on top of your purchase orders.
- You can keep track of every order from each of your vendors and see contact information for your vendors in one place.
- QuickBooks integrates with the tools you’re already using to track sales and expenses and makes managing your business even easier.
Types of Inventory Items to Track
- Inventories items- These are the items that you purchase or sell and keep a track record of.
- Non-inventories items- These are the item that you purchase or sell but don’t track their record for example nuts and bolts used in the installation.
- Services- These are the services that you provide to customers.
- Budget – This is a collection of products or services that you sell together.
Enable QuickBooks Inventory Tracking
Now we will discuss how to track inventory in QuickBooks. To enable inventory tracking you have two options either you can turn on inventory tracking with quantity on hand, or you can import your products and services with an excel file. Follow the all steps to enable QuickBooks Inventory.
Enable inventory tracking by quantity on hand.
- On the select the Gear icon.
- Go to your company and select Account and Settings.
- Select Sales in the left sidebar.
- Select the pencil icon next to the Product and Services.
- Tick both options Track quantity and price rate and Track inventory quantity on hand.
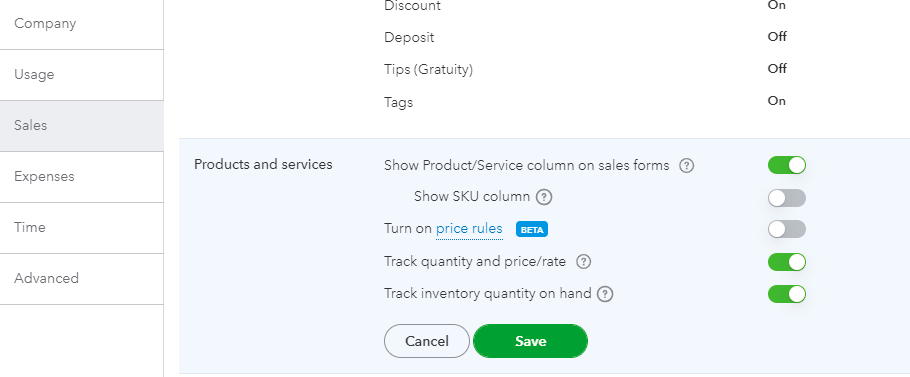
- This leads to enabling the new item type called inventory item when selecting New under Products and Services.
- Click Save and then Done.
After you have turned the inventory, now create your inventory tracking by selecting your product type.
Create Inventory Items
Inventory items and other products and services you sold can be recoded into QuickBooks. It allows you to add them as line items to sales forms. The complete process is given below:
- Go to the toolbar and select the Gear icon.
- Go to Lists and select Products and Services.
- Choose New.
- Select Inventory as the type.
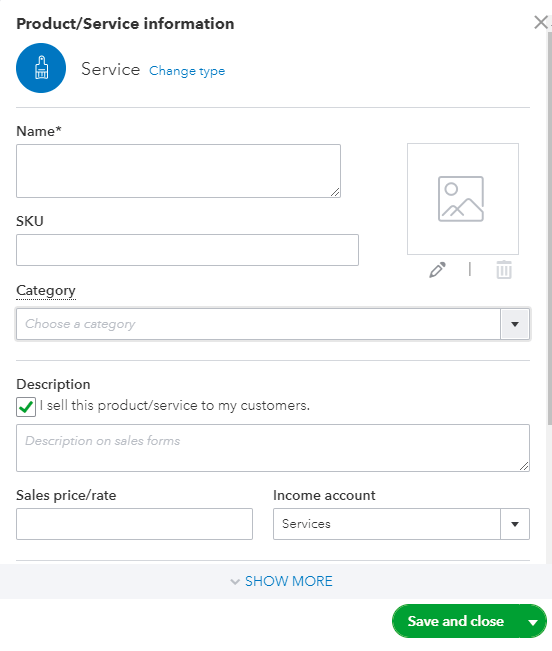
Fill in the information on the product and service window
- Enter the name of the product or the service.
- Upload(this is optional) an image and enter SKU. Do not use an airy form template for SKU.
- Add a category in the Category dropdown.
- Enter the Initial quality on hand.
- Enter the date( you start to track the quantity of the inventory items on hand) in the as of date field.
- In the Reorder point field, enter the minimum quantity of the inventory item you have in your stock(optional).
- Go to the Inventory asset drop-down, choose or add an asset account.
- Complete the following optional field – sales information, sales price/rate, and purchasing information.
- Go to the Income account fields and select Sales of product income.
- Select the cost of goods sold in the expense account field.
- Select Save and close.
Continue the process until all the appropriate products have been marked for the process of inventory tracking.
Add Inventory Items to Products and Services
This page helps you to see all your products and services with the available quantities, costs, selling prices, and more. To move forward for the page:
- Select Gear icon and click Product and services.
- Click New.
- Click Non-inventory or Service.
- Add a name. Enter an SKU for the product if you track SKUs.
- Choose the category that best describes your product or service, from the Category dropdown.
- Click I sell this product/service to my customers checkbox. Leave it unchecked if you don’t sell the items.
- Enter the description in the Sales information section. It will visible to the customer on the sales form.
- Enter the amount in the Sales price/rate section. Leave the field blank if you charge variable rates for services.
- Click the Income account dropdown and the account you want to use to track the sale.
Tip: QuickBooks set up an income account, you can also use it. If you want to add a new account, scroll to the top of the dropdown and click +Add new.
- If you want to track sales tax, click Taxable- standard rate from the Sales tax category dropdown. Click Choose a special category and find the best option if the item has a special tax rate.
- Click Save and Close, once you are done.
Edit Products and Services
In QuickBooks, you can edit Products and services as an individual or a group. To edit you can follow the steps-
Edit Individually
Follow the steps to edit the products and services individually.
- Click Settings and click Product and Services.
- Find the product or services you want to edit.
- Click Edit under the Action column.
- Make the changes.
- Once you are done, click Save and close.
Edit by Batch
- You can edit multiple products, by placing a checkmark in the box next to the items and choosing the appropriate option at the top.
- You can also assign different categories, make the items inactive, or change the type (non-inventory item or service).
Inventory Method of QuickBooks Desktop
- Invoicing progress– QuickBooks desktop offers the ability to create an invoice based on percentage estimates, invoices, and what you have invoices so far.
- Purchase orders- You can partially receive purchase orders on the QuickBooks desktop.
- Receipt of items- In QuickBooks Desktop, you can use the item receipt to receive the inventory and convert the item receipt to accounts payable when needed.
- Fixed % Price Levels- This feature of the QuickBooks desktop allows you to create different levels of pricing.
- Manufacturer’s Part Number (MPN)- This feature helps you to also put the part number from the manufacturer or vendor to use as a reference in purchase orders.
- Custom Fields- you can add up to 5 custom fields on each item that allows you to record information.
- Item Groups- It also allows you to sell “kits” of multiple items that are sold together as a package.
Inventory Method of QuickBooks Online
- Sales Orders- QuickBooks Online allows you to enter sales without affecting inventory.
- Max Reorder Point- You can also track the maximum quantities you would like to have per item to use as a guide to reorder in the future.
- Multiple Units Measure- You can track inventory in more than one unit of measure in QuickBooks Online.
- Item-Level Price Levels- You can set up multiple price tables for all items that allow the users to easily choose the appropriate price.
- Inventory Assemblies- It helps in manufacturing multiple inventory parts and other raw materials into one single new item.
- Inventory Center- it provides a fully functional screen like a customer center or vendor center that allows you to see all related transactions and attributes.
- Sales Order Fulfillment Worksheet- QuickBooks Online provides a great tool that oversees all open sales orders, indicating which ones are partially fulfillable or fully fulfillable.
We hope the steps discussed above help you to understand how to edit quantity on hand, reorder quantity, and make multiple items inactive. But if in case, if you are still unable to perform these steps or get any issues while performing the steps, then you can directly contact our QuickBooks Pro-Advisors team by dialing our toll-free +1-844-405-0904. Wizxpert experts team is always available to provide relevant and reliable solutions for all kinds of QuickBooks related issues.