As you know that there is a billable expense feature in Quickbooks Online Plus and QuickBooks Online Essentials, you can keep track of billable time by the job. With the help of this feature, you also can Set up jobs as sub-customers to keep all your billable expenses organized. Read this article to learn the steps to enter billable time by a job in QBO. The article provides you with the solutions in steps so that you may troubleshoot them on your own. For any assistance or help contact us toll-free: +1-844-405-0904
Steps To Enter Billable Time By Job In QuickBooks Online
1. Add a Sub-Customer
- From the left menu, Go to Get paid and pay or you can go to Sales.
- Then from the top of the page Click on Customers.
- Now Choose a New customer.
- After that, you have to Enter all the appropriate information for the sub-customer that you want to add.
- Click on the Is sub-customer checkbox.
- Now select the parent customer from the Enter parent customer drop-down.
- Then Choose Bill with Parent.
- Select Save.
When you finish the setup for the Customers page, it would look something like this:
- Jane Doe
- Jane Doe: Brochures
- Jane Doe: Letterhead
After applying this to set up your job/project as a sub-customer, now you must have to turn on some settings.
2. Turn On Billable Time
For directly billing your customer from tracked time, you have to turn on billable time.
- Go to the Gear icon ⚙ at the top of the page and select Account and Settings.
- Now you have to select the Time tab.
- After selecting the time tab you have to click on Edit from the Timesheet section.
- The next step is to turn on the setting of Allow time to be billable.
- Now click on the Edit Icon In the Time tracking section.
- (Optional) Choose Show billing rate to users entering time. You have to pay your employee and subcontractors if you bill customers a different hourly rate and you may want to leave this blank.
- After doing all the steps you have to select Save and then Done.
3. Enter or Record Time as Billable
You will able to enter billable time through the Single Activity Time Sheet and the Weekly Time Sheet. You just need to go through the given steps:
- Firstly, go to Payroll and then select Time.
- Select Add Time and choose the user for which you are adding time.
- Now from the drop-down you can adjust the date range by choosing This week, Last week, or Custom and select the day for which you are going to enter time.
- Now you can turn on the Start/end times to add the duration of hours worked.
- The next step is to Select Add work details and then choose your customer and or project from the Customer/Project drop-down.
- After choosing a project you have to turn on the Billable (/hr) for making the timesheet billable.
- You can now add notes accordingly and then select the Done button.
- In case you want to add more timesheets then select Add and repeat the steps that are given.
- If you are done then select Save & Close.
Add billable time to invoice
Once you have entered time, marked them as Billable, and entered the customer’s (that is, sub-customers) name, you will see all billable time ready to be included when you create invoices.
I hope this will help you to enter billable time by a job in QuickBooks Online Plus or Essentials. If you want more discussion on this topic, you can contact our toll-free QuickBooks support number +1-844-405-0904 and talk to a Certified ProAdvisor today.
How To Turn On & Setup Time Tracking
With QuickBooks Online Essentials, QuickBooks Online Plus, and QuickBooks Online Advanced, you can track and bill customers on your time. Use the Time tracking feature to assign a particular activity to a project or customer and select whether to bill your customers for the activity.
Time Details
Based on the rates you specify and whether or not the time is billable, time detail will automatically appear on customer invoices. The number of detail will automatically appear on customer invoices. The number of details on the invoice is up to you.
You can include:
- Employee’s name
- Hourly rate charged
- Number of hours billed
You can customize the invoice to show the following:
- Text from the description field on the timesheet
- The name of the standard service you are using
- The Custom text that you specify for time tracking charges
How to Turn On Time Tracking
Following some steps:
- Click on the Gear icon on the Toolbar.
- Under your company, select Account, and settings (or Company settings).
- Choose the Time tracking section.
- Set your time tracking preferences.
- Click on Save, then Done.
How to Add a Time Tracking User
Following are some steps:
- Click on the Gear Icon on the Toolbar.
- Under your company, select manage Users.
- Select Add user.
- Choose Time tracking only.
- Click on the Next.
- Select which employee or vendor you want to add as a Time Tracking Only user and enter their contact information.
- Save.
Steps to Entering a Single-Time Activity
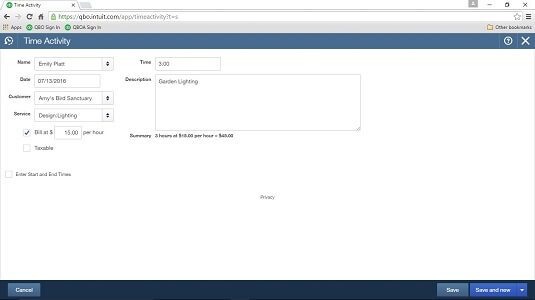
Initiate the Time Activity window, and go to the Create plus (+) sign list at the head of the QBO. follow these steps:
- Go to the Create plus (+) icon to begin the Create menu.
- Under the Employees column, choose Single Time Activity. It will display the Time Activity window.
- Choose the employee or vendor who conducted the work from the Name list.
- Insert the date, when the work was finished.
- Choose the customer for whom the work was done, from the Customer list
- choose the service that was performed, from the Service list,
- Put a check in the billable box that will change to the Bill at the box, and supply at an hourly rate.
- Put a check in the Taxable box, if the work performed is subject to tax.
- Insert the amount of time spent on this activity in the Time box. By checking the Enter Start and End Times boxes, you can enter the start and end time, including any break time, QBO determines the time spent and show it below the information/description box.
- On an invoice, by default, Insert the description of the work that appears. You can modify the items after adding the time entry to the invoice.
- Go to Save and click on it to save the entry or select Save and New if you want to enter additional or new time activity.
Steps to Record Time Using a Timesheet
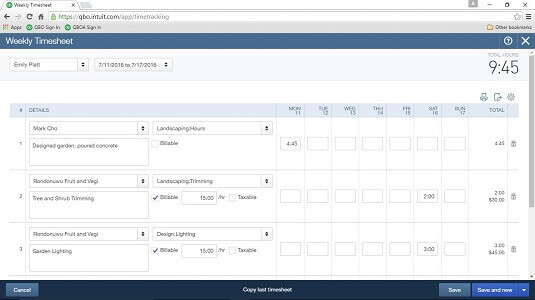
If you want to insert times in a grid form that represents the days and dates of a week, then the weekly timesheet is for the best option for you. Follow these steps to enter the time using a timesheet.
- Go to the Create plus (+) icon to begin the Create menu.
- Select the Weekly Timesheet under the Employees column.
- Choose the name of the person whose time you are recording.
- Choose the week that you require to record time.
- Choose a customer name, and a service item in the details part, and if relevant, supply a classification.
- To give back time to a customer, choose the billable checkbox, and provide the rate at which time to charge.
- Enter the accurate time worked on the appropriate day.
- Choose Save and later click on New, or choose the arrow alongside Save and New and choose Save and Close.
How To Add a Billable Expense to an Invoice
You can add billable time entries to an invoice in some ways. For example, if you see a customer’s page, QBO shows a list of unusual transactions. In the billable time entry action column, QBO shows a start invoice button that you can click on to initiate an invoice to the customer and add billable expenses to your invoice. If you want to see the customer’s page, Choose the Customer in the Navigation bar, and later select the customer’s name.
But you do not need to go watching/tracking for bill time entries. QBO inspires you to add customers you create to customers for whom billable time entries exist. Start an invoice- Go to the Create menu, later choose the plus sign, and select Invoice) and choose a customer. If the customer has bill time entries, they will show you in the right-hand pane of the screen.
Choose the Add button in every billable time entry that you need to add to the invoice. Or if you want to add all entries, choose the Add All button at the top of the right-hand pane. QBO fills in the information, service, description, quantity, rate, and the total amount of each billable time entry on a line on the invoice. You can also update/edit any information on the line as required. Fill in the rest of the invoice as you can add any other invoice, adding other lines that may not be related to time entries.
Hope, you will find this article helpful and now you are able to enter billable time by the job in QuickBooks Online. But if you still have any query or issue, then feel free to contact our Intuit-certified ProAdvisor by dialing our toll-free +1-844-405-0904 and get an instant solution.
Thanks for visiting Wizxpert. You are always welcome here anytime soon.