In QuickBooks Desktop, you can create checks which are written orders for the bank to pay the mentioned amount on the check to the person depositing the check. In this article, we learn to create, modify, and print checks in QuickBooks Desktop. Here you may go through the format of the check attached in the article to let you understand it in a realistic way. The article guides you with the process and several terms with definitions as well, that will enhance your learning. If you have any queries, contact our QuickBooks ProAdvisor through toll-free no:+1-844-405-0904
Write Checks
Regular Checks
You can write regular checks in QuickBooks Desktop if you want to pay for the inventory & non-inventory items, fixed assets, services, other charges, and expenses you track. If you want to put money in the petty cash account or pay for the credit card dues then you can use these check forms as well. To start writing a new check, first, go to the top menu bar and then select the Banking menu and then click on the Write Checks option.
After the Write Checks window will open, follow the instructions mentioned below carefully to fill all the required fields correctly.
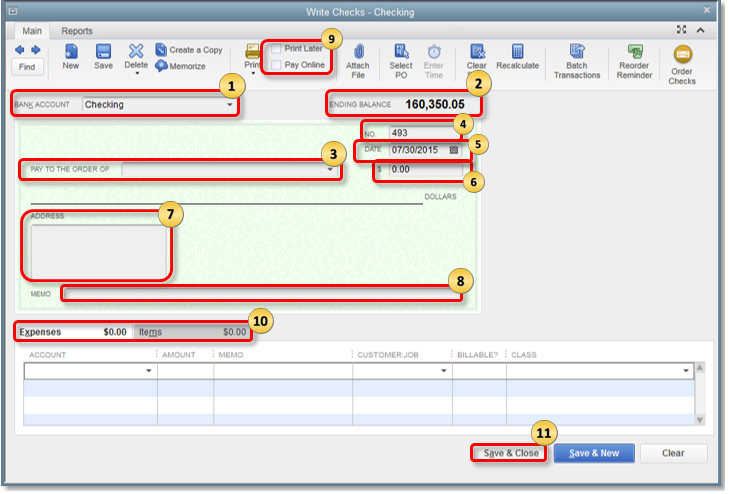
- Bank Account: Here, you need to choose the account from which you wish the money to be deducted.
- Ending Balance: Here, you will be able to see the balance of the account you selected on the given day when you are writing the check.
- Pay to the Order of: Here, enter the name of the person to whom you want to issue the check or the name of the payee.
- Number: This number is based on the check number preference you set in QuickBooks.
- Date: Here, enter the date at which you are issuing the check.
- Amount: In the $ field, you need to enter the amount in numbers. The amount in words will be automatically filled in the below Pay to the Order of box.
- Address: The address field will be filled automatically depending on the information you filled in the Payee setup.
- Memo: Memo field is not mandatory, you can leave it blank if you want. You can use it for additional information like account number, what is the payment for, time period, etc.
- Print Later or Print Online: If you want to print the check later then checkmark the box saying Print Later or if you want to use the online payment process then select Pay Online.
- Expense or Item tab:
- In the Expense tab, you can enter information like shipping charges, if you have payments due for liabilities or loans, and miscellaneous expenses that are not related to QuickBooks.
- Go to the item tab and then click on the drop-down menu to select the appropriate item.
- Once all the required fields are filled, click on the Save and Close button at the bottom of the screen.
Other Check Forms
Below mentioned are the other type of check forms that you can create with the help of QuickBooks Desktop.
- Bill Payment Checks: If you want to create Bill Payment Check then select the Pay Bills option in the QuickBooks Desktop.
- Sales Tax Checks: These are the checks that are created for paying the sales tax liabilities.
- Paycheck: If you want to make payment of an employee’s salary or wages via checks then you should create a paycheck.
- Payroll Liabilities Check: These checks are used for paying the payroll taxes that you have deducted from the employee’s salary or whatever your company owes as a result of your payroll. This could include deductions like Unions dues, Health Insurance contributions, 401(K) contributions, and Child Support Garnishments.
Delete or Void a Check
Before you start deleting or voiding checks in QuickBooks Desktop, it is important to understand the difference between both.
- Void a check: When you void a check-in QuickBooks Desktop it only changes the amount to $0.00. In the Memo field, the VOID message is saved. Also, when you void a check, the record of the transaction is kept saved in QuickBooks. You can re-enter it later if you want to. You can also unvoid a check if you want.
- Delete a check: If you want to remove the complete record of the check then you should delete it. If you delete a check then there will be no trace left behind of the transaction. You can’t undo this but you can re-enter the check.
Void a Written Check
- From the top menu bar click on the Banking menu and select the Use Register option.
- Click on the Account drop-down menu and then select the account to which you have written the check.
- Select the Check in the Bank register.
- After that, click on the QuickBooks Edit menu and select the Void Check option.
- Review all the fields, if everything seems correct, click on the Record button.
Void a Blank Check
- First of all, you need to create a check with a $0.00 amount.
- Then, go to the Expenses section and assign an account to the check and enter the name of the Payee.
- Once you filled in all the required information, click on Edit, and then select the Void Check option.
Delete a Check
- From the top menu bar, click on the Banking menu and select the Use Register option.
- Then, click on the Account drop-down menu and select the account to which you have written the check.
- Next, select the check in the Bank Register menu.
- After that, go to the QuickBooks Edit menu and then select the Delete Check option.
- If all the required fields are correctly filled then click on the Record option.
Print Checks: One at a Time or in a Batch
If you want then you can either print one check or more than one in a batch in QuickBooks Desktop.
NOTE: If you are printing checks using the QuickBooks Desktop then make sure that the account number should be preprinted on the forms. QB Desktop only fills in the payment information. You can’t use blank checks or plain papers for printing checks in QuickBooks. You can order preprinted checks from the official Intuit website.
To print one check at a time
- From the top menu bar, click on the Banking menu and then select the Write Checks option.
- Here, find the check or create a check if you haven’t created one yet to print the check.
- Enter the check number in the First Check Number field, if required, and then select the Print option.
- After that, select the appropriate check style (Standard, Voucher, & Style) and also make sure that the correct printer is displayed. Then, select Print.
To print multiple checks in batch
- From the top menu bar, click on the Banking menu and then select the Write Checks option.
- In the Write Checks window, select the checkbox stating the Print later option right next to the print icon and then close the window.
- After that, click on the File and then select the Print Forms option. You can either choose Check or Paycheck, whichever is appropriate.
- Then, select the Bank Account.
- You need to select the checks that you want to print, to do this click on the box right next to check.
- In the First Check Number field, enter the check number and then select OK.
- After that, select the appropriate check style (Standard, Voucher, & Style) and also make sure that the correct printer is displayed. Then, select Print.
On the Print Checks windows
- Here, you need to select the Printer Name and Printer Type as well.
- Then, choose the appropriate check style.
- Uncheck the box stating the Print company name and address if both are already printed on the preprinted checks that you have bought from Intuit.
- At last, review all the settings to make sure they are correct.
- And then click on Print.
NOTE: Since QuickBooks can’t MICR fonts on the checks but if you want to print MICR (Magnetic Ink Character Resolution) font on the checks then you need to download third-party software that you need to download from Intuit Marketplace.
Other Useful Resources:
- How to Connect or Import American Express Business Account to QuickBooks Online
- 5 Secure Online Payment Security Methods
- Quicken vs QuickBooks (Difference Between Quicken And QuickBooks)
Print the Check Register
- From the top menu bar click on the Edit menu and then select the Use Register option.
- Click on the Account drop-down menu and then select the appropriate account and then select OK.
- At the top of the register, click on the Print icon.
- Then, choose a date range for printing. NOTE: If you are willing to print the split details then you need to put a checkmark in the box stating Print Splits Details
- Select OK and then select Print.
Create a User Role to Write Checks without showing Confidential Information
When you are setting up user roles to write checks then QuickBooks needs access to the user’s bank account. It is important to set up a user role because if you are using QB Enterprise then you don’t want a user to access confidential information like payroll transactions in the bank register. By setting up a role for users you can set a restriction on the number of bank accounts from which users can write a check or view it. Follow the steps mentioned below to set up users and roles in the QuickBooks Desktop.
First of all, you need to create a sub-account of the main checking account. For this,
- First, go to the Lists menu and then select the Chart of Accounts option.
- When the Chart of Accounts window opens, right-click anywhere on it and then select the New option.
- In the Account Type option, you need to select the Bank and then continue.
- After that, go to the Account Name field and here you need to type an appropriate name so you can differentiate it from other accounts. For example, A/P Check Register.
- Then, checkmark the box stating Sub-account of and then select the account that you wish to draw funds for the transactions.
- Once all the required fields are correctly entered, click on the Save & Close button.
Once the sub-account is created you need to assign a role to the user. For this,
- First, you need to sign in to QuickBooks software with administrative credentials.
- Go to the menu bar at the top and select the Company>Users>Set Up Users and Roles option.
- After that, click on the Role List tab.
- Here, you can either create a new role or duplicate a role that you have previously created to copy the access needed for the user.
- To modify the roles,
- Click on the ‘+’ icon next to banking.
- Then, select Allow Full access to create checks option.
- In the Banking section, click on the ‘+’ icon in front of the Bank Register option.
- Then again, click on the ‘+’ sign right next to the main checking account.
- After that, select the newly created sub-account and then allow the View and Print access.
- If required, you can also modify the role for access to other tasks as well.
You can also use this method if you want to keep payroll information and other sensitive information safe. You just need to create a sub-account to store the confidential information and only allow those users to access this information who need to access it. You can also give access to primary accounts to some users and they won’t be able to access the sensitive information of the sub-accounts.
Common Printing Issues and How to Fix?
Check Number is always the same
Sometimes when you create a check, QuickBooks shows the check number is the same, and even when you are writing a different check number every time you create a check. The reason behind this error could be the damaged Check Number queue that needed to be repaired. The queue consists of the next check numbers. You can fix this issue with the help of any of the following troubleshooting methods.
- First, you can repair the damaged QuickBooks company files.
- Again try to write a check, if the number is still not correct then modify the check and enter the correct number.
Class Field missing from the Check Register and Write Checks windows
When you write checks there is an option to add class information. Sometimes in the Check Register and Write Checks windows this option is not available. Due to this, checks and deposits do not have any source class. Although, if you want to add a target class then you can do this from the Splits option at the bottom left corner of the Check Register window.
Sometimes, when you open the class fields and the register, you won’t able to see the Restore or Record button. To fix this, close the window and then reopen it again by holding the Shift key at the same time. If this doesn’t work then also check the font DPI settings and the screen resolution of your system. You may need to optimize both of them to display QuickBooks properly.
Follow the instructions below to fix this issue.
- First, we need to make sure that the Class Tracking feature is enabled. For this,
- From the top menu bar, click on the Edit menu and then select the Preferences option.
- Here, select the Accounting preferences option.
- After that go to the Company Preferences tab.
- Make sure to checkmark the Class Tracking box here.
- At last, click on OK and close the preferences tab.
- Open the Register and from the bottom left corner of the screen, select the Splits button.
- By doing so, the option to add a class will be included.
Follow the instructions mentioned below, if you are not using the Windows recommended default fonts.
- Open Windows personalization settings and change the display settings to Smaller – 100% (Default).
- After that, open QuickBooks, and from the top menu bar, click on the Banking menu.
- In the next window, select the Write Checks option and go to Vendors<Enter Bills.
- Next, open a blank transaction, and under the Items and Expenses tab, you need to adjust the column so it becomes very narrow.
- Once done, click on the Save & Close option.
- Again, open Windows personalization settings and change the display settings to Medium – 125%.
- If required, you need to adjust the check and bill entry form column until they are not fixed.
The Bottom Line
We hope you found our article on how to create, modify, and print checks in QuickBooks Desktop resourceful and valuable. In addition to this, we have also shown how to delete or void a check in QuickBooks Desktop. From here, you will also learn to print one check at a time and print more than one check-in batch.
If you still have any issues related to the printing checks in QuickBooks or any other queries related to the QuickBooks accounting software then you can have assistance from our team of Intuit Certified QuickBooks ProAdvisors. The only thing you need to do is to call us at our 24/7 toll-free support number +1-844-405-0904 and our experts will solve your problems instantly.