In this blog, we’ll tell you how to void a check in QuickBooks Desktop as well as QBO. It will be helpful in canceling the incorrectly issued check and retrieving the amount that was deducted from the bank account. The article here is with different methods that allow you to easily void a check, in QBD &QBO, along with the tips and notes of important points. So, read the full article to get your query resolved, and stay with us to learn more. For any query or help contact our QuickBooks ProAdvisor toll-free: +1-844-405-0904
There are few conditions where you might need to void a check in QuickBooks.
For example, when paying your clients, vendors, and colleagues while computing QuickBooks. It is quite common that you have mistakenly issued a check to the wrong person or entered the wrong amount of funds in a check.
You issued a check and then later realized that it could bounce because the amount that was mentioned in the check was more than your current bank balance. This will definitely affect your business negatively.
Table of Contents
What is a void check?
The void check simply means that the amount on the check changes to zero. All the other details like a check number, the payee’s name, and the issue date of the check remain intact in the registry but the check is tagged as a Voided transaction.
You can also easily unvoid check later if you want to.
When to Void a check in QuickBooks Desktop
You can void a check in QuickBooks Desktop if you are confronting the given situation:
- If the cheque is received by the wrong person.
- In case the cheque is misplaced or lost somewhere.
- If the date or the amount entered on the cheque is inaccurate or incorrect.
- Inaccurate work location entries on paychecks (tax jurisdiction)
- Checks for duplication are made.
Simple methods to void a check in QuickBooks
There are some different ways a check can be voided some of them are mentioned below with easy steps.
Follow the instructions mentioned below to void a check easily.
Void a check in QuickBooks
- Open the QuickBooks software and select ‘Banking’.
- Then, choose ‘Use Register’.
- Select the bank account that originally issued the check.
- Take a look at the list of check numbers/entry and then select the check that you want to void.
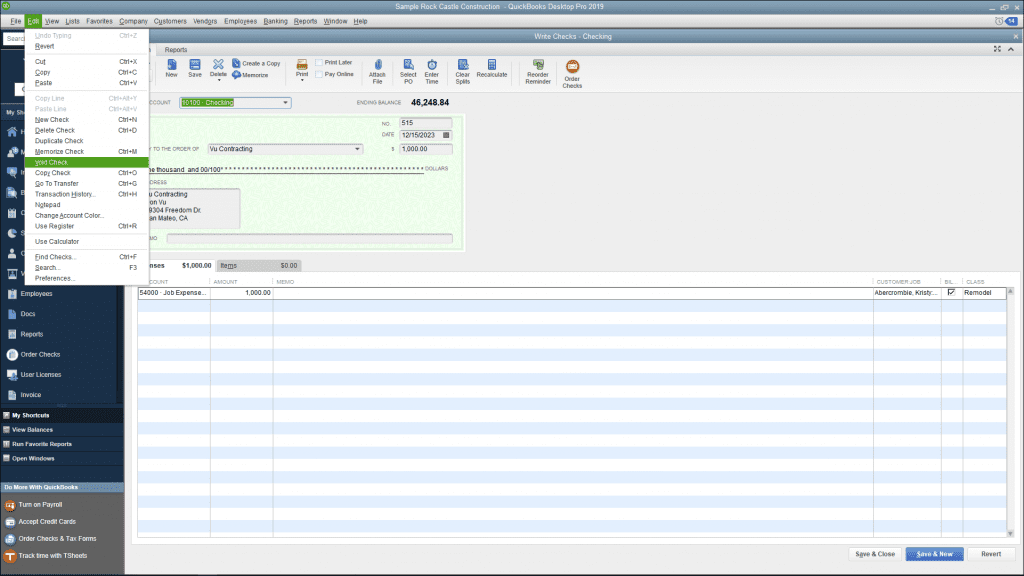
- Click ‘Edit’ then select ‘Void check’. After that, a message will appear asking you if you want to void the check using the current date then select ‘Yes’, or if you want to void the check using the date at which the check was originally issued select ‘No’. Choose whichever option is suitable for you.
- Select ‘Record’ to void the check.
Void a Payroll check in QuickBooks
- Select ‘Employees’ if you are computing through QuickBooks Payroll services and if you are using a Third-Party payroll service then click on its icon.
- Select the ‘Void Paychecks’ if you are using QuickBooks Software. Click on the down arrow next to the ‘Related Payrolls Activities’ and then ‘Void Paychecks’ if you are using a Third-Party payroll service.
- Fill in the dates in the ‘Show Paychecks From and Through’ field to specify the time period in which the check was issued.
- Now click on the ‘Tab’ to see the list of checks issued within that period.
- Select the paycheck you want to void and follow the instructions shown on the screen to complete the process.
- After completion, the funds on the check will change to ‘0.00’, and ‘Void’ will appear on the memo field.
- Select ‘Done’ when the process is completed.
Void a paper check in QuickBooks
- Select the ‘Banking’ and then the ‘Write Checks’ option.
- Select the account from which the check was issued under the expense section.
- Enter the check number and check issued date into their respective field from the paper check.
- Enter the Payee name into the ‘pay to the order of’ field.
- Fill the ‘0.00’ in the amount field.
- Select ‘edit’ and ‘void check’.
- Now a message will appear on the screen asking you to press ‘Yes’ if you want to void the check using the current date or you can also select ‘No’ if you want to void the check using the date when the check was issued.
- If you select ‘No’, then your company’s journal will not update but the check will show as voided.
- By selecting the ‘Record’ option your check will be voided.
Void a check in QuickBooks Desktop
- First, you need to open the check which you want to void in the ‘Write Check’ window.
- From the top of the menu bar select ‘Edit’ and then ‘Void check’.
- To proceed further choose ‘Save’ at the top of the Main tab of the Write Checks or select the ‘Save and Close’ option at the bottom right corner of the screen.
- A new window will pop up asking you how to proceed with voiding the check. Options will depend on the type of check and related transactions.
- After reading carefully select the option which is the best for you and finally void the check.
Easy steps to Void a check in QuickBooks Online
- Firstly, you need to open QuickBooks Online accounting software.
- Open the ‘Accounting’ tab from the top left.
- And then, select the ‘Chart of Accounts’ option from the top left.
- Choose the bank account that originally issued the check.
- Then, click on the ‘View register’.
- Find the check you want to void and then click on it to highlight the check.
- Select ‘Edit’ and then choose the ‘More’ option.
- Now at last select ‘Void’ and then later confirm the same by clicking on ‘Yes’.
How to void a check for bill payment in QuickBooks Desktop
1. Move to Check Register
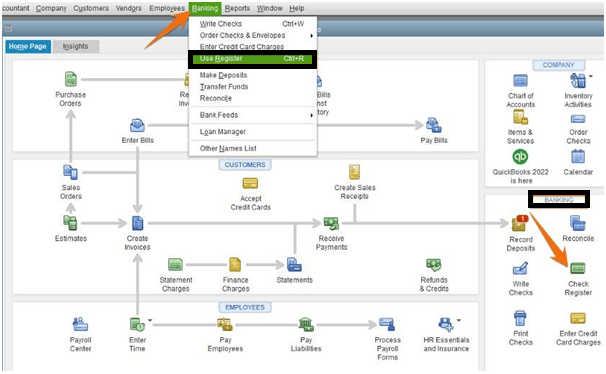
- First, open the QuickBooks Desktop and then go to the banking menu.
- Then select the Check register option.
- After that go to the Banking menu which is on the top of the menu list.
- Now select Use Register from the options in the banking menu list.
2. To Void Select Check
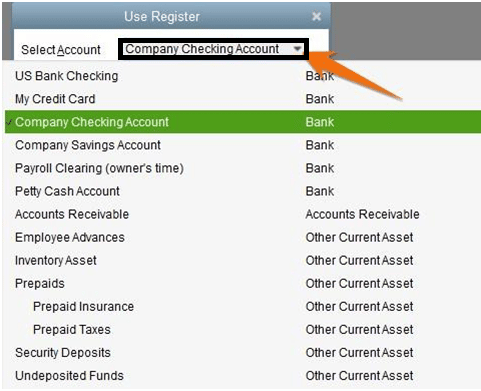
- Select the bank account from which you want to void the check. We’ll show you a company checking account as an example.
- From here you can choose any check that you want to void, just by double click on that. You can understand by the given example in point no.3.
3. Void the Check
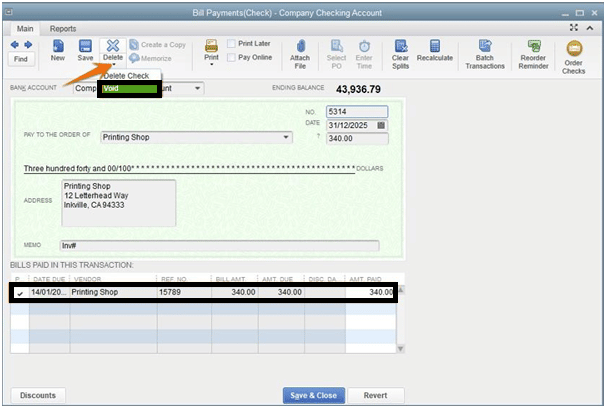
- Now your check shows up after choosing from the list.
- From here you can see the delete drop-down button and select the void option.
- After selecting the Void option the amount changes to zero which means the bill was opened again. The memo field also has “VOID” in it. Now click on Save and close to cancel the check.
- Now you can see the new message pop-up on the screen that asks “want to save your changes”. Click on Yes.
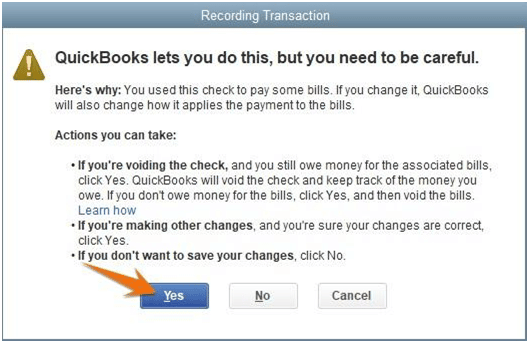
- Now if you need to reissue and reprint then move ahead.
How to Delete a Check in QuickBooks Online?
It is difficult to understand the process of voiding a check or deleting a check. If you void a check the reports remain in QBO software and it will not affect your accounts. But, if you delete a check then it will remove from the accounts.
Void a check: With this process, the check becomes Void, but it remains in your records. To balance your accounts, QuickBooks generates an adjusting entry when the transaction amount falls to zero.
Delete a Check: With this process, the check is deleted completely from your QuickBooks data. It appears that the check was never registered.
Follow the steps to delete a check in QuickBooks Online:
- Open QuickBooks then go to the menu that will be on the left side of the system display.
- Click on the worker’s option.
- Choose employees from the list.
- Select the paycheck list from the run payroll option.
- If you want to locate the check that you want to delete may adjust the date range.
- Choose the paycheck that you want to delete.
- Hit the delete button.
- After that review the confirmation box.
- Finally, complete the process by clicking on the delete paycheck option.
How to void a check that QuickBooks Online has already recorded?
If you want to get an accurate bookkeeping record then you need to Void your checks properly in QuickBooks Online. Deleting checks may put you in more difficulty to spot account fraud. So void check only if a duplicate entry was entered mistakenly.
Void a Check from the Check Page
- Select Expenses from bookkeeping, transactions, or expenses.
- Next, choose the filter.
- Now you must select Check in the Type column.
- After choosing the check’s receipt date range, click on Apply.
- Choose the check from the Expense Transactions list to open it on the Check screen.
- Now you have to click More from the pop-up menu before selecting Void.
- Select “Yes” when prompted to void the check.
Void check without opening Transaction
- Again start with selecting Expenses from Bookkeeping, Transactions, or Expenses.
- Now find the check you want to cancel in the transaction list.
- Go to the View/Edit drop-down in the Action Column and then select Void.
- Next, you’ll be asked to void the check then choose ‘Yes’.
Void a check that was previously recorded
- First, find the check that you want to void.
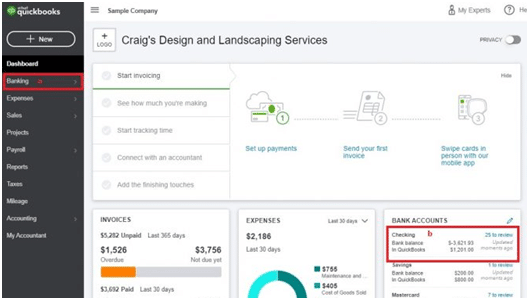
- Go to the dashboard and click on Check register.
- Now go to the left-hand side of the toolbar and then click on Banking.
- You can also click on the bank account on the right side of the screen.
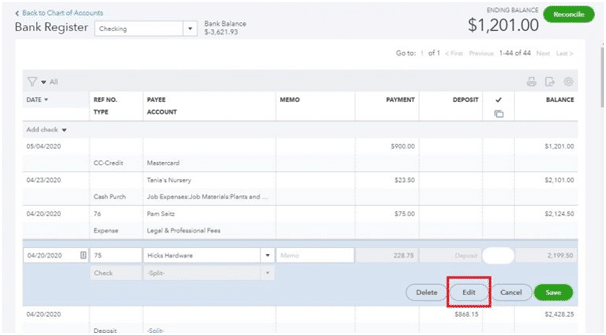
- Now search for the check and click on it. And then click on the edit button.
- Now you are on the next screen where you have to click on More and then click on Void.
- Next, if the prompt appears then click on yes. It says that the check was used to pay the bill.
- After clicking on Yes your payment or check is void. Now the bill is updated and shown on your AP records.
Void check that was not previously recorded
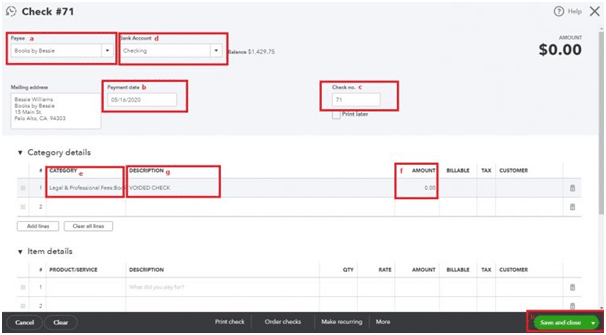
- First, go to the dashboard and select the New button, after that select Check under Vendors.
- Now you have to create the check by entering the check number, category, date of the check, correct bank account, and payee name. Then enter the amount as zero and mention it in the description box. After that click on Save and close.
After doing all the steps, you can review that the check is voided and the amount is Zero.
Frequently Asked Questions
How can I delete a check in QuickBooks?
If you want to delete a check instead of voiding it. Then, you need to select ‘Banking’ and then ‘Use Register’. After that select the ‘Bank account’ from which the check was issued and select the ‘Check number/entry’ of the check you want to delete. Finally, click on ‘Edit’ and then select ‘Delete’. ‘Record’ to delete the check.
How do I void a Blank check in QuickBooks?
For voiding a blank check go to ‘banking’ and then select ‘use register’. After that select the bank account to void a check and then create a check with 0.00 in the amount field enter the payee’s name and allocate any expenses field to it. In the end, select ‘Edit’ and then ‘Void check’. ‘Save and close’ to finalize.
What is the difference between voiding and deleting a check?
Voiding a check only changes the amount of the check to zero but keeps the details like vendor name, date, and check number of the transaction in the QuickBooks record, on the other hand, deleting a check will completely remove the transaction history.
How can I find Voided/Deleted transactions in QuickBooks?
You can find the voided/deleted checks or Invoices in the Reports>Accountant and Taxes>Voided/Deleted Transaction Summary.
Conclusion
If you want some advice related to financials, accounting, tax returns, etc then we have a team of accounting professionals who will provide you support and help you in growing your business.
You can get help from our QuickBooks ProAdvisor team through our 24/7 Toll-free number +1-844-405-0904.
