Looking for how to set up & use location and class tracking in QuickBooks? You are on the right page, here in this article we have provided you details of class tracking and steps to set up. Class tracking provides the standard account-based tracking in QuickBooks. If you are unaware of this term!! Below, we have discussed how we use Class and location tracking in QuickBooks. Go through the article to learn the setup steps, it contains the relevant images of the process flow. If you have a problem then contact our QuickBooks ProAdvisoe toll-free: +1-844-405-0904
Class tracking provides the standard account-based tracking in QuickBooks. QuickBooks offers a user-friendly method for setting up class tracking and running quickly. It helps with any other meaningful breakdown of your business. Classes support the business with different departments or locations by reporting account balances for each department.
If you want easier expenses or greater control over expense categorization, you use class tracking because there is a primary benefit of class tracking.
Class tracking in QuickBooks is an awesome feature. Class track of your income, and expenses by department, location, property, and project in QuickBooks. QuickBooks offers a user-friendly method for setting up class tracking and running quickly. It helps with any other meaningful breakdown of your business. You can manage or run reports of profit and loss statement, and even filter reports like accounts receivable and accounts payable reports by class.
For Example Class tracks the landscaping business with a maintenance and installation division separately.
Classes and location tracking are more effective. Sometimes we read Classes or location tracking on google or other sites one Question is always in mind how to use classes in QuickBooks online? How set up classes? What is Location Tracking and how to use it in Quickbooks?
Here we describe these things in a very simple way. And if you need to know which part of your business is bringing money or where a majority of your business income is coming from.
You use QuickBooks online turned on the features of classes and track the important information and make important decisions for your business it’s helpful for you.
Follow these steps to create classes in QuickBooks:
- First, load the main page of the QuickBooks application
- Now Enable the class tracking option in your company profile
- Now, select your class list from the menu bar, click the class list to set up class categories for your expenses and accounts.
- Click the arrow next to the class button at the bottom of the page.
- To create a new class click on “New”.
- In the class types, you create an account for a variety of expenses.
- Input the name associated with the class. If the class can be broken down further, put a check in the box next to Sub-Class and enter the information in its text fields.
You choose the expense input form when you enter the information associated with the class. Your all QuickBooks entry associated with the class.
Common Mistakes in Class tracking
- Classes can be useful for workarounds: Focus on the main work and assign the class of each transaction, because you work on many items on an account and you do not properly list them.
- Balance sheet by class: If you want to learn more about the balance sheet you search for the balance sheet report by class in QuickBooks, it gives detailed knowledge. The class report manages the QuickBooks balance sheet.
- Chart of accounts and classes: Classes are different from a chart of accounts. In business, one mistake mostly happened that using classes to track projects or events, because they are not sure where to track expenses.
- Use classes on posting transactions: Assigning a class to every posting transaction. For example, when you give the bill for any product or service of your customer using the invoice, the invoice is a posting transaction, and you assign the class for the invoice.
- Run a profit loss unclassified report: When you make the profit and loss reports assign the class before creating your reports. It’s a simple way and memorizes the class of profit and loss.
Other Useful Resources:
- QuickBooks Payroll Plan Pricing & Support (Review & Guide)
- How To Open A QBB File Without QuickBooks in Excel
- How to Cancel Direct Deposit in QuickBooks Payroll
Set up and work with class and location tracking in QuickBooks
Class tracking tracks the different reports at one time, you can use class orlocation tracking according to your business.
Turn on class tracking in settings:
For Windows:
- Firstly you have to open the company file.
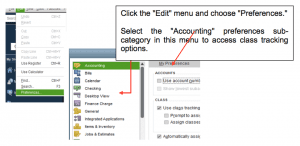
- After that, you have to click on the edit menu.
- Now you can see many options in which you have to select a preference.
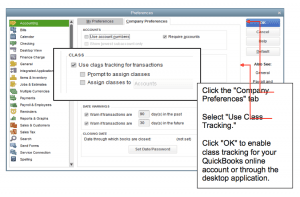
- After that you have to select Accounting here you have to click on the Company preference tab.
- After doing the above steps, you have to choose the checkbox of Use class tracking for transactions.
- If you didn’t assign a class then you can set a reminder, for this, you have to select the checkbox of Prompt to assign classes.
- After doing the aforementioned steps you have to click on OK.
For Mac
- Firstly you have to go to the QuickBooks menu and click on preference.
- Now you have to select transactions from the workflow section.
- After that, you have to click on the checkbox of Use class tracking then close the transaction window.
Create class categories:
For Windows:
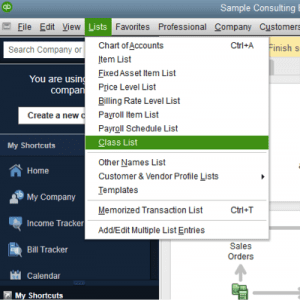
- You have to go to the List menu after that you have to click on the Class List.
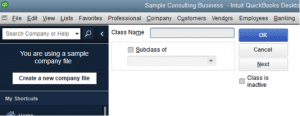
- Now from the Class drop-down menu, you have to select New.
- After doing the above steps you have to put the class name.
- If it’s a subclass then you have to select the checkbox of Subclass of and find the class it’s under.
- After doing the aforementioned steps you have to click on OK to add it.
For Mac:
- Firstly you have to open the List menu.
- Secondly, click on classes.
- Now you have to create the new class through the plus+ icon.
- After that, you have to enter the class name.
- Lastly, you have to choose ok to create a class.
Edit or delete class or location:
- Select the Gear icon at the top, then All Lists.
- Choose Classes or Locations.
From the drop-down under the Action column:
To delete:
- From the drop-down, choose Delete.
- When asked Are you sure you want to delete?, select Yes.
To edit:
- From the drop-down, choose Edit.
- Edit the desired information, then choose to save.
Turn on location tracking
- First, click on Settings ⚙, and look for the Company Settings and click on it.
- Next, click on Advanced.
- Now, go to the Categories section, and later click on the Edit ✎ icon.
- Click on the checkbox to track locations.
- Now, click on Save, and next click on Done.
Add a location
- First, click on Settings ⚙️, then go to All Lists.
- Click on Locations.
- Select New, then add the Name of the location you want to track.
- Select Save and close.
Edit or delete a location
- Go to Settings ⚙️, then select All Lists.
- Select Locations.
- Select the location you want to edit or delete, then from the ▼ drop-down menu in the Action column, choose Edit or Make inactive.
- Select Save or Yes.
Make an inactive location active
- Go to Settings ⚙️, then select All Lists.
- Next, go to the Locations.
- Now, click on Settings ⚙️, click on the above action column, then next choose the checkbox by Include inactive.
- Last, click on Make active on the location when you need to activate.
I hope this will help you to set up and use class tracking and location tracking in QuickBooks. For any further assistance Dial our QuickBooks Support number +1-844-405-0904 toll-free.