Want to set up sales tax in QuickBooks Desktop & Online? The process and steps to set up sales tax are at your fingertips, just read this article completely and gt the solution to fix it up. Go through the whole article, and learn to set up sale tax in QBO & QBD along with the advantages of setting up sales tax with accurate rates. Still, having an issue contact QuickBooks ProAdvisor toll-free:+1-844-405-0904
In QuickBooks, you can collect and remit sales tax on behalf of governmental authorities. You need to establish sales tax items and codes. You need to create sales tax groups.
Don’t forget to enroll with the department of tax collection for the state( you will be selling it. Each state has specific standards and rules, just as providing you with a unique recording ID number for your business. Not all states require sale tax to charge to your clients on the specific products sold. To check if the taxing authority has a special rule to follow, call their business their sales tax department; my experience is they are quite useful and can guide you to the required documentation.
So here we will discuss the simple steps to Set up sales tax in QuickBooks.
Points to Remember Before Setting Up Sales tax
- It makes it simpler to create reports needed (that you will use later on) to fill out tax forms while paying the sales tax liability.
- Covers the way for accurate invoicing.
- In acquiescence with the law, examine the sales tax requirements for the location that sells your products and services.
- Recognize the tax agency to pay the taxes collected.
- The CRA website is an outstanding sales tax source.
Way to Set Up Sales Tax in QuickBooks Desktop
To start recording sales tax in QuickBooks Desktop, you have to turn on this feature and set up a sales tax or tax group, to start recording sales tax in QuickBooks Desktop.
- First, open QuickBooks and look for the Edit menu and then choose Preferences.
- Select Sales Tax on the Preferences window, then move to the Company Preferences tab and click on it
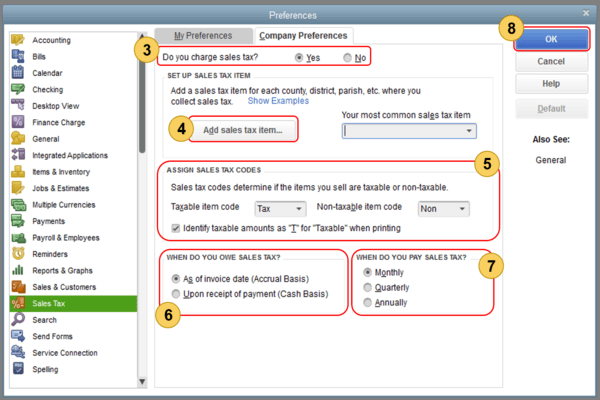
- To turn on sales tax choose Yes
- Set up all sales tax items or sales tax groups for all specific county, district, city, etc. where you assemble sales tax. Choose Add sales tax item.
- Specify the Sales Tax Code. Sales tax codes assist you to track taxable and non-taxable sales customers. Establishing and assigning the correct sales tax code enables you to execute a report that breaks total taxable and non-taxable sales. Two tax codes are automatically generated while turning on the sales tax in QuickBooks. i.e. TAX (taxable) and NON (non-taxable). TAX is used for items and customers that require you to collect taxes. NON is used for items and customers that are free from tax such as non-profit organizations, state sales, or items that your customers will resell.
- Steps to setup the non-taxable status of Item
- First look for the Lists menu and choose Item List.
- Choose an item on the Item List window then go to the New (or Edit Item).
- Select Non-Taxable Sales (or Non-Taxable Labor) from the tax code drop-down
- Steps to setup the non-taxable status of Customer
- First, select the customer menu and choose Customer Center.
- Give a right-click on the name of the customer name which you want to set up as non-exempt and choose Edit Customer: job
- In case if you are still not setup your customer, then choose New Customer & Job and later click on New Customer.
- Continue to the Sales Tax Settings tab, under the Edit customer screen
- Select Non-Taxable Sales (or Service) from the Tax Code drop-down. On the Resale No. field, enter the customer’s resale certification no, in the Resale No. field.
- Choose OK.
- Steps to setup the non-taxable status of Item
- Arrange the Sales tax basis like Accrual or Cash. Get into account your company’s accounting a choice.
- Also, set up your choice to pay the sales tax. You can choose it Monthly, Quarterly, Annually.
- Choose OK
Way to Set Up Sales Tax in QuickBooks Online
Follow all of the procedures to edit sales tax rates and agencies in QuickBooks Online.
How To Add a Combined Rate
Generally tracking sales taxes for more than one tax agency we will be using a combined tax rate. For example, you need to report and pay out sales tax to your city, country, and for your state.
Steps You Need To Know Before Add a Combined Tax Rate:
In the Combined tax rate, your clients are able to see only one tax rate on their sales form. It will keep track and splutter suitable amounts for each agency. It is possible to add up to five components.
- Choose “Taxes”.
- In the related task list on the right, Choose to add or edit tax rate and agents.
- Select “New”, and pick out “Combined tax rate”.
- Enter a suitable name for Combined rate and different sales tax requirements.
- Choose “Add another rate” for adding more than two rates in case it is needed..
- Choose ”Save”.
After Completing this few changes might occur:
- Under the “Sales Tax Rate” and “Agencies List” new rates will come to view.
- Choose the new Combined rate in forms like accounts.
- It is now possible for us to view the amounts owed to each agency in the Sales Tax owed list in the “Sales Tax Center”.
- Now we can view the “Sales Tax Invoices report”.
How To Edit A Tax Rate
It is possible to make changes to sales tax rates by using the “Edit” option. We are able to edit only the Component rates. For editing a combined rate we need to make changes to its component rate.
- Choose “Taxes”..
- From the list of related tasks on the right, Choose “Add or edit tax rates and agencies”.
- Select the rate that you need to change then Choose “Edit”.
- Then Enter the new rate, and it is possible for us to change the agency name.
- Choose “Save”.
Notes:
Tax departments are the cities and country authorities that you pay QuickBooks Online offers the calculated amount that you owe to each agency and the due date.
After Completing this few changes might occur:
- New rates will be available only for the new transactions. we cannot use the old one after creating a new transaction. Transaction will use only the new rate.
- After editing a rate the previous rate will be no longer able to be used.
- Current transactions can be used for previous rates; it remains unchanged. Except editing the transaction and precisely choose a different sales tax rate.
- Recurring templates will use the changed component and new transactions created will use the new rate. Current transaction created with the templates and the previous rate will remain unchanged.
- It will show Reports for both before and after rates.
How To Edit An Agency Name
To Edit an agency name there are a few steps you need to know before editing the agency name. It is not possible to change the “Tax Rate field”. You need to deactivate the current tax name and rate in case you need to edit it. Finally, create a new tax with the rate according to your needs.
- Choose “Taxes”.
- Select Edit where you need to change the name of the organization.
- Enter the new name ,then Choose “Save”.
Configure Sales Tax Settings
In this section, we will see how to change the sales tax center filter, Edit sales tax settings, and Deactivate the tax rate.
Steps To Change the Sales Tax Center Filter
- Choose “Taxes”.
- Select preferred filter, from the Start of year and Accounting Basis drop-down.
Note:
Visit the Cash vs Accrual accounting and its effect on sales tax if you need to know more information regarding the Accounting Basis.
Steps To Change Sales Tax Settings
By Editing Sales tax settings we are able to turn ON or OFF the sales tax.
- Select “Taxes”.
- From the related task list on the right, Select change sales tax setting.
- If you want to collect sales tax, Select Yes.
Additional Steps To Follow If You Needed:
- Create a default tax rate, the default rate is automatically selected in new sales forms. We are also able to select different rates in case you need it. Suppose if we select the different rate for a precise customer, QuickBooks Online recalls the rate for that customer and overrides the default rate.
- Choose “Mark all new customers are taxable”, This indicates new customers we are adding will not be tax exempt. We are able to change this setting for individual customers in the Tax Info section of each customer record.
- Choose “Mark all new services are taxable”. This indicates that we add to a form that has a tax column which has been already selected. We can clear individual items in a form so that we don’t need to charge sales tax.
- Choose “No” in case you do not charge sales tax.
- We charged sales tax already on your previous transactions ,then we will not be able to disable sales tax without removing sales tax for previous transactions.
- Choose ”Save”.
Steps to Deactivate a Tax Rate
- Choose “Taxes”.
- From the list of related tasks on the right ,Choose tax rates and institutions.
- Choose a tax rate name and select “Deactivate”.
- Choose Continue.
Note: Refer to ”Apply Sales tax rates to transactions and sales forms” to know how to apply tax rates to specific transactions and also refer to sales tax in QuickBooks Online to know more information regarding sales tax in QuickBooks Online.
Additional Set-Up for Sales Tax
Here are some of the additional setting up procedures for setting the sales tax properly in QuickBooks. These are not compulsory to set, but these set up steps can be beneficial for you to do in advance.
Where To Collect Sales Tax:
QuickBooks Online will keep track of your business tax laws to exactly calculate sales tax and returns. You can also add other tax departments you pay in case you charge sales tax outside of your business. There are two methods available to set up and to Collect Sales tax.
- Sign Up to QuickBooks Setup where you charge tax for the first time.
- In case if you use manual sales tax, check you can switch over to the new sales tax system.
How To Add Tax Categories For Your Products And Services
To tax the product will depend upon where you are selling the product. Once you are ready then you can assign tax categories for what you are going to sell. Based on your selling QuickBooks will let you know how much tax you need to charge.
Checking Your Customer Information Twice:
Tax rates can also be changed according to your shipping products or perform services depending on your customer’s address. For customers like a non-organization need not be required to pay sales tax. But all the non profit organization like NGOs, schools, and churches can set their sales tax. Check whether you have your customer’s exact tax status, Invoice address, and shipping address. In the below sections we will see how customer updates your company file and how to update customer information.
How Customer Updates Across Your Company File
The changes will reflect other areas of your company file if you edit customer information it also includes old invoices you sent. QuickBooks Online will upgrade any recurring templates that use prior information such as
- Billing Address
- Shipping Address
- Is Taxable
- Preferred Payment Method
- Terms
- Preferred Delivery Method
To Upgrade Customer Information:
- Choose ”Sales”, then Customers from the left menu.
- Select the Customer you need to Update the information.
- Choose “Edit”.
How To Track Sales Tax From Your Customers:
After Setting up this you are able to use the sales tax feature. QuickBooks will provide steps for how it will work and where you should see when you set a bill or receipt for customers.
Checking How Much You Owe
It will assist you to make sure that everything is accurate before you file and pay your sales tax return. For that, you need to look deeply at the taxes you owe. QuickBooks also provides steps to learn how to run a GST or HST detail report to view sales tax information anytime.
Filing Sales Tax Return
QuickBooks Online tracks your payment and recalls your dues and makes you file on time so that we don’t need to pay an additional fee. It is easy to review and make sure that everything is accurate. you can e-file on your tax department website or mail your returns. You can track your new sales tax payment in QuickBooks to maintain upgraded records once you file them.
It’s all about the setting up of sales tax in QuickBooks Online. We hope the above article will clear you that, how to set up the sales tax accurately in QuickBooks Online. Further, if you have any confusion to perform the above-mentioned steps then you can contact us directly through the toll-free number +1-844-405-0904 and can share your problem with our ProAdvisor. They will try their best to clear your confusion.