Here in this article, we are describing how to set up and use of Multi-Currency feature in QuickBooks Desktop and QuickBooks Online. In most businesses, especially in Online Businesses, Multi-Currency transactions done by selling anything to customers all over the world. Intuit QuickBooks discovered a dynamite multi-currency function in 2009 available in the windows version. So, go through the article to learn different steps to set up Multi-Currency in QuickBooks Online & QBD. Still, having any issue contact our QuickBooks ProAdvisor toll-free:+1-844-405-0904

The first international deal requires additional support to offer efficient accounting and banking options. So, this is the main reason QuickBook’s multi-currency feature arrives in the business. In addition, it assists you to track foreign transactions and allow a specific currency to an international seller.
What is Multi-Currency in QuickBooks
Through QuickBooks Multi-Currency feature you can track income and expenses in Multiple Currency in the whole world and can track previous exchange rates. This feature gives you to assign the desired currency type to multiple currency profile and the account such as Credit Card Accounts, Vendors, Bank Account, Customers, Account Receivable, etc.
Steps to Enable Multi-Currency in QuickBooks Desktop
You can keep track of transactions in foreign currency with QuickBooks Desktop, The QuickBooks multi-currency specialty enables you to specify a specific currency type for the following profiles and accounts:
- Customers
- Vendors
- Price levels
- Bank accounts
- Credit card accounts
- Accounts receivable
- Accounts payable
Before turning on multi-currency, please keep in mind, the following steps.
You can no longer turn off Multi-currency, once you have the ON multi-currency feature. Be sure you have backed up your QuickBooks company file before continuing. Other important points have been considered here:
- Activating the multi-currency feature will not affect QuickBooks desktop add-ons, like Fixed Asset Manager &Statement Writer, US currency.
- You will not be capable to use Insights, Income Tracker, and Bill Tracker. In QuickBooks accountants and enterprises, you also not even be able to enter batch invoices orbatch delete/void transactions.
- You will not be capable to choose multiple customers in the invoice for time and expense window.
- You will not be capable to transfer information or copy your company’s file with QuickBooks Desktop for Mac.
- Online payment of invoices does not work with many currencies.
Step 1: Turn on Multi-currency
- Open QuickBooks and go to the Edit menu, then choose Preferences.
- Choose Multiple Currencies.
- Later, click on the Company Preferences tab, then choose Yes, I use more than one currency.
- Choose your home currency, from the drop-down
Step 2: Add foreign-currency customers and vendors
You can allocate only one currency per customer or vendor profile. To assign a new currency you need to create new profiles.
- All current customers and sellers will be allowed your home currency upon commissioning the facility. The currency cannot be changed for names that already have transactions registered against them.
- Continue using these home currency customers or sellers as soon as you close the open balance. Use your foreign-currency customers or sellers for any new sales or purchases you have made, but continue to use domestic currency names until you complete any open transactions.
- Use customer and seller centers to create foreign exchange customers or sellers. If a name is already listed using your home currency, give a slightly different name to the foreign-currency customer or seller you have created.
Follow these steps to add foreign-currency Vendors or Customers:
- First, select the Customers or Vendors menu, then look for Customer Center or Vendor Center, click on it.
- Under the Customer Center or Vendor Center option, choose the New Customer: job or New Vendor from the drop-down, then select New Customer or New Vendor.
- Allocate a Customer or Vendor Name and Currency.
- Choose OK.
Step 3: Add foreign-currency accounts
You can provide only one currency per account. You have to create new accounts for your foreign-currency transactions.
- All current accounts will be allocated to your home currency. Currency cannot be changed for accounts that already have transactions recorded.
- Continue to use domestic currency accounts to meet any open balance. Use new foreign currency accounts for transactions after all open balances are closed.
- Currencies can be allocated to these account types: banks, credit cards, accounts receivable (A / R), and accounts payable (A / P). Note: The currency of A / R and A / P accounts need to meet with the currency of the buyer or seller used in the transaction. QuickBooks automatically generates a distinct account for specific currency while creating the transaction.
- Use chart accounts to generate foreign currency bank and credit card accounts as required.
Follow these steps to add foreign-currency accounts:
- Start QuickBooks and select Lists menu, later click on Chart of Accounts.
- Right-click anywhere on Chart of Accounts, and choose New.
- Select the suitable account Type and specify a name.
- Choose Save & Close.
Step 4: Update your exchange rates
Go with the steps to download exchange rates:
QuickBooks Desktop downloads rates only for current currencies and you can download rates only if your domestic currency is the US dollar.
- Select the Lists menu, and go to the Currency List.
- Choose the Activities button and click on Download Latest Exchange Rates.
Go with the steps to manually enter exchange rates:
- Select the Lists menu, and go to the Currency List and double-click on the currency.
- Update the currency exchange rate for the specific date/s, in the Edit Currency window.
Step 5: Create foreign-currency transactions
Note: Use only those foreign-currency names or accounts you have added for new foreign-currency transactions.
If you own an open invoice for an existing customer that has your home currency, don’t use the new foreign-currency version of that customer to receive payment against that invoice. Alternatively, proceed to use the home currency version of the customer to finish the transaction.
- You do not allot a currency for transactions and sales because they are assigned the currency of the customer or seller that you have recorded in the form.
- Exchange rates are a component of every transaction and manage the domestic currency value of the transaction.
- Dependencies on sales and purchase transactions are in the currency of the customer or seller and the equivalent of the home currency is listed for the transaction.
- The report will regularly display the domestic currency despite the currency used in the transaction.
Steps to Enable Multi-Currency in QuickBooks Online
TheQuickBooks Online plus version supports multiple currencies. You use the QuickBooks Multi-currency facility while selling products or services to customers or buyproducts and services whose base currency differs from your domestic currency. If you do not require to enter transactions in multiple currencies, do not turn this feature on because you cannot turn it off again.
How the Multi-currency feature changes QBO
You will see new fields in QBO after turning on the Multi-currency feature. In particular, you can also notice some changes on your screens:
- While opening the gear menu, you will view the option of Currencies under the lists column. With an exchange rate, you use a list of currencies to establish the foreign currency you want to use.
- When you look at the chart of accounts, you will see a currency column, which displays the currency distributed to every account. You will also get a new account – another expense account called exchange profit or loss.
- When you look at the bank and credit card registers, the currency of each transaction appears in parentheses in the Payment, Deposit, Sales Tax, and Balance Payable columns.
- Sales and purchase both use home currency and foreign currency, QBO performs all the changes for you on screen.
- In QuickBooks reports, you will notice that QBO changes all foreign currency amounts to domestic currency amounts, automatically reflecting changes in the exchange rate.
Steps to Turn On the Multicurrency Feature Other Useful Resources:
You can adjust the currency of your home from the same place where you enable the multi-currency features. Go through with these steps:
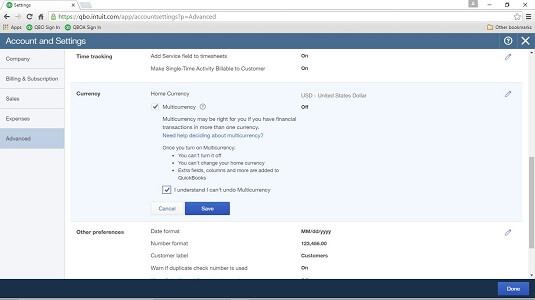
- First, go to the Gear icon and look for the Account and Settings.
- QBO represents the Account and Settings dialog box on your screen. Click to Advanced
- Go down to the Currency option.
- Next, go to the Home Currency List box and set your home currency.
- Select your country’s currency. If your currency does not belong to the United States then do not set the United States as your home currency
- Click on Multicurrency. QBO informs you with the following points while turning on the Multicurrency feature:
- You cannot turn it off, and
- You cannot change your home currency.
- Choose I Understand I Can’t Undo Multicurrency.
- Select Save.
- Choose Done.
Use a different currency to deposit payments to a bank.
Multi-currency in QuickBooks online allows one to make a payment or deposit payment to a bank in a different currency. Here are some steps to deposit payment to a bank:
- Firstly, find and collect the same currency, and then you can deposit the invoices to your bank account.
- Choose the New tab and then select the Transfer button.
- Now, you have to choose the account for each field:
- Transfer Funds From: It indicates the account where you take the money.
- Transfer Funds To: It indicates the account where you transfer the money.
- Currency: The selected currency indicates the value you enter in the amount field. The next thing is that if you do not set up the amount then you have to enter the exchange rate. For example: I will select US Dollars as the currency and enter $15.00 in the Transfer Amount field. So, QuickBooks will transfer funds equal to that amount in US dollars.
- Transfer Amount: The amount depends on the currency and exchange rate that you’ll transfer to the account.
- After all these processes, you need to enter the value of the payment for the invoice in the Transfer amount.
- Now, enter the exact date that is mentioned in the invoices.
- Last, click on the save and close tab.
Pay Employees with a Different Currency
Here are some steps to pay employees using a different currency:
Step 1: Create a Vendor using Employees’ info
Before paying employees using a different currency, you have to create a vendor with your company employees’ info. It can reflect employees’ profiles, so check them first then apply the next steps, select payroll, and then select employees.
- Navigate the Expenses tab and then select the Vendors option.
- Choose the New Vendor.
- After that fill in all the employees’ info in respective fields.
- Go to the dropdown menu of the currency and select the appropriate currency.
- Now, in their display name add a currency and then click on the Save option.
Step 2: Pay your employee
- Choose the New tab.
- After that click on the Expense.
- Find the payee dropdown menu and choose the vendor that you created with your company employees’s info.
- Choose the account that you want to track payroll expenses from the category menu.
- Select Save and then Close.
Change an assigned currency for a customer or vendor
For changing an assigned currency for a customer or vendor you have to create a new vendor and customer:
Step 1: Make a customer or vendor inactive
To make a Customer inactive:
- Navigate the Sales and then select Customers.
- After that, you have to search and choose the name of the customer which you want to change currency for.
- Take all their information by clicking on the edit tab.
- After that return to the Customer’s list by clicking the save option.
- Select the action dropdown menu after choosing the same customer.
- Choose to make inactive option and then click on the yes for giving confirmation.
To make a Vendor inactive:
- You have to select Vendors after navigating the Expense option.
- Then, you may choose the name of the Vendor you want to change the currency for and search for their information by clicking on the edit tab.
- The Vendors list is displayed after saving the previous step.
- Choose the action dropdown menu for the same vendor.
- Select the Make Inactive option.
- Confirm the request by clicking Yes.
Step 2: Create a New customer or vendor
To create a new Customer:
- Go to the Sales option and then navigate to Customers.
- Fill out all the info of your employees by selecting the New Customer tab.
- After filling out the info, you have to select a currency from the Currency dropdown menu.
- After adding currency select the Save option.
To create a new Vendor:
- Navigate to the Expenses option and then to the Vendors tab.
- Fill out all the required information for your employees using the New Vendor tab.
- Select a currency from the Currency dropdown menu after completing the information.
- After adding currency select the Save option.
How to Setting up Currencies
After enabling the QuickBooks multi-currency option, you’ll find an option to display the Currencies list if you click the Gear button, the Currencies option appears at the bottom of the Lists section on the Gear menu. Go with these steps to set up the currencies you want to use:
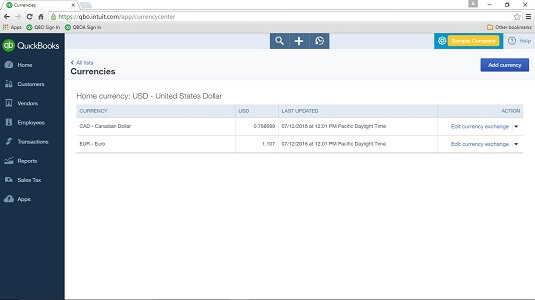
- Go to the Gear icons and look for the Currencies (QBO will represent the currency page)
- Select Add Currency at the upper right corner of the page (QBO represents a drop-down list).
- Choose the currency which you need to use.
- Select Add
Note: If Once you turned on the Multi-currency feature that you cannot change your domestic currency.
The QBO regularly records exchange rates, displayed on the currencies page, as the number of domestic currency units required to equal the foreign currency unit. QBO downloads the exchange rate every four hours from Wall Street on Demand, but you can provide your own exchange rate if you wish. Click the currency exchange link next to the supply of the rate you want to edit and the rate you wish to use.
Hope, after reading this article you have got a clear idea of setting up multi-currency in QuickBooks. But if you still have any issues or queries with this topic or any accounting and bookkeeping issues, then feel free to contact us our toll-free+1-844-405-0904 and have a one-to-one talk with our intuit certified ProAdvisor and get instant help to solve your problem.