Want to resolve data damage to your QuickBooks mac Desktop company file? In this article, we have provided the solution to aid you. Here in this blog, we will discuss what are the possible reasons behind Data Damage in QuickBooks Mac Desktop. Go through the article and follow the steps mentioned in different methods and get this issue fixed. For any suggestion or help contact our QuickBooks ProAdvisor toll-free: +1-844-405-0904
For your Data damage issue in QuickBooks Desktop for Mac, you can follow the steps given below to resolve this Data damage problem. If you are using a window system then follow this Resolve data damage on your company file.
Causes of data damage in QuickBooks Mac Desktop company file
- Error message when working in QuickBooks.
- Unable to open the company file.
- QuickBooks Company file is working so much slower.
- Unable to convert the QuickBooks company file.
- Amounts on the Balance Sheet don’t match amounts on the specialty reports.
- QuickBooks Deleted memorized reports still show on the list.
- Unable to edit or save a transaction.
- Names are missing from the lists or unable scroll past a certain point in a list.
Follow the below steps to Resolve Data damage for Mac Company File
Before you begin troubleshooting data damage, you might need to consider other options.
- Restore a recent backup file( If you do this, you must re-enter transactions entered since the backup was made).
- Create a new company file, re-enter your data.
Note: If you want to avoid this issue in the future, it is recommended to create a backup for your company file frequently.
Solution 1: Run the Verify and Rebuild Tool for Mac
- Run a Verify to identify potential issues
- First of all, go to the File and then choose Utilities and then Click Verify Data.
- After that, If you receive a prompt stating QuickBooks has detected a problem, then proceed to the next step.
- If you don’t receive a prompt stating no problems have been detected, but still experience the issue, please contact QuickBooks Online Support.
- Run a Rebuild to have QuickBooks attempt to correct the issue.
- First of all, go to the File and then choose Utilities and then Click Rebuild Data.
- After the Rebuild completes, run another Verify as stated on the Previous Step to confirm if problems have been resolved.
- If this didn’t work after doing it at least twice, see re-sort lists in QuickBooks for detailed instructions then try to Verify Data again.
- If re-sorting the list still didn’t work, contacting QuickBooks Support can work for you.
NOTE: If you are rebuilding data for the very first time then it might take up to 2 hrs in completing the entire process.
Solution 2: Fix QuickBooks Desktop Company File using QuickBooks File Doctor
Even after using QuickBooks verify and rebuild data feature, the issues still persists, you can use QuickBooks File Doctor to fix Data Damage of file.
Solution 3: Manually Repair Data Damage done to your QuickBooks Company File
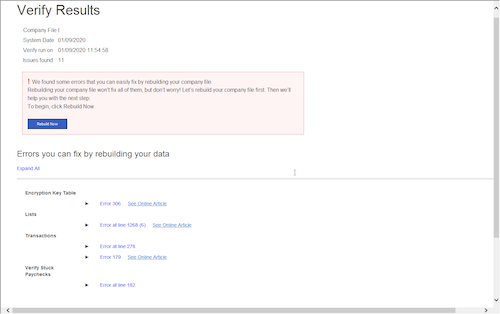
If you possess a decent knowledge of computers & if you are comfortable then you also manually fix this error. You can easily find the cause of the error and then fix it in the Verify Result window. Remember to create a backup of the recent company file if something went south.
Follow the steps mentioned below to fix error.
- Go to the File menu from the top menu bar, and then go to Utilities, and then select Verify Data option.
- Wait until the tool finds and identifies the data issues.
- As soon as the process is finished, click on the Expand All to see the errors.
- You can fix the errors with the help of Online Articles depending upon the type of errors. If you are not able to fix the article on your own, you can contact QuickBooks assistance.
Solution 4: Fix Errors using transaction records numbers
With the help of transaction records numbers, you can find the errors that QuickBooks find while verifying the company file. If any error exists in your file then you’ll be able to open QuickBooks.log file using a link. This file consists of the errors of your company file.
You can find the QuickBooks.log file anytime you want by:
- Press and hold the command key and then go to Library.
- Go to the Logs folder and double-click on it.
- Then, go to the QuickBooks.log file and double-click on it.
When you open the QuickBooks.log file, you’ll be able to view the record numbers as RecNum and RefNum. These are used by QuickBooks as internal record numbers.
To find the record number:
- Select Edit and then click on Find.
- To search, enter @recnum and then type the record number. For example: @recnum 43.
- Here, you can find all the records including the transaction numbers. Review the numbers and make some changes to fix the error.
Do’s and Don’t’s
- Update your recent version of QuickBooks to the latest one.
- Make a backup before begin with any Data Damage troubleshooting.
- Do not run the data utility until restoring your Data Damage.
- Use the knowledge base to fix known issues.
- Work with a local copy of a company file only.
- Do not update previously installed QuickBooks to a newer year of QuickBooks.
The Bottom Line
We hope you found this article worthwhile. Talk to our U.S based QuickBooks ProAdvisor to get advice and consulting. Dial 24/7 toll-free QuickBooks Support number +1-844-405-0904.