If you are looking for a QuickBooks print & pdf repair tool? Then no need to worry, WizXpert is here, with the most demanding troubleshoot article on how to fix printing problems in QuickBooks during, emailing, or saving as a PDF from QuickBooks Desktop, there is a tool named QuickBooks print and pdf repair tool that can help you troubleshoot if you can’t print, email, or save as a PDF from QB. Read the article details to be able to use print and pdf repair tools, and learn the methods and detailed steps to troubleshoot pdf and printing problems. Still, having an issue contact our QuickBooks ProAdvisor toll-free;+1-844-405-0904
When you print a document with QuickBooks needs Microsoft components that include XPS Documents Writer, Print Spooler service, and MSXML any fault in these components may create errors.
QuickBooks Print and PDF repair tools are designed in such a way that they can resolve almost every error related to PDF and Print.
Table of Contents
Various PDF and Print problems with QuickBooks Desktop

Sometimes errors arise due to incorrect settings of the QuickBooks Desktop application or maybe a failure of any Microsoft component. These errors may be solved quickly with the help of the QuickBooks Component Repair Tool.
Somehow, issues occur just because of faults in the printer itself that need additional troubleshooting steps and also need to take the help of an IT professional to get a solution.
There is a list of errors that need to rectify with QuickBooks PDF and Print Repair Tool:

- Error activating PDF Converter like error 30, error 20, and error 41.
- Unrecoverable error
- Formatting issues while printing.
- Blank prints from the printers
- Unable to get the preview of PDFs and other documents.
- There is a problem connecting to your currently selected printer, Microsoft XPS Document writer on XPS port.
- Unable to get print invoices, reports, and checks.
- Printer not responding or printer not activated error.
- QuickBooks got stuck after the print command or while reconciling the accounts.
- Error while saving the PDF files using QuickBooks.
- QuickBooks unable to create PDF files for printing.
- Error installing the PDF Converter that also appears as Error 1801 or QuickBooks Error 1722.
- QuickBooks giving an error message “The Device is Not Ready”.
- The device is not ready to issue
- QuickBooks is not responding.
- Unable to save as .pdf file.
- PDF Converter shows offline.
- Problem printing transactions or reports.
Reason for QuickBooks Printing Errors
There are a number of reasons that occur while using QuickBooks printing. Some of these errors are caused due to misconfigured QuickBooks Desktop Application or while printing any document. Following are the reasons for QuickBooks printing errors:
- Unsupported or missing printer drivers.
- Limited folder access permission to the QuickBooks application.
- Windows Print Spooler service is idle.
- Antivirus or Firewall is not configured. Therefore the application is interrupting the print process.
- Corrupt or damaged installation of MSXML.
- XPS Documents Writer does not have proper Windows User Access Permission.
- XPS service is disabled or damaged.
System Requirement For QuickBooks Print & Pdf Repair Tool
- Internet is needed to download the tool.
- 1 GB RAM, 512 Free hard disk
- 1024*768 screen resolution or higher
- 266MHz processor or faster.
- All windows versions are compatible.
How to use QuickBooks Print & PDF Repair Tool to Troubleshoot PDF and Print problems with QuickBooks Desktop
Learn how to resolve issues related to printing, emailing, and pdf problems with QuickBooks desktop with the help of pdf printer repair tool
Download and Install the QuickBooks Tool Hub
QuickBooks Tool Hub is used to solve common errors.
Note: Before using QuickBooks Tool Hub make sure QuickBooks is closed.
- First, download the QuickBooks Tools Hub file. Remember to save the file at the location where you can find that easily. Such as in the download folder or in your Windows desktop.
- Then open the file that you downloaded ( QuickBooksToolHub.exe).
- Follow the instructions that you will see on the screen and click on agree to the terms and conditions.
- After finishing the installation, click on the tool hub to open it.
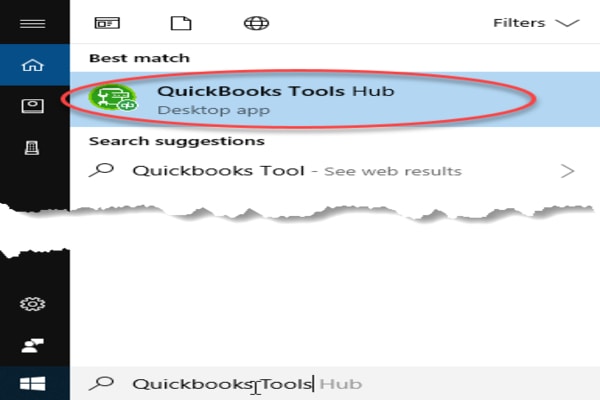
Note: If you don’t find the icon then search on the window for finding QuickBooks Tool Hub and choose the program.
Here are four solutions to get rid of these issues.
Solution 1: Run the QuickBooks print and pdf repair tool
Update your QuickBooks to its latest version before starting troubleshooting.
- Go to QuickBooks Tools Hub then select Program Problems.
- Select and run the QuickBooks print and PDF repair tool.
- The process will take about a minute.
- Try to print, email, or save as a PDF from QuickBooks Desktop again.
If this tool doesn’t fix your issue move forward to the next solutions
Solution 2: Reset your temp folder permissions
Step 1: Reset your temp folder permissions
If the problem continues, try to reboot your computer and then try again if it still fails, try resetting your temp folder permissions. Verify the folder permission to the temp folder by following the given below steps:
- Open the RUN command.
- Type %TEMP% and press enter.
- Right-click on an empty area of the temp folder and choose properties.
- Click on the Security tab.
- Make sure that all the user names and groups showing on the security tab have full control.
- After the permissions have been set to full control, try saving it as a pdf again within QuickBooks.
Step 2: Confirm if you can print to your XPS(only for saving as pdf and email issues).
If you had saved as pdf and email issues you can have one more option. Now, verify if you can print to your XPS document writer. Quickbooks uses parts of the XPS document writer(Microsoft Windows product) to save as PDF.
- Open your notepad.
- Type anything on your notepad.
- Go to the file and then print.
- Select the XPS document writer and select a print.
- Go to the save dialogue box and see if you can view the XPS document you have printed from Notepad.
Things To Remember
- For testing, and printing issues print to your actual printer instead of your XPS document writer and check if you can print successfully outside QuickBooks.
- If you can not print to your actual printer outside of QuickBooks then you will need to contact your IT professional or Microsoft for help. Microsoft XPS Writer (or your printer drivers) isn’t an Intuit product.
Solution 3: Verify to see if the reconcile window is off of the screen
If your QuickBooks does not work after selecting reconcile from the banking menu, but the PDF function is working, then the reconcile window might be off of the screen.
- Select the window menu and look in the list to see if your reconcile window is listed.
- Select Close All and start the reconciliation again
Solution 4: Test, reinstall and adjust permissions for XPS Document Writer
Before you proceed with this solution consider the following points:
- Intuit doesn’t support Microsoft applications and is not responsible for running these tools.
- If you’re not able to perform these tasks, we recommend having an IT professional do this for you.
- If you are reconciling the accounts when you experience this issue, get help from intuit.
Step 1: Test the XPS Document Writer by printing outside QuickBooks
- Go to the File menu and select the print
- Go to the window, and select Microsoft XPS document writer from the list of printers, and click print.
- Save the.XPS file on your computer’s desktop
- Go to the desktop ad and look for the .XPS file.
If you didn’t find the file there and you didn’t receive an error saying it, a security setting is maybe preventing you from printing the XPS document writer or maybe it is deleting the XPS file after its creation.
Find out the XPS file there and open it. If the file does not open and an error occurs in opening it, or if the file does not display properly, then the XPS document writer will need to be reinstalled.
If QuickBooks creates an error when you are trying to print, or if the XPS document writer is not available then it needs to be reinstalled.
Step 2: Reinstall Microsoft XPS Document Writer
There are two parts:
- Part A: To verify if the XPS services are enabled or not.
- Part B: Reinstall the XPS document writer
Part A: Verify if the XPS services are enabled or not
- Press window+E to Open the explorer window.
- Go to the upper left and select tab.
- Go to the system group, select uninstall or change a program.
- Click on turn windows features on or off over the left.
- Scroll down and verify both the XPS service and XPS viewer are enabled or not.
Things to remember:
- If any of the XPS services and viewer or both are enabled, put a checkmark in both boxes and press ok. Now check if the issue is resolved or if it’s still there.
- If the issue still occurs move forward to the next solution.
Part B: Reinstall the XPS Document Writer in Windows
For Windows 10:
- Move the mouse to the lower or upper right-hand corner and display the Start Screen.
- Go to the Settings select Control Panel and choose Devices and Printers.
- Select the Microsoft XPS Document Writer icon and click Remove the device.
- Click Yes to confirm.
- Go to the toolbar, select Add a printer, and choose to add a local printer or network print with manual settings.
- Go to the Use an existing port: choose PORTPROMPT: (Local Port).
- Click Next.
- Go to the manufacturer list, select Microsoft, then Microsoft XPS Document Writer v4.
- Click Next.
- Choose Replace the current driver option and click Next.
- Go to the Printer name field, take out the v4 so the name is Microsoft XPS Document Writer.
- Select Finish (you may want to uncheck the box to make the XPS writer the default printer).
For Windows 7/Windows Vista:
- Go to the Windows Start menu, and choose Devices and Printers.
- Select the Microsoft XPS Document Writer icon and click Remove device.
- Click Yes to confirm.
- Go to the toolbar, select Add a printer, and choose to add a local printer.
- Choose the option Use an existing port.
- Choose XPSPort: (Local Port) and click Next.
- Go to the manufacturer list, choose Microsoft, then Microsoft XPS Document Writer v4.
- Click Next.
- Choose Replace the current driver option and click Next.
Step 3: Adjust Windows user permissions for the XPS Document Writer
If you are a Windows user and you do not have permission to print the XPS document writer, then QuickBooks will not be able to create the.XPS file that can be converted to a .pdf file. In this case, you need to log in with the admin right to change the permissions.
- Open the printer control panel in Windows.
- Right-click on the Right-clickPS document writer and choose printer properties for Windows 8 and properties for Windows Vista.
- Select security.
- Choose the Everyone user group.
- If the everyone group is not on the list
- Click the add button.
- Enter everyone in the field.
- Select check names.
- Select ok
- Go to the Allow column, select print, and click ok.
- Now navigate to C:\Windows\System32\spool in Windows Explorer.
- Select printers and choose properties
- Select security.
- Select edit.
- Choose to add.
- Type local service and click enter.
- Ensure local service has full control then click ok.
- Now open your QuickBooks and try to create a file.
Step 4: Edit security software settings
There can be some other reasons like setting in your system software like an anti-virus or McAfee firewall, which block the creation of the XPS file.
Verify the settings in your security software to make sure that. XPS files are not blocked and enabled.
We cannot provide support for issues like the number of available firewalls or anti-virus programs.
If you need further assistance with this issue check with your system or network administrator, the vendor from whom you purchased your anti-virus or firewall software, the software developer’s website, or a local computer consultant.
Step 5: Install or repair MSXML 6.0
MSXML 6.0 is a Microsoft Windows component and is part of the system requirements for the XPS Document Writer.
For Windows 8:
Run System File Checker to repair MSXML 6.0, which is built-in Windows 8. System File Checker is a service provided by Microsoft to repair Windows system files.
- Hover the mouse in the Upper or Lower right-hand corner and select the Magnifying Glass.
- Type Command and then select the Command Prompt.
- Select the option on the bottom bar to Run as administrator.
- Now If you must be prompted for an administrator password, enter the password or click Allow.
- Type in sfc/scannow.
For Windows 7 and Windows Vista:
Run the System File Checker to repair MSXML 6.0, which is built into Windows 7. System File Checker is a service provided by Microsoft to repair Windows system files.
- Click on the Windows Start.
- select to all programs, then choose Accessories.
- Select Command Prompt and choose Run as Administrator.
- If you are prompted for an administrator password, enter the password or click Allow.
- Type in sfc/scannow.
Step 6: Create a new template for your form
You may see an issue if the template for your form is damaged.
Create a new template for your form:
- Create a new template for your form. Get more help with creating new templates.
- Change the template on your transaction.
- Create your .pdf.
Step 7: Bypass the print spooler (for Terminal Services only)
- Open the Printers Control Panel in Windows.
- Right-click the Microsoft XPS Document Writer choose Printer properties for Windows 7 & 8 and choose Properties for Windows Vista.
- Go to the Advanced tab and choose Print Directly to Printer.
- Click OK to save your changes and close the Printer Properties.
Solution 3: Rename/Delete the Printer file
If any of the above methods do not work, i.e, neither backup restoration was possible, nor were you able to run the ‘Printer Utility Tool’, then you have the last option remaining is to delete the damaged files and create a new one.
You can follow the below steps to perform this Solution :
- First, search and look for your files
- Later, ‘Rename’ to something like ‘qbprint.old’ & ‘wpr.old’ and as of now do not delete that file.
- Now open your QuickBooks and go to your company
- Click on File and then click on Printer Setup
- Now Click on any transaction in the Form Name
- And, later click on OK
The above steps help you to create an error-free ‘qbprint.qbp & wpr.ini ‘ file.
These are the several solutions to get rid of printing and PDF issues. I hope you can remove this error and work on your QuickBooks Desktop easily.
FAQs
Can QuickBooks PDF repair tool fix corrupted PDF files?
The answer is ‘Yes’. if you have several corrupted files and want to repair them then you can use the QuickBooks PDF repair tool. If you are facing printing errors then you can also repair them with a PDF repair tool.
Can users use the QuickBooks repair tool for recovering deleted or lost PDF files?
‘Yes’, QuickBooks repair tool is mostly used for recovering or restoring deleted and lost PDF files.
What are the system requirements for using the QuickBooks PDF repair tool?
QuickBooks PDF repair tool needs a high-end computer having free space of 1 GB and at least 215 MB of Disk space. You also need a stable internet connection with 10248*768 screen resolution. These are the least common requirements for using the QuickBooks PDF repair tool smoothly.
What is the size of the QuickBooks PDF repair tool?
The latest version of the QuickBooks PDF repair tool is available in 23 MB size.
Is it available in a free or paid version?
It is available in both versions. You’ll get either a free or paid version, it’s up to you.
For any technical support, you may hire our certified accountant & ProAdvisor. Dial our toll-free number +1-844-405-0904.