It is seen that many users are facing printing problems related to ” QuickBooks cannot create PDF” or “QuickBooks save as pdf not working”. So here in this blog, we will discuss in detail how you can easily resolve this problem step-by-step. Just go through the article and get rid of your problems. Still, the problem continues then let us know, contact our QuickBooks ProAdvisor toll-free:+1-844-405-0904
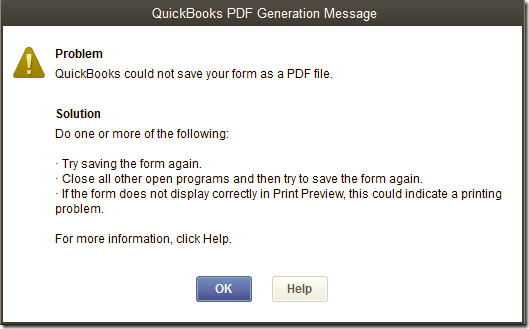
Unable to create a PDF in QuickBooks. It can be very annoying for the users to get this error while they try to email an invoice to a customer. In this case, the user gets an error message as “Your forms were not sent because QB could not create the necessary PDF file.”
Why QuickBooks unable to create PDF?
This error is generally concerned with PDF file mailing and printing. It occurs when you try to create, email, and print a report, you will get a sudden error message, or QuickBooks suddenly close. Before consulting with our experts, you need to know the main reason for error which can be any one of the following reasons:
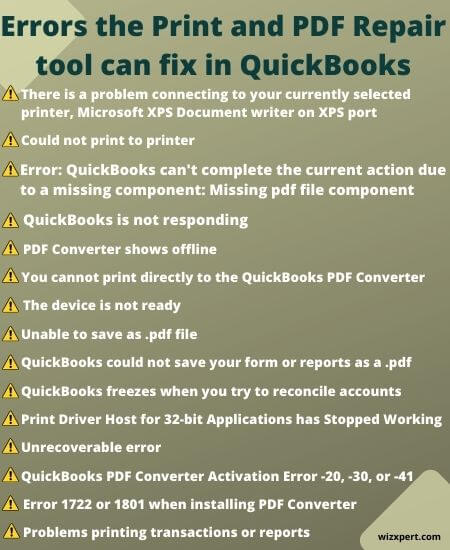
- Error: QB unable to finish the present task due to a lost part: Lost PDF file component.
- PDF converter installation Error 1722 or 1801.
- QB doesn’t save the form as a PDF.
- A non-functional part driver.
- No direct print from QB PDF Converter.
- Improper connectivity with printer and unable to save reports as PDF.
- The device is not ready to print to the printer.
- QB desktop hangs when accounts are reconciled.
- QuickBooks Unrecoverable error: 15064 06798, 14982, 50172, or 14983 96787.
- QuickBooks Desktop does not start and PDF Converter shows offline.
Solutions to Fix QuickBooks Cannot Create PDF Issue
Here are the list of possible solution to fix this issue, check out the whole list and try to get rid this issue very easily.
Solution 1: Download and Run the QuickBooks PDF & Print Repair tool
- First, you need to transfer and run the QuickBooks Print and PDF Repair Tool.
- Try work related to the .pdf file that originally caused the error upon completion of the device.
- Please try rebooting your laptop and try again if the error still occurs.
- Confirm if you can print to save as PDF for your XPS document author Email Issues.
- Use elements of XPS Document Writer (Microsoft Windows product) to save PDFs as QuickBooks
- Go to the Notepad and type anything.
- Now on the top left look for File and select Print.
- Select the XPS Document author, and select on Print.
- Click on your Desktop within the to ignore wasting as dialogue box
- Later, you need to navigate to your desktop and check if you will be capable to understand the XPS document you written from the tablet.
Solution 2: Modify Windows User Permissions for XPS Document Writer
- Begin the printers Control Panel in Windows and look for the Microsoft XPS Document Writer and right-click on it.
- Go to the Printer properties(Windows 7 & 8) or Properties in (Windows Vista).
- Select on the Security.
- You need to settle on the Everyone user cluster.
- Where everyone group is not on the menu.
- Go to the Add button and look for the field Enter Everyone and choose Check Names.
- Select OK.
- In the Allow column, choose Print (spot a checkmark in that row), and select OK.
- Now go to C:\Windows\System32\spool in, In Windows Explorer.
- Find and Right-click on Printers and select Properties.
- Select on the Security
- Choose Edit and then select Add.
- Insert Local Service and press Enter.
- Assure that Local Service has your Full Control, then click on OK.
- You need to Open QuickBooks and now you try to create a .pdf file. Hope you can do it now
Solution 3: Design a new template for your form
- Create a new template for your form.
- you have to change the template for your transaction,
- You need to create your .pdf.
Solution 4: Avoid the print spooler (for the Terminal Services only)
- You need to Start the Printers Control Panel in Windows.
- Look for the Microsoft XPS Document Writer and right-click on it
- You need to select Printer properties for Windows 7 or 8 or Properties for Vista.
- Select the Advanced tab and select Print Directly to Printer.
- Click OK to save your changes
- Next, close all the Printer Properties
Other Useful Resources:
- Best QuickBooks Add-Ons Software, Plugins, Extension To Automate Tasks and Save Time
- Upgrade To The Latest Versions of QuickBooks Desktop Pro Plus, Premier Plus, or Enterprise
- QuickBooks Error 1334 Fix: Complete Troubleshoot Guide
Solution 5: Install or repair MSXML 6.0
MSXML 6.0 is a section of the system specifications for XPS Doc Writer and is also a Microsoft Windows component and
For Windows 8:
To improve MSXML 6.0, run System File Checker, which is a built-in feature in Windows 8. System File Checker is a service offered by Microsoft to recover Windows Windows files.
- Move the mouse to the upper or lower right corner and go to the magnifying glass.
- Insert Command and right-click on Command Prompt and in the list menu, choose the option Run as administrator.
- If it is asking you for the Administrator password, insert the admin password and select Allow.
- Now, in the cmd window, type sfc /scannow and hit enter
Windows 7 and Windows Vista:
To improve MSXML 6.0, run System File Checker, which is a built-in feature in Windows 7. System File Checker is a service offered by Microsoft to recover Windows Windows files.
- First, go to the Windows Start button.
- Select All Programs and go to the Accessories.
- Open Command Prompt and right-click on it and choose Run as Administrator.
- If it is asking you for the Administrator password, insert the admin password and select Allow.
- Now, in the cmd window, type sfc /scannow and hit enter
Solution 6: Reinstall Microsoft XPS Document Writer
Verify XPS Services are Enabled
- Open the Explorer window by pressing the shortcut Windows key + E on your keyboard.
- Click the Computer tab In the upper left of your screen
- Click Uninstall or change a program, under the System group.
- Select Turn Windows Features on or off, Over on the left.
- Scroll down and make sure both the XPS Services and XPS Viewer are enabled (check-marked).
- Scroll down and enable both XPS Services and XPS Viewer (check-marked).
- Put a checkmark in both boxes, if one or both are not permitted, and click on OK. Test both QuickBooks after enabling both services to resolve the issue.
- Continue below to reinstall the XPS printers if they are enabled or if the problem still occurs
Reinstall the XPS Document Writer in Windows 8
- Move the mouse to the lower or upper right corner to reveal the start screen.
- Click on Settings
- Select Control Panel
- Choose Devices and Printers.
- Go to the Microsoft XPS Document Writer icon and right-click on it and choose Remove device.
- Click Yes to confirm
- From the toolbar, click Add a printer and select the Add a local printer or network print with manual settings.
- Select Add Printer from the toolbar, and choose Add Local Printer or Network Print with manual settings.
- In the use an existing port, click on PORTPROMPT: (Local Port).
- Select Next.
- Select Microsoft from the manufacturer list and then choose Microsoft XPS Document Writer v4.
- Select Next.
- Choose to Replace the current driver choice and choose Next.
- In the Printer Name field, take out the v4 so the name is Microsoft XPS Document Writer.
- Exclude v4 so that the name is Microsoft XPS Document Writer, in the Printer Name field.
- You must end the click (you may want to uncheck the box to make the XPS writer the default printer).
Reinstall the XPS Document Writer in Windows 7/Windows Vista:
- From the Windows Start menu, select Devices and Printers.
- Later, go to the Microsoft XPS Document Writer icon and right-click on it and select Remove device. Next, select Yes to confirm.
- Select Add a printer from the toolbar and choose to Add a local printer.
- You need to click on Use an existing port choice.
- Select XPSPort: (Local Port) and select Next.
- Select Microsoft from the Manufacturer list, and then Microsoft XPS Document Writer.
- Choose Next.
- Click to choose the Replace current driver option and select Next.
The above solution will rectify your QB error. But if you still have issues, then you can contact our Proadvisors and technical support team. To get in touch with them, you just need to simply dial our toll-free number +1-844-405-0904.
Hope this article will be worthy and helpful. To get further assistance and instant help related to any QB error, call to our technical support agents and get in touch with our experienced executive at QuickBooks support phone number.