In this article, we will discuss some common 1099 E-File issues with their solution. The article contains all the relevant details of error 1099, as the reasons behind the e-file error and effective methods to troubleshoot the issue. Read the complete article to know all the details and learn to fix the issue. Follow the steps carefully in order to resolve the issue. In case you need help, you can always talk to our QuickBooks Proadvisor toll-free: +1-844-405-0904
Vendor Missing from the 1099 E-File Summary Report
When you run a 1099 summary report, a vendor doesn’t emerge in the report. If the seller doesn’t emerge in the 1099 summary report, you are not able to print 1099 E-File for this seller. This article describes how to solve this issue.
⇨ The Vendor was not set up as eligible for 1099
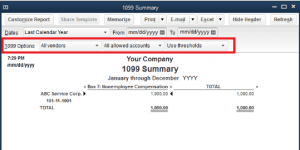
- On QuickBooks Desktop, go to Reports> Vendors and Payables> 1099 Summary.

- On the 1099 form, First of all, click the first drop-down button and choose Only 1099 vendors. Review the report and check. If amounts are lost.
- In the 1099 Options, click the first drop-down button again and select All vendors. If the report displays the missing amounts already. Then the vendors for the lost amounts are not marked as Eligible for 1099.
What to do:
- Go to the Vendor > Vendor Center menu. Right-click the vendor’s name and click Edit. Go to Tax Settings tab, select the Vendor eligible for 1099 checkbox, and then click OK; OR
- On step 1 of the 1099 Wizard, select the vendors missing in the 1099 Summary report as eligible for 1099.
⇨ The Vendor was paid from an account that is not marked as a 1099 E-File account
- On QuickBooks Desktop, go to Reports> Vendors and Payables> 1099 Summary.
- In 1099, choose the second drop-down button and choose Only 1099 accounts. Review the report and view if the amounts are missing.
- In the 1099 choice, select the second dropdown button again and choose All allowed accounts. If the missing amounts have already shown in the report under the Uncategorized column, you may haven’t mapped all of the important accounts to 1099 boxes.
What to do:
- From the report, double-click an amount under the Uncategorized
- Verify that the transaction is on the correct account.
- If the account is right, go through the 1099 Wizard and in the Map Accounts step, verify if the account has been mapped correctly.
- If the account has been renamed, modify the account of the transaction to the new account name.
- Do the same for all missing amounts under the Uncategorized
⇨ The vendor hasn’t met the threshold needed to generate a 1099 E-File.
- On QuickBooks Desktop, First of all, click on Reports> Vendors and Payables> 1099 Summary.
- In the 1099 forms, First of all, click on the third dropdown option again and then choose to use thresholds. Verify the report and see if some are missing.
- In the 1099 forms, First of all, click on the third dropdown option again and then choose Ignore thresholds. If the lost amounts already display in the report, then the total payments for the specific seller don’t match the filing thresholds for 1099s.
What to do: Go through the 1099 Wizard. In the Map, Accounts step, review, and if necessary change the threshold amounts.
⇨ The Vendor is set up as an Other name type instead of the Vendor
Sometimes vendors are mistakenly added to the Other Names list instead of the Vendor list. QuickBooks Desktop is unable to create 1099 forms from the Other Names List.
What to do:
- Make a backup of the company file.
Note: After a name in the Other Name list is modified to a vendor name (or any other type of name), it cannot be modified back. It is suggested that you back up your company file before making this change.
- Go to Lists> Other Names Lists.
- Right-click the vendor (or select Activities) and choose Change Other Name Types.
- Select the Vendor column next to the chosen vendor, and click OK.
Application Certificate Window doesn’t display when launching QuickBooks Desktop after installing the Tax1099 plugin.
This issue can be due to the following reasons:
Reason 1: The QuickBooks Desktop preferences do not permit other applications to access the company file.
To solve this problem:
- First of all, go to the QuickBooks Edit menu, click Preferences.
- After that, on the left pane, choose Integrated Applications then go to the Company Preferences
- After that, uncheck the box Don’t allow any applications to access this company file then click OK.
- Close and re-open QuickBooks.
If the Application Certificate window still doesn’t display after performing the above steps, then proceed to the steps under Reason 2.
Reason 2: It may be possible during installation the antivirus or network firewall may have been enabled
- First of all, close QuickBooks Desktop.
- After that, disable your antivirus/network firewall.
- Open QuickBooks and wait for the Application Certificate prompt to appear.
If the steps above do not work, proceed to the steps under Reason 3.
Reason 3: The Tax1099 plugin installation was not successful due to steps missed or not followed
To solve this problem, you have to uninstall and then install the plugin again:
- Close QuickBooks Desktop. After closing QuickBooks Desktop, verify the Windows Task Manager for any QuickBooks Desktop instances.
- First of all, press and hold Ctrl + Shift + Esc on your keyboard.
- After that, go to the Processes tab.
- In the list of processes, look for .exe, highlight it, then click End Process.
- Close the Task Manager.
- Uninstall the Tax1099 plugin.
- Restart your computer.
- Reinstall the Tax1099 plugin.
Tax 1099 option is still not showing under vendors after successfully installing the plugin
Reason 1: This can occur if you choose the wrong option when the application certificate window pops up the first time you open QuickBooks Desktop after installing the plugin.
- From the QuickBooks Edit menu, click Preferences.
- On the left pane, select Integrated Applications then go to the Company Preferences
- Make sure the Don’t allow any applications to access this company file box is NOT checked.
- In the list of application names, look for Tax1099, highlight it and click Reauthorize.
- The QuickBooks Application Certificate window appears.
- Choose the third option Yes, whenever this QuickBooks company is open.
- Check the box enable this application to access personal data such as SSN and customer credit card data.
- Click Continue.
- In the Access confirmation window, click
- Check if the Tax1099 option is now available on the Vendor menu.
Reason 2: The Tax1099 is not marked as checked under Integrated Applications.
- From the QuickBooks Edit menu, click Preferences.
- On the left pane, select Integrated Applications then go to the Company Preferences
- In the list of applications, put a checkmark on the Allow Access column for Tax1099.
- Click OK.
- Check if the Tax1099 option is now available on the vendor’s menu.
Unable to import vendors to tax 1099
Aside from plugin issues, possible data damage may also prevent you from importing vendors to Tax1099.
To fix this:
- Try the steps outlined in this Tax1099 support article.
- If the issue persists, proceed to the following steps.
- First of all, From the Reports menu, select Vendors & Payables then click 1099 Summary.
- After that, on the 1099 Summary report, look for a vendor with minimal transactions.
- Then, open one transaction that meets the threshold, then, verify the account used for it.
- After that, create a new expense account and use it in place of the account originally used for the transaction.
- Then, run the 1099 wizard and map the new account.
- After that, upload the data to Tax1099.com
- Then, once the import is complete, go back to QuickBooks.
- After that, merge the old and new expense accounts. Note that you need to un-map both accounts in 1099 before you can change the name or merge them.
- After that, run the 1099 wizard and then map the merged account.
- Then, upload the data to Tax1099.com.
- After that, complete the process for all expense accounts used for 1099 vendors.
QuickBooks and Tax 1099 show different number of vendors and transaction sums
Tax1099 recognizes sellers and adds up the amount based on EIN. As such, the number of sellers may decrease. And the transaction amount may be dissimilar once the data are uploaded to Tax1099.
To work around this:
- Export Tax1099 and QuickBooks 1099 Summary reports to Excel.
- Compare the two reports by vendor name and amount.
- If there are two vendors in QuickBooks recognized by Tax1099 as one. You can merge them until you get the same number of vendors and the threshold amount for both reports.
Technical Support & Help
For more information, you can dial our QuickBooks Support Number +1-844-405-0904. You will be connected to our experts, who will help you resolve the issue.