In this article, we are going to show you how you can prepare and E-file 1099 MISC forms with the refreshed Intuit 1099 E-File Service that is only available to a few users in QuickBooks Desktop. In this article, you will learn the process of adding, and editing the form information and deleting it as well. Go through the complete article and try to learn it, in case you have any trouble in performing this operation then let us know through our Tol-Free No: +1-844-405-0904
It is necessary for you to E-File the 1099 forms if you pay a vendor more than $600 in a year. So, let’s see how you can use the refreshed 1099 E-File service in order to file the forms correctly.
NOTE: You have to make sure to e-file the forms by 27 January 20XX so that your contractor can postmark the 1099 forms by 31 January 20XX. However, you can also e-file the 1099 forms by 31 January 20XX, it will be still under the time period set by the Internal Revenue Service (IRS).
How to Create and File 1099s With QuickBooks Desktop
Basically, 1099s are the form of tax that you have to pay to contractors in cash, check, or direct deposit that you need to file with the IRS. You need to prepare your form and have to file it online or you can print also and mail them to the IRS. Before filing you need to get some answers like:
What and when to need to Report?
If you paid in cash, check, or direct deposit at least $600 in the previous year.
The IRS and your contractors must receive 1099s by January 31. However, we advise you to start early to ensure that your contractors receive your 1099s by January 31. To submit your 1099s electronically on time to the IRS, you have until January 31. Some states demand individual filing. Our 1099 e-file service can assist with additional costs if you need to file separately with your state.
Set up your 1099 Accounts
You might have paid contractors in a variety of categories. The majority of businesses don’t need to bother about changing their accounting; they simply classify all contractor payments as non-employee remuneration.
However, if you gave contractors several forms of cash payments, you might have to file a 1099-NEC and a 1099-MISC, and you might have to change your accounting records to track these payments separately.
Update QuickBooks Desktop
Updating QuickBooks is important if you need to process your 1099-NEC and 1099-MISC forms. In case you are using QuickBooks Desktop for Mac then you have to update QuickBooks Desktop for Mac also. After that, you need to create 1099s in Quickbooks desktop.
Create your 1099s in Quickbooks desktop
- Firstly you need to go to the vendors and then select 1099 Forms.
- After that, you have to click on Print/E-File 1099 forms.
- Then the next step is to create a backup.
- After back up you need to click on Get Started to create a 1099 form. You can create a 1099-NEC and 1099-MISC so do it carefully and verify that you are filling in the right form.
- After that select a vendor and then click on continue.
- If all the information of the vendor is correct then continue otherwise you have the option to update the vendor’s information and then continue.
- After updating the information, you have to open the drop-down of Apply payments to this 1099 box select the account you want to link the payment to map the vendor payment account, and then click on continue.
- The next step is to review the payment information and then to see detailed reports you can view included payments and also View excluded payments.
- Then you review the amount you are going to report and click on continue. If any vendors don’t meet the IRS thresholds then you can see through the View summary report.
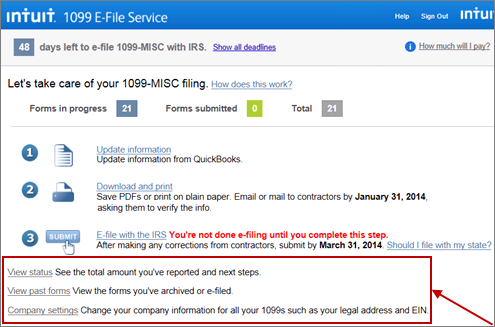
How to E-File 1099s
As soon as you receive 1099 information from Intuit QuickBooks, you’ll be able to see it in the 1099 E-File Service. Here, you can review the information and if everything looks good then you are good to go to e-file the forms to the IRS.
Follow the below-mentioned instructions carefully to do this.
- First, go to your QuickBooks Desktop software.
- Next, click on the list view and look for the E-file option.
- Now, you have to enter the payment details, then you need to click on confirm and choose the Pay and E-File option.
- You will return to the ListView window with the forms if a payment that you made was successful. You can see the ‘submitted’ status in front of those who are successfully e-filed and paid.
NOTE: Intuit QuickBooks will automatically e-file all of your forms to IRS and in addition to this your vendors will also get theirs via USPS mail. Your vendors will also receive the notification that they can now access their 1099 using the Intuit account, but this will only happen if you have included the vendor’s email address.
Adding or Editing the form Information
If there is a form in which you want to modify the information because it is not correct or see the “require info” tag on any of the forms, then there is an option to add or edit each form’s information.
- First, head to the List view, look for the form on which you want to like make changes and click on it, and open it to see the detail view.
- Now make the changes that you want to do, and when you are done with modifying all the changes, next go to the Complete Form button.
- If you want to make changes on the multiple forms simultaneously then click on the E-file Selected option in the ListView window.
NOTE: You can only edit those forms that have the ‘Saved’ tag on them. You will not be able to add or edit information on those forms that have a ‘Submitted’ tag on them.
How to make corrections to the form?
If you are wondering what to do with forms that have incorrect fields, in this section we’ll show you how you can issue a corrected form. You can correct the information such as you have filled an unnecessary form that is not required, incorrect name, incorrect money amount, incorrect tax identification number, and incorrect name. Follow the information mentioned below to fix the uncorrected filled forms.
- Go to the List View window and then find the form in which you would like to make corrections and then open it in Detailed View mode.
- Select the Correct Form option at the bottom of the screen.
- Once selected the option mentioned in the previous step, you’ll be able to edit the form fields.
- After making the required changes, you need to select the Complete Form option.
- If you are willing to correct multiple forms at the same time then select the E-File selected option from the ListView option.
- After that, you need to enter the payment information and then select the Pay and E-FIle option.
- Once the payment you made is confirmed and successful, you will be returned back to the ListView page. The form that you recently corrected will be shown with the “Submitted” tag. The original form with incorrect information will now be tagged as “VOID”.
NOTE: You will only to able to correct those forms that have the status “Accepted By IRS”.
How to Delete the Form Information
You have the option to delete those forms that you created in the first place but for some reason, you don’t need them anymore such as irrelevant or duplicate form info. But remember you can only delete the form with the ‘Saved’ tag on it.
- Go to the List View menu and then select the form that you would like to delete and then open it to see in the Detailed View mode.
- At the upper right corner of the screen, you will be able to see the Delete Form option.
- Click on the Yes, delete it to confirm your selection.
What is the meaning of statutes?
E-File Status
- Submitted: If you see this status then it means the form is already has been submitted to the Internal Revenue Service (IRS). This is respective to the IRS deadline to submit the form and this matter in meeting the IRS deadline.
- Accepted: If you see this status then it means that your form is reviewed and validated by the IRS. After you submit the form it might take up to a week for you to able to see this status.
Print Status
- Mail Submitted: It means that the information of the form has been sent out to the printing facility.
- Mailed to the Recipient: It means that the information that you have sent to the printing facility is now printed and postmarked as well. It is important to complete this step before the IRS deadline.
- In transit: The form is on the way to the recipient.
- In the local area: It means that form is in the local area of the recipient.
- Out for Delivery: It means that now the form is ready and is out for delivery to its recipient. Once this status is live, it will take the form of about 2 business days to reach the mailbox of the recipient.
Supported Boxes
You can enter the values in all boxes i.e. all boxes are supported. To learn how to do this, go to the above section of Adding and Editing the form information.
Print additional copies
In order to print the additional copies, first of all, you need to download the PDF version of the form.
- Go to the List View and then find the form that you want to print and then open it in a Detailed View.
- And then click on the Download PDF link.
- Once the file is downloaded, you can view and print it from the device you were using.
What about State Fillings?
In order to allow the IRS to transfer the 1099 information to participating states, You can E-File with help of refreshed Intuit QuickBooks 1099 E-File service that uses the Combined Federal State Filing Program (CF/SF) for this purpose.
NOTE: Intuit does not provide the information to some of the participating states that have additional obligations and exceptions.
The Bottom Line
This new method of e-filing 1099 forms is pretty simple and straight forward too. There is not too much that you need to do yourself. Intuit QuickBooks will get the most of the things done for you. In addition to this, now you can e-file, edit, delete, and make corrections to the form information all from one place.
If you encounter any issue while e-filing the 1099 forms yourself then you don’t need to worry at all. Simply, contact our team of QuickBooks ProAdvisors, who can instantly fix the 1099 e-file and any issue related to accounting or QuickBooks software. To know more about the services we offer, call us at our 24/7 toll-free customer support number +1-844-405-0904.