Want to create a backup of your QuickBooks Desktop company file, to keep your all accounting data safe? Find it here in simple steps, the article is the gateway to knowing the procedure of making and restoring the QuickBooks company file backup. Read the complete article, and be ready to get rid of the data loss hassle. In the meanwhile can contact us for help. +1-844-405-0904
It is important to back up the data before you run into a problem and lose your important data. If you own a mid or small-sized business and use QuickBooks Desktop for your bookkeeping and accounting needs, the following process can help you make back up your QuickBooks Desktop company file. Creating a backup of your company file can save you from sudden data loss. In case of accidental loss of data, these backup copies act as insurance. You can utilize them to restore a backup company file.
Procedure to Create & Set Up Backup File of QuickBooks Desktop company file
QuickBooks Desktop company file backup can be created and set up in just 2 simple steps. Here is the complete procedure to perform the task. Follow all the steps carefully, and complete the procedure;
Step 1: Create a Backup Company File
The Backup company file includes all accounting data, templates, letters, logos, pictures, and related files (QuickBooks statement writer, cash flow projector, business planner, and loan manager). But the payroll form is not meant to be saved.
There are two types of backups available for QuickBooks company files. It’s either manually or automatically. Let’s discuss the 2 methods.
Method 1: Schedule Automatic Backup in QuickBooks
The following steps to backup automatically company files are as follows:
- The first step is to switch the File and Switch to Single-User Mode.
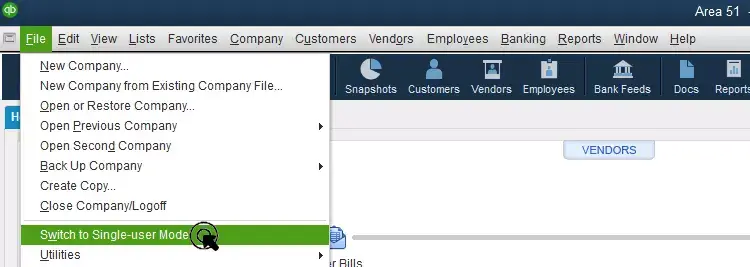
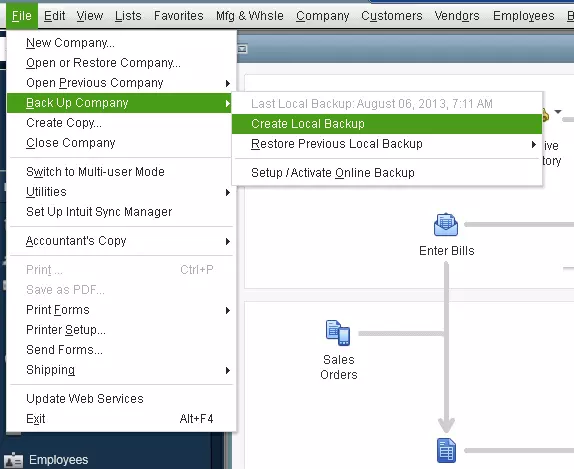
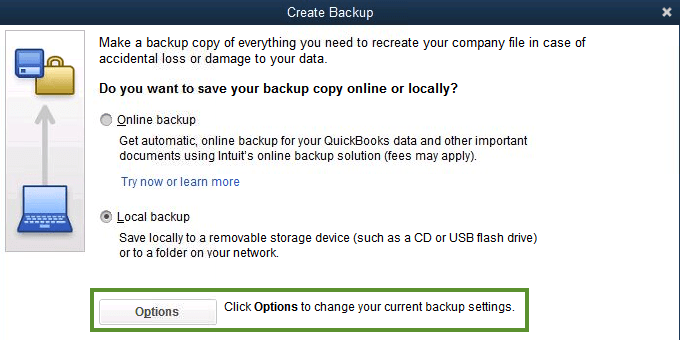
- And then, go to the QuickBooks File menu, choose a Backup Company, and then Create a Local Backup.
- Now from the ‘Create Local Backup‘ window, select the ‘Local Backup‘ option, and the ‘Next‘ option.
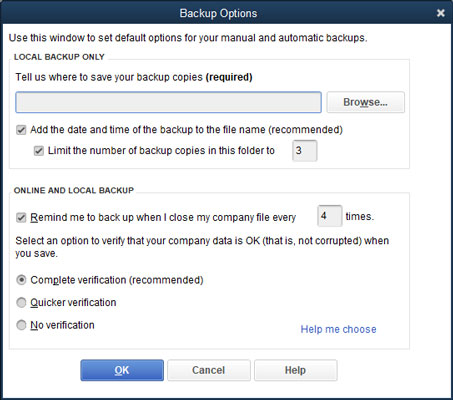
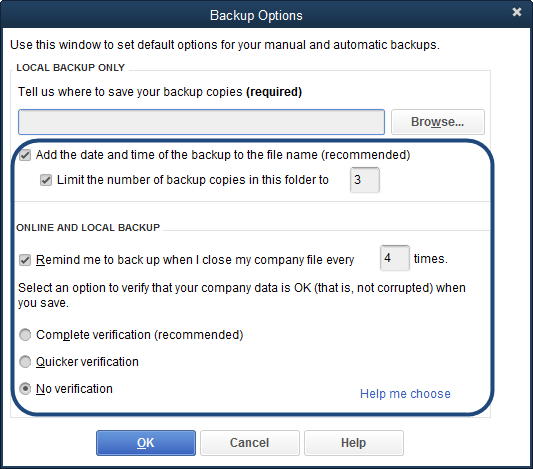
- There you can see an option of ‘Local Backup Only‘, just click on that, and select the ‘Browse‘ option to select the backup file.
- Here you can set the number of backups, but it is not mandatory to do.
- Then go to the ‘Online and Local Backup‘ section to choose the ‘Complete Verification‘ option. This step is necessary to ensure that the backup file is in good form before you save it.
- After changing all the needed sections, click ‘OK‘.
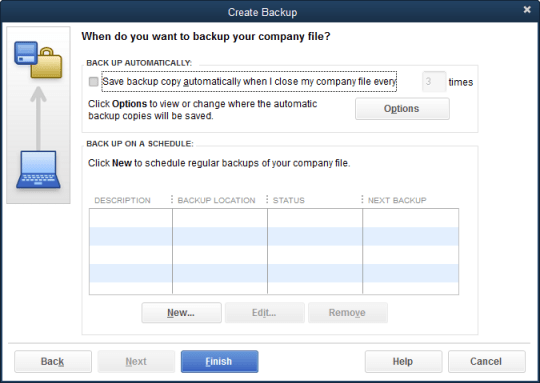
- Chose the ‘Save it now and schedule future backups‘ option, and then the ‘Next‘ option.
- If you want to make a schedule to get a backup for later then click on the ‘Only schedule future backups‘ option.
- Now click on the ‘Save backup copy automatically when I close my company file‘ checkbox, and select the number of times between backups.
- Click on the ‘New‘ option to create a schedule.
- Now you have to cover all of the data fields to create a backup schedule. Set a specific date or time of the week for the automatically scheduled backup.
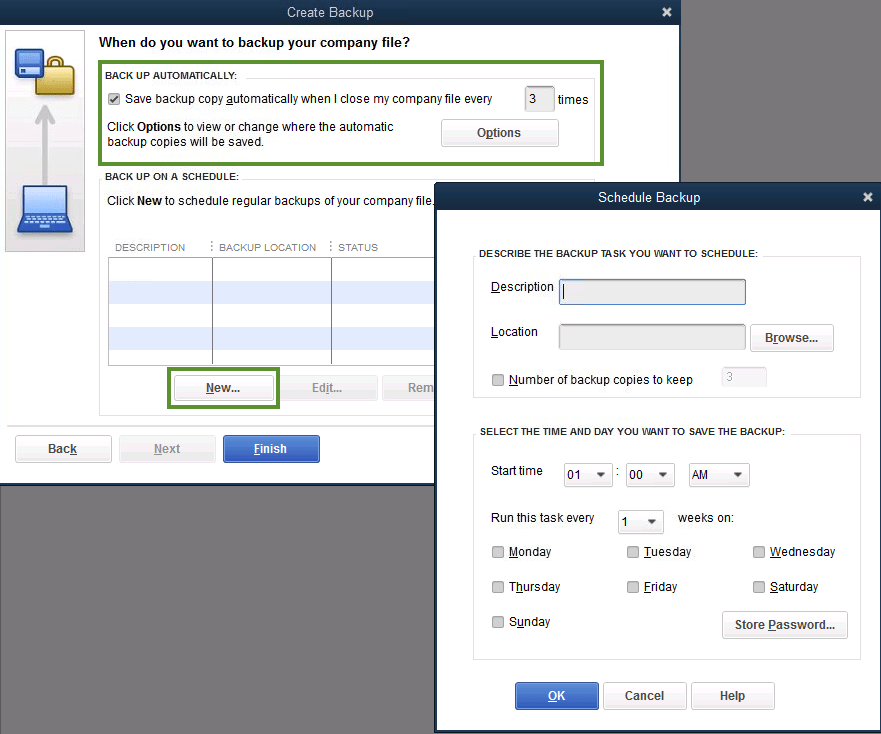
- Click ‘Ok‘ to confirm the schedule. After that, QuickBooks will ask you to enter a Windows login password for backup permission.
- After setting the schedule successfully, click on the ‘Finish‘ option.
QuickBooks will generate a back of your QuickBooks Desktop company file and schedule your future backups at the same time.
Method 2: Manually back up the company file
If the user is comfortable with manually backing up the company file, in that case, the following steps can be taken.
- To get started, go to the File menu in QuickBooks, and then choose Single-User Mode.
- After that, go to the File menu once again and then go to the backup company. In addition, select the option of Create Local Backup.
- The next step is to select the local backup option in the window and then press Next.
- Moving forward, the user must click Browse in the Local Backup Only section, followed by selecting the location to save the backup company file.
- After that, determine the number of backups that the user can keep. It should be well known that this step is not a compulsion.
- The user is recommended to set a backup reminder using the Options in the Online and Local Backup section.
- Now, the user needs to run a test to ensure that the backup file is in good condition before saving.
- And then, press and click on the OK button.
- The user then needs to choose the Save it now option, with the next option next.
These were the 2 methods to create a company backup file. Choose any one of the methods to create a backup file. And as we have mentioned, the backup of the payroll form can’t be done by following the above 2 methods. So if you want to have the backup of the payroll form then you need to create it later by following the below procedure;
How To Create a Backup of QuickBooks Payroll Form
You can’t automatically back up the payroll forms. Here you need to print the copies and save them to the hard drive or if you have QuickBooks Enhanced Payroll, they can be saved as PDFs.
- First, click on the ‘Start’ button.
- Open ‘File Explorer.
- You have to browse your computer for the folder:[your company name] Tax Forms. In this folder, all of your payroll data will be included.
- After saving the entire folder, send it to the accountant.
- And also send the backup company files to them.
- Your accountant has to restore the Tax forms folder in the same folder where your company file has stored.
- After the checking is done by them, tell them to copy and send the Tax Forms folder to you. To open the updated forms follow the steps on your computer.
Step 2: Adjust backup settings in QuickBooks
If the user wants to find out when he has backed up the company file, in that case, go to the File menu and then the Back Up Company option. Thereafter, the user will see the time and date at the top of the menu.

If the user wants to change backup preferences, the steps below may work well:
- First, select the File and go to the backup company. Then proceed to click on Create Local Backup.
- The upcoming step is to select Options.
- And to finish the process the user needs to make changes and hit the OK button.
Next Step: Restore the Company File Backup
Now that the user has a backup of the company file, the user can use QuickBooks to restore the company file. It should be noted that this file has a .qbb extension at the end of the filename. The point to note here is that if the user places the backup company’s files on an external device or hosting service like Box, the user will need to move them to a local hard drive before restoring them.
Conclusive Line
We hope you find this article informative and will be helpful in making a back of your QuickBooks Desktop company file. If you need any assistance, you can reach us at our toll-free number i.e. +1-844-405-0904. Our certified QuickBooks experts will handle all your problems of backing up your QuickBooks Desktop company file in no time.
FAQs
How to restore a backup of your company file if it is on an external device?
You need a backup of your company file at the time when your system is system is crashed otherwise you may lose your data if your company backup file is on an external device then you have to follow the given steps.
- The first step is to transfer or move your backup file from the external device to the local hard drive.
- Now go to the file menu and then click on open or restore company.
- After that, you have to click on Restore a backup copy and then click on the Next button.
- After clicking on the next button you have to click on Local backup and then click on Next.
- Now you have to browse your backup file which is .qbb.
- After getting the .qbb file you have to select the folder where you want to save your company file, and click on open after choosing your folder.
- Now the last step is to click on save.
*Make sure you chose different folder where you don’t have any prevuous .qbb file otherwise it’ll overwrite with the new one.
Where is the QuickBooks backup files located?
If you were not saved your back-up in your desired llocation or folder then it is saved in the default location that is:
C:\Users\Public\Public Documents\Intuit\QuickBooks\Company Files, that is in the C drive in the folder of Intuit.
What is QuickBooks .qbb file?
Qbb file is the back-up file of your QuickBooks comapany file that will be used for restoring your data if lost due to crashing your company file.
What is the difference between Qbb file and Qbw file?
When you want to restore your data or company backup file then it contains all accounting data and forms Qbb file and then QuickBooks create a new company file that is Qbw based on your last backup saved.
How Access the Qbb and Qbw file in your system?
If you want to get or locate your Qbb and Qbw file then follow the given steps:
- The first step is to open the start menu from your Windows.
- Then in the search box, type “File Explorer” and open File Explorer.
- The next step is to open “My Computer” or “This PC”.
- Then again click on the search field and include the asterisk (*) mark before the file extension that is *.qbw and *.qbb to file all the files related to that extension.
- Now you can see all the files of QBB and QBW on your screen.