Here, we will discuss how to manually upload transactions in QuickBooks Online, which means how you can download your transactions from your bank or credit cards and after downloading how to import those transactions manually in QuickBooks Online. So, all such questions are answered here to quench your thirst for learning. Go through the article here we have described it in steps with activity images along with. Hope this article leads you to your solutions but if still having trouble then contact us through toll-free no: +1-844-405-0904
As we know adding the bank and credit card accounts is one of the most prominent timesavers at QuickBooks Online. After connecting, QuickBooks automatically downloads all the last 90 days or more than that of transactions from your bank. If you want to make old transactions with your bank, or if your bank is not connected to QuickBooks, you can upload them manually. Now, let’s move further and discuss the steps to Manually upload transactions in QuickBooks Online.
Steps to manually upload transactions in QuickBooks Online
Follow these below steps sequentially to manually upload transactions in QuickBooks Online.
Step 1: Choose a date range
To ensure that you do not import previously recorded transactions, you will need to get the earliest transaction date in your account. This restricts copies.
- Open QuickBooks Online, look for the Accounting menu and click on the Chart of Accounts.
- Now, look for the bank or credit card account in which you want to upload more transactions. Then click on the view register.
- Keep on Scrolling and come to the bottom of the list.
- Here, insert the date of the oldest transaction. In most cases, the opening balance is the oldest transaction.
Step 2: Download transactions from your bank
- First, you have to log in to your bank or your credit card’s website.
- Follow the instructions of your bank for how to download the transaction to your computer. Some banks ask this feature the QB WebConnect. Each financial institution has different stages. Here we will discuss the steps for Bank of America, Chase, and Wells Fargo.
- Keep in mind, the date range for the download should be at least only one day before your oldest transaction.
- Now, download all your transactions and save your file anywhere on your computers where you find it, whenever you need, such as your desktop, downloads, or any folder.
Step 3: Review the file format and size
Your bank can give you the option to download/export your transaction. Choose one of these so that you can easily upload the file to QuickBooks Online:
- Comma-Separated Values (CSV)
- QuickBooks Online (QBO)
- Quicken (QFX)
If you want then use the QBO format. QBO files from banks must already be formatted for QuickBooks. If in case your file is not formatted, you can repair it and upload it. The 350Kb is the maximum file size. If your file is too big in size, reduce the date range, and after download your transactions in small batches.
Step 4: Start your upload
These steps are for accounts that are connected to online banking
Here are the steps to start your upload, If your account is connected to online banking.
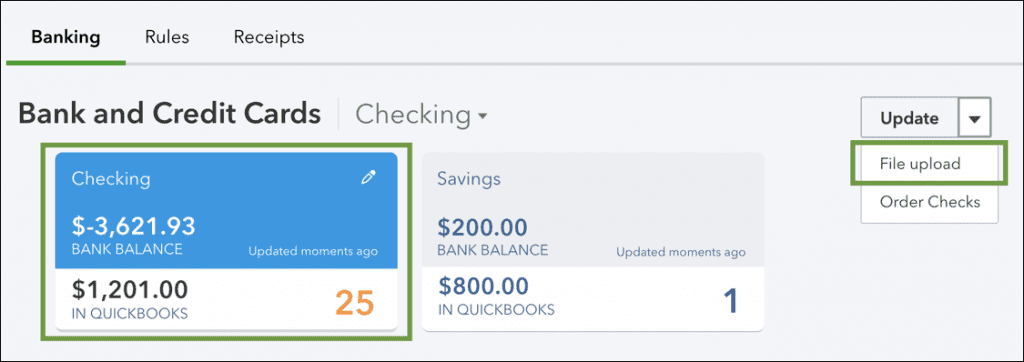
- Open QuickBooks Online and look for the Banking menu or Transactions menu. Later, click on the Banking tab.
- Now, click on the blue title for the account that you need to upload into the transactions.
- Click on the Update ▼ and after that choose to File upload.
These steps are for accounts that are connected to online banking
If you do not want to connect your account, or also your bank can not connect to QuickBooks, Here are the steps to start your upload.
- Open QuickBooks Online then look for the Banking menu or Transactions menu.
- Later, click on the Upload transactions.

Step 5: Upload your file into QuickBooks
Here are the steps to upload your file into QuickBooks. Go through with below steps:
- Click on Browse and choose the file that you downloaded from your bank, then click on the Next.
- Look for the QuickBooks account ▼ drop-down menu, and click on the account that you want to upload into the transactions, and click on the Next.
Note: If in case, you have not still connected your account to QuickBooks, you may not have an account to upload the transaction to. If you cannot see any account there then from the dropdown menu, click on Add New to create a new bank account.
- Now, go with all the onscreen guidance. Later you have to match the file columns with the QuickBooks banking fields, then click on Next.
- When you’re ready, select Let’s go. QuickBooks will add the transactions to your account.
- When you are ready, click on let’s go option. QuickBooks will automatically add transactions to your account.
Step 6: Categorize the transactions
Now all your transactions are saved in the QuickBooks, the time has come to match and categorize transactions. Keep in mind, transactions are not fully in your accounts until you have reviewed them.
Step 7: Reconcile the transactions
Now you have to reconcile your transaction because your transaction is in QuickBooks This assure that your books are correct and there are no duplicate transactions.
For example, you might need to edit your initial balance if the transactions you just uploaded are older than your initial balance. It is possible that you have included some (or maybe all) of the old transactions as part of the initial balance. You need to reconcile transactions to ensure that QuickBooks is not counting them double.
Hope, you have understood nicely the steps to manually upload transactions in QuickBooks Online and after reading this article you will be able to perform it by yourself. But if you still face any issue or query then feel free to reach us directly by dialing our toll-free+1-844-405-0904 and get-in-touch with our ProAdvisors and get instant help for your issue. We are 24*7 available in the assistance of our customers and always try our level best to resolve your issues.