How do I get my W-2 from the workforce? How do I set up the QuickBooks Workforce? Why W-2 doesn’t show up? Are such questions bothering you? Stop worrying about it, you just landed in the place where you can find the solutions to your every problem related to QuickBooks Workforce. In this article, we will discuss how you can set up a QB Workforce account and view paychecks and W-2. Along with this, you will get the steps to invite employees into the Workforce and the solutions to the queries you might be facing. If you need QuickBooks support, connect with our QuickBooks ProAdvisor by dialing the toll-free number [QuickBooks].
What is QuickBooks Workforce?
QuickBooks workforce is an important online portal tool that helps to bridge the gap between the owner and the employee. It also allows the employees to check the payroll view print their paystub and view W-2. It also facilitates that employees get notified by email about payroll services. After installing Quickbooks Workforce, it is beneficial for Employers to pay salary, overtime payments, and bonuses easily. With the help of QuickBooks workforce employees have also got access 24×7 to their pay, and necessary tax information, and view their payments online. So, overall QuickBooks Workforce is a tool that employees can use to view their paychecks and W-2. When the employer runs payroll, the employees who already set up the QuickBooks Workforce account will be notified by email that they can view pay stubs and W-2.
If you are a payroll services user, QuickBooks Workforce is part of that service. If the employer cancels the payroll services, employees can access the Workforce for 18 months. Make sure to print all the required Workforce documents for future records.
Here are some official & important links that you need to know
- Payroll Employee Portal Experience: https://workforce.intuit.com/app/payroll-employee-portal-ui/ius/sign-in
- Intuit Paychecks: https://paychecks.intuit.com/
- view my paycheck intuit: https://static.onlinepayroll.intuit.com/LearnMore/LearnMoreViewPaychecks.html
- Paycheck Records: https://workforce.intuit.com/app/payroll-employee-portal-ui/migrate
- Sign In Online Payroll for Small Business: https://iop.intuit.com/login/login.jsf
How to Setup QuickBooks Workforce in Quickbooks Desktop
Procedure for Intuit workforce login
You need to log in and set up your QuickBooks Workforce account to view paychecks and W-2. Once you receive the invitation link from your employer, you can set up your account. After setting up you can view your employment info. Let’s start the process to set up the Workforce account.
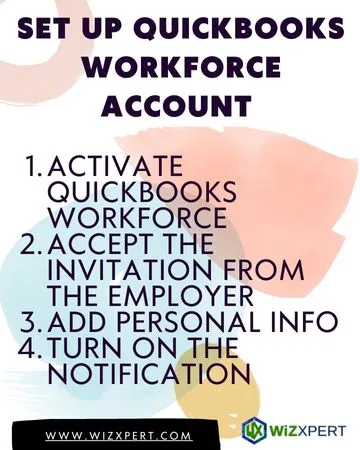
Step 1: Activate QuickBooks Workforce
Firstly you should activate QuickBooks Workforce. For this, you have to log in to QuickBooks Workforce but keep remembering that you have the latest version of the QuickBooks desktop with an updated payroll feature. In case you are using the older version, it shows some error message or the employee may face trouble in log-in.
Step 2: Accept the Invitation from the Employer
After activating the QuickBooks workforce, you have to invite your employees to use their accounts. Employer invites employees to create or log in to their Workforce account. For employees, to view their paychecks and W-2s, they need to accept the invitation sent by their employer. Once the employer sends you the invitation, it will be valid for up to 30 days. After that, employees will be unable to create their accounts. After accepting the invitation by employees, fresh paystubs and w-2’s available on QuickBooks workforce.
Follow the given steps to accept the invitation.
- Open Gmail and search for the email with the subject [Business Name] that has invited you to view your pay stubs online.
- If it is not there, check the spam folder. If you still can’t find it anywhere, let your employer know about it. And ensure that they will resend the email to the correct email address.
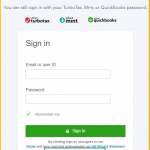
- Once you get the email, open it and accept the invitation by selecting Create Account or Sign in.
- Using your email and password, create your Intuit account. If you already have an Intuit account for TurboTax, Mint, or a previous QuickBooks Workforce account, sign in with that email address and password.
Important:
- If you already have a QuickBooks Workforce account, you can accept the invite from a new employer. Give them the email address that you use for your existing QuickBooks Workforce account.
- Use a different email address for your QuickBooks Workforce account if you have already QuickBooks Online access such as QuickBooks Workforce, Turbotax, and Mint Account you can sign in with that account. It is better to use QuickBooks Online with your work email address and use Workforce with your personal email address.
How to troubleshoot sign-in issues?
Sometimes you may confront some issues while sign-in, so in that case, you can follow them to avoid these issues or troubleshoot these issues by giving steps.
- You can accept another invitation from your new employer but you have to log in to your existing QuickBooks workforce account. Keep remembering one thing always give the same email address that is used for the existing workforce account.
- QuickBooks online access will not work for the QuickBooks workforce account so you have to use a different email address for the (Intuit) QuickBooks workforce account.
- It is recommended to use your personal email address for the QuickBooks workforce account and your work email address for QuickBooks online.
- It may happen that you’ll get a new invitation from your employer so you have to accept the invitation through a recent email which is sent by your employer.
Step 3: Add Employee’s Personal Info
When an employer hires, they may invite their new employees to add their personal info. To add personal info, follow the given steps.
- Please find the email sent by your employer and open it.
- Click on Get Set up or Complete Setup now (or Sign in).
- Fill in all the required info such as personal, bank account, and W-4. If your employer didn’t select to pay via direct deposit, the bank account option disappears for you.
- Check the information you filled in and sign in to W-4.
- Click on the Save or Submit option.
Once you hit the save button, your information is saved and sent to your employees. Now your information is visible to the employer. If you need to make any changes, let your employee know.
Step 4: Turn on the Notification
You can turn on the notification to get an email reminder when your new paychecks are available. To turn on the feature, follow the steps.
- Go to workforce.intuit.com and sign in to the account.
- Click on the Setting icon.
- Choose the Email Notification
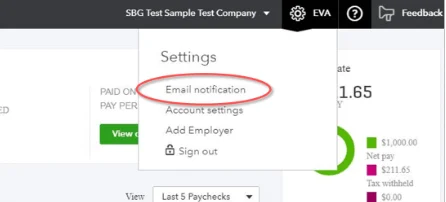
- Click Send me an email when new pay stubs are available.
How to set up Intuit Workforce in QuickBooks Online Payroll?
Users of any version of QuickBooks Online Payroll can use and access QuickBooks Workforce. It is incredibly simple and only requires a few steps. These are what they are:
Addition of Employees to QuickBooks Workforce
Employers have the option to add employees automatically in the employees section by choosing employees and their e-mail addresses.
Account setup of employees by Email
From the QuickBooks online payroll center, employers can notify their employees about invitations. Reassure them to complete the form as well. They can now check the data on their W-2s and paystubs in this manner.
Use T sheet Time Tracking
If you are a premium and elite user of QuickBooks Online then the T sheets Time tracking feature is available for you but it is optional.
View Your Paychecks and W-2 in QuickBooks Workforce
After setting up your Workforce account now you are ready to view and print your paychecks and W-2. Follow the steps to view your home address, bank details, your joining date, and other employment info.
View your information in Workforce
You can view, download, and print the pay stubs, and see time off, and year-to-date pay QuickBooks Workforce anytime. Let’s discuss how you can do this.
- Sign in to the Workforce account.
- Click on the Paychecks.
- Choose a date range. You can view multiple paychecks at a time for up to one year.
- After doing the above steps you have to follow any one of the following steps:
- Click on Download on the pay stub you want to download.
- To open, view, download, or print, select a pay stub.
- If the Download all button is available for you below the paycheck list, choose it to download all the pay stubs at once. (not available for everyone)
Note* You’ll get a reminder when your new paystub is available, it will be notified through email. Turn on the notification by selecting email notification through the settings menu. Click on Send me an email when new paystubs are available.
View your Time Off, Year-To-Date Pay, and Personal Info
The paycheck screen provides the info that could be very important to you. Look at the points given below describing what you can view on the paycheck screen.
- Available time off You can check your vacation, sick, and other time off balances.
- Year to date: check your year-to-date net and gross pay, deductions, and withholding easily.
Select Profile to view your personal info
Missing pay stubs
Due to some reasons, you may not see all the pay stubs in your account. You can check with your employer.
- Past pay stubs must be uploaded by your employer.
- Some pay stubs are missing if the payroll isn’t run by your employer.
- If your employer still has not invited you to the new account after switching to payroll services.
- You can’t see paystubs if the payroll service is canceled by the employer.
View your W-2
From the W-2 screen, you can view your W-2 copies B, C, and 2. You might have to verify your phone number or some personal info first to view it. Follow the quick steps to view your W-2.
- Click on the W-2 menu.
- Click on the W-2 copy that you want to view or download. You can also print W-2.
Invite Your Employees to QuickBooks Workforce
An employer can invite their employees to add their personal info or view their pay stubs and W-2 in QuickBooks Workforce. This feature is only available in QuickBooks Desktop Payroll Basic and Enhanced or QuickBooks Online Payroll. Let’s discuss the steps for both in deep.
Invite your new Employee:
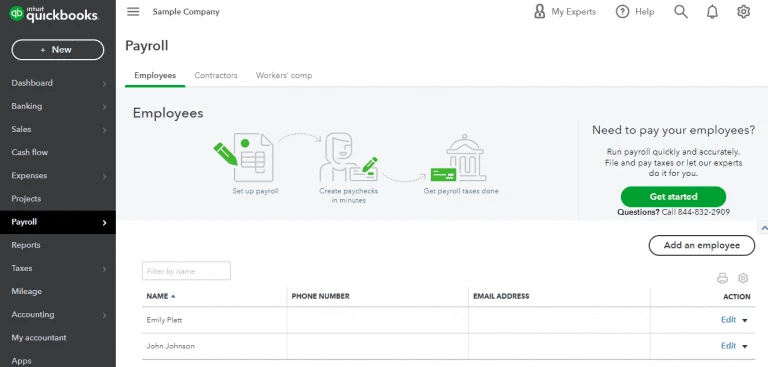
- You have to choose the Employees after that click on Employee Center.
- After that, you need to click on Add new to add the new employee.
- Now in the Address and Contact tab, you have to add the email addresses of the employees.
- Choose Employees and then click on Manage Payroll Cloud Services.
- Now go to the QuickBooks workforce and click on Invite employees.
- Login to the Intuit account but ensure the person owns the QuickBooks payroll license.
- After doing the above steps, select the employees to add to the workforce as well as their email addresses.
- Now finally you can send invites by clicking on Send Invite. You have the option to see the status in the Invited column.
QuickBooks Online Payroll
In QuickBooks Payroll you can invite both new and existing employees to the Workforce account. Follow the steps to invite.
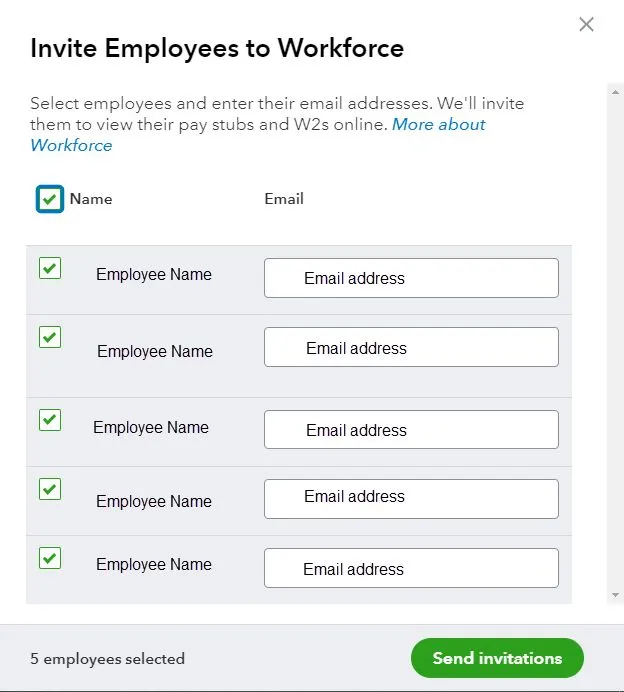
Set up and invite a new employee
- Click Payroll and then Employees.
- Click Add an Employee.
- Add the employee’s info and email address. This will automatically invite employees by sending them an email.
- If you want the new employee to add their personal info, mark the checkbox Ask this employee to enter their personal, tax, and banking info with QuickBooks Workforce.
- Once you finish, hit Done.
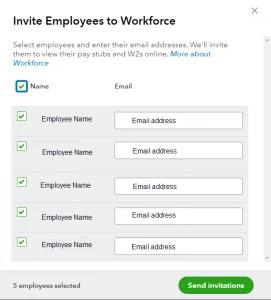
Invite an existing employee
- Click Payroll and then Employees.
- Click Invite to Workforce.
- Find the employees you want to invite and check the box next to their names. Enter their email address.
- Once you finish, click Send invitations.
QuickBooks Desktop Payroll
Invite your new and existing employees to the QB Workforce with the following process.
Invite an existing employee
- Sign in to QuickBooks as an admin.
- Go to the Employees menu, and choose Manage Payroll Cloud Services.
- Make sure the status is turned on under QuickBooks Workforce. Click Invite Employees.
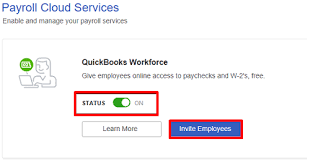
- Sign in to the Intuit account. You can only sign in if you have a QuickBooks Payroll license.
- It will show you an employee list. Choose the employees to add and fill in their email addresses.
- Click Send Invite. Once you have done it, it shows the Invited in the status column.
Invite a new employee
- Click Employees and then Employees Center.
- Click on Add new and add the new employees.
- After adding the employees, follow the steps mentioned above in Invite an existing employee to invite them.
Frequently Asked Questions
Why am I unable to sign in to the QuickBooks Workforce?
There could be many reasons why you fail to log-in to QuickBooks Workforce. Let’s discuss this in detail.
1. If your employer sends you multiple emails, so make sure to log in with the latest one.
2. If you have access to QuickBooks Online, don’t use the same email address for QB Online and Workforce accounts.
3. If you already have an account with other Intuit products and didn’t provide that email to the employer, use the one that you provided to your employer.
What do I do if my W-2 doesn’t show up?
You can view your W-2 before 3 January. It shows up past 3 years of W-2. There are some reasons why didn’t get your W-2.
1. Intuit didn’t receive your W-2.
2. Intuit received your W-2 but still working on it.
3. Your employer didn’t use QuickBooks payroll to file W-2.
How do I change my email address and password?
You can change your email ID and password but it will change your sign-in with other Intuit products. If you want to change it, do it by following the steps given below.
1. Click on the Setting icon.
2. Choose Account Settings.
3. Select Sign-in & Security to change your email address and select Personal info to change your password.
How do I delete the Workforce account?
You can send the request if you are an employee and want to delete your QuickBooks Workforce account. Once your data is deleted, you can’t get it back.
1. Sign in to the QuickBooks Workforce account.
2. Go to the Setting icon and choose Account Settings.
3. You’ll be redirected to the Intuit page. Click on Data Privacy from the left menu.
4. Click Delete and select Make a Delete request.
Is QuickBooks Workforce Intuit Login secure or not?
This is a very important question that comes into the minds of employers as well as employees whether it is secure or not due to the sharing of information with each other. So, the answer is yes it secure as the other QuickBooks programs. When an employee accesses the system, both the employer and the employee must sign in and verify their identities. In order to secure their data, every employee must also go through the two-factor authentication process.
We have discussed how you can set up an account in QuickBooks Workforce, view pay stubs and W-2s, and invite employees. Hopefully, you find the article helpful. If you still have any queries related to QB Workforce, contact our QuickBooks ProAdvisor to get instant QuickBooks support. Feel free to dial our toll-free number +1-844-405-0904.