Don’t know how to log in to ViewMyPaycheck Intuit? In this article, you will learn how to log in and set up ViewMyPaycheck so that your employees can get access to view their pay stubs and W-2 online. If you are facing ViewMyPaycheck Intuit not working issue, then this article is going to be important for you as well. Read the article to learn Intuit ViewMyPaycheck login steps and solutions to fix not working issue. If you need expert support, contact our QuickBooks ProAdvisor toll-free: +1-844-405-0904
Do you want your employees to view their paychecks and tax-related information online then you can start using ViewMyPaycheck – an online portal offered by Intuit that allows you to do so. Once QuickBooks ViewMyPaycheck is enabled then QuickBooks will automatically send the payroll information to Intuit. Employees can use the Intuit ViewMyPaycheck login(paychecks.intuit.com) to view their pay stubs and current year W-2 Forms.
Requirements to Enable ViewMyPaycheck in QuickBooks
Before activating ViewMyPaycheck in QuickBooks, you need to know what are its requirements. Read the following to know the view my paycheck intuit requirements:
- Make sure that you are using the latest QuickBooks version and your system and windows compatible with that QuickBooks version.
- Check whether you are on the latest update of QuickBooks payroll or not.
- If the payroll cloud services are not available, then you can’t use cloud payroll and other maintenance issues.
- Make sure that you have administrator rights and log in as an administrator.
3 Steps to Enable Intuit ViewMyPaycheck
Here are the steps for how you can enable ViewMyPaycheck intuit. Follow the steps and enjoy your new experience with QuickBooks ViewMyPaycheck.
Turn on QuickBooks ViewMyPaycheck Service
For using this service first, you need to enable it from Payroll Cloud Services. This feature is available in all QuickBooks Online Payroll services.
Before starting, we recommend you update QuickBooks and Payroll Services to the latest release for a flawless experience.
- Select the ‘Employees’ from the menu bar at the top and then click on the Manage Payroll Cloud Services.
- If the manage payroll cloud services are not showing on the Desktop company page then you are not in the latest update of QuickBooks payroll.
- Under the ‘QuickBooks Workforce‘ select the ‘Payroll Cloud Services Window‘ option, and then turn the status on.
- Now you need to confirm a pin and save all the changes.
Send Information to Intuit
- Click on the ‘Return to QuickBooks‘ option to confirm the window.
- Upload the paycheck details to Intuit, and run payroll.
- Upload pay stubs, before the employee sign in to the QuickBooks workforce. You can follow the below procedure to upload the paycheck details after each, and every payroll.
- Normallycreate a paycheck in the QuickBooks Desktop company file.
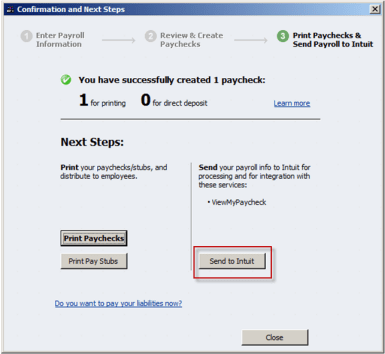
- Add on the printing checks, and click the ‘Send to Intuit‘ option on the confirmation page, and on the next page.
- Now in the ‘Send/Receive Data‘ window, click the ‘Send‘ option.
- Put the payroll service PIN, when you will prompt.
- If in case, you forget to select the ‘Send to Intuit‘ option after the creation of paychecks then you can go for the alternative. And i.e. select the ‘Send Payroll Data‘ option from the ‘Employee‘ tab.
- Upload historical paychecks for the employee, so that they can view the pay stubs prior to setting up the QuickBooks Workforce. You need to do this if you are doing it for the first time.
After setting all the things, you may be asked for the account confirmation. To confirm your account follow the below procedure:
- When you will be prompted for the account confirmation with a code, you will get an option to choose the way to receive the code.
- So click on the ‘How you would like to receive your code?‘, and choose any one of the options.
- Click on the ‘Continue‘ option.
- If the email you are using is not linked with QuickBooks then you can update your email by selecting the ‘Confirm my account in a different way‘.
- Don’t skip this process, complete it with the confirmation code.
- Check your mail Id for the code (It make take some time to receive the code in the mailbox, so wait for some time).
- Enter the code in the field of confirmation code, and select the ‘Continue‘ option.
- If in case, you didn’t receive a code then, select the ‘Didn’t received a code‘ option. QuickBooks will sign in to QuickBooks Workforce automatically, after verifying your details. But make sure to check the spam/ junk folders of your mail.
NOTE: If you are already a payroll service user then you’ll be asked to enter the existing PIN.
Send ViewMyPaycheck (paychecks.intuit.com) link to the employees
After sending the paychecks information to Intuit. Now you need to send the website address (paychecks.intuit.login) to the employees.
Employees who already have Intuit account ID and password can directly sign in and view their paychecks.
But the employees who don’t have an Intuit account need to sign up. To create an Intuit account follow the below steps.
- Visit paychecks.intuit.com and click on the sign-up.
- Enter the email address. (If the email is already registered then Intuit will send you a link on this Email ID. You can use this link for sign-in.)
- Now create a password that you’ll be using to log in to the site.
- You need to pick a security question and an answer. In case you forget your password in the future.
- Click on sign-up.
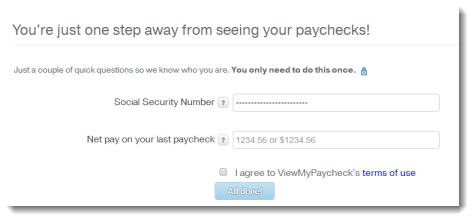
- Now enter your SSN (Social Security Number) and Net Pay (amount after-tax deduction) then finally click on All done.
Send W-2 Forms to Employees using View my Paycheck Intuit
Employers can also share W-2 Forms with the employees using this website.
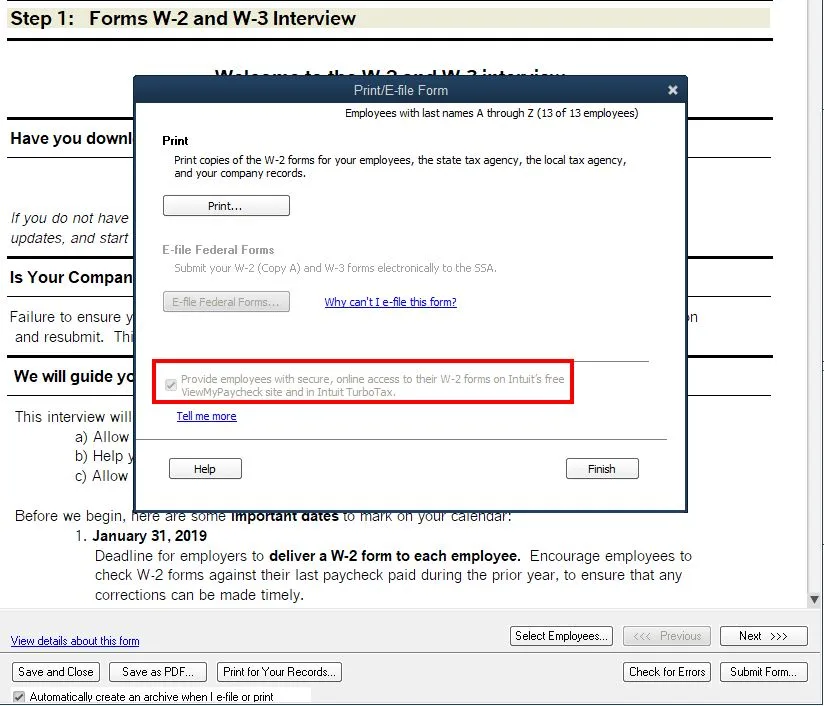
- Create a W-2 Form of an employee as usual and after examine it. Submit the form.
- In the next Print/E-file Form window, tick the box ‘Provide employees with secure online access to their W-2 Forms on Intuit ViewMyPaycheck site’.
After that QuickBooks will automatically send emails to the employees and notify them about the availability of W-2 Forms.
How to Fix ViewMyPaycheck Not Working Issue
If QuickBooks ViewMyPaycheck is showing the error “Fix display my paycheck not working”, you need to follow the given steps to solve your query.
Solution 1: Open QuickBooks Workforce in the private window.
Open the private windows from the following shortcut keys to open the private windows.
- Press Ctrl + Shift +N for Google Chrome.
- Press Ctrl + Shift +P for Mozilla firefox.
- Press Ctrl + Shift +P for Internet explorer.
- Press command + option + P for Safari.
Solution 2: Clear your Browser’s cache
The browser saves data in your system so that it loads faster when you again visit the website. When the browser memory gets full, it can’t save the data anymore and create various QuickBooks issues such as ViewMyPaycheck not working issue. To solve this issue, you need to clear your browser cache. You can simplify your task by using the shortcut keys given below.
- For Google Chrome, Mozilla Firefox, and Internet Explorer press Ctrl + Shift + Del.
- For Safari, Press Command + Alt + E.
Solution 3: Use the Supported and latest version of Browser
Intuit ViewMyPaycheck not working issue can also arise when you are not using the supported and latest version of your browser. You need to use a browser that is updated and compatible with QuickBooks software. Check your browser version and compatibility with QuickBooks and take steps accordingly.
Frequently Asked Questions
If you have any question, read the below questions and their answers to solve out your query.
Is ViewMyPaycheck free to use?
Intuit ViewMyPaycheck is working with QuickBooks 2009 or later versions. This service is free to all existing QuickBooks Payroll service users.
Is there any app for ViewMyPaycheck?
You can access Intuit website through the mobile phone or a computer system browser. Intuit has not developed any native mobile app yet.
How to resend an invitation to the employee?
If any one of the employees didn’t get the invitation then ensure that the mail address is correct, and there is no invite mail in the junk folder. After that, you can follow the same procedure to invite employees.
How to remove employee access from QuickBooks Workforce?
When you are not able to remove an employee’s access from the QuickBooks Workforce, you can turn off the access of the QuickBooks workforce to the QuickBooks payroll.
You can follow the below procedure to turn off the QuickBooks Workforce. But we will not recommend doing this, because it can affect your payroll account.
1. Select the ‘Manage Payroll Cloud Services‘ option from the ‘Employees‘ menu.
2. And then turn off the status under the QuickBooks Workforce.
3. Lastly, save it.
ViewMyPaycheck will help you with lots of work but only if you know how to optimize all the features. You can easily distribute pay stubs and W-2 forms to the employees easily and they can print them whenever they want using the website. So if you want to know about the features of using ViewMyPaycheck and how to use them effectively or ViewMyPaycheck is not working then you can contact our team of QuickBooks ProAdvisor through a 24/7 toll-free number +1-844-405-0904. Our team consists of certified and experienced technicians who can solve any query instantly.