If you want to accept an upfront deposit or retainer for products or services, you will need to take several steps to get that money. So, here are the easy steps on how to set up, record, and manage upfront deposits in QuickBooks Desktop. In this article, we will discuss in deep – fromsetting up a liability account to managing a canceled job. For any assistance contact our QuickBooks ProAdvisor through Toll-Free No. : +1-844-405-0904
Steps to Setup, Record, and Manage Upfront Deposits in QuickBooks Desktop
Step 1: Set up your account for upfront deposits or retainers
First, you have to set up a current liability account before accepting the upfront deposits or retainers. The reason for this is that upfront deposits and retainers are liabilities, not an income, even if you deposit money in your bank account.
Check out the below steps to create a liability account:
- Open QuickBooks Desktop, and go to the Lists menu and click on Chart of Accounts.
- Right-click on the Chart of Accounts window, and look for the New from the pop-up menu.
- Later click on the Other Current Liability as to the Account Type.
- Now you have to insert a name for the account in the Name field(e.g., Upfront Deposit).
- Note: As long as you are not tracking existing upfront deposits or retainers, you should set up an account with zero opening balance.
- Click on the Ok.
Once your account is created, now you have to generate an item to use while recording upfront deposits or retainers.
Step 2: Create an upfront deposit item
If you want to accept an upfront deposit or retainer, then you have to set an item to use when recording a related transaction. This item is associated with the liability account that you set up to record only the upfront deposit accurately.
Check out the following steps to create an item:
- Open QuickBooks Desktop, and go to the Lists menu, later click on the Item List.
- Right-click on the Item List window, and look for the New from the pop-up menu.
- Now, go to the Type drop-down menu, choose the purpose of the deposits you get.
- If you collect upfront deposits for services, you can select the service, or if you receive upfront deposits for products, you can choose other charges.
- Now you have to insert a name for the account in the Name/number field(e.g., Upfront Deposit).
- Click on the Advance Deposit Liability account you have created from the Account drop-down list.
- Click on Ok.
Now you can use this item to record for accept upfront deposits or retainers.
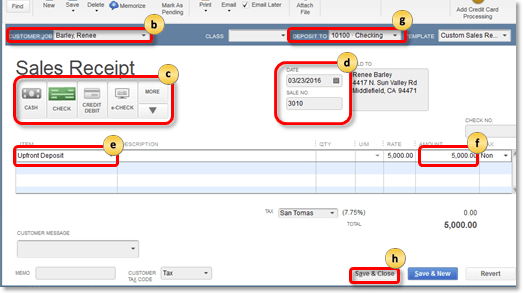
Step 3: Record upfront deposits or retainers you receive
You must record an upfront deposit or retainer from the customer when you receive it. Check out the below steps to do the same:
- First, go to the Customers menu and click on the Enter Sales Receipts.
- Now, go to the Customer: Job drop-down menu, click on the customer or job.
- If the Deposit field displays, click on the account in which to deposit money.
- If this field is not visible to you, then the funds are recognized as undeposited funds and can be deposited later.
- Next, go to the Payment Method.
- Now, insert the appropriate information, like the Date and Sale No, in the relevant fields.
- Go to the Detail section and click on the Upfront Deposit item you generated from the drop-down list of items.
- Insert the amount of the deposit or retainer in the Amount field.
- Click on Save and Close.
Always remember, your deposit or retainer is ever reported as a liability.
Step 4: Create invoices
You have to create an invoice for the product or service while receiving a retainer or an upfront deposit for a product or service. Check out the below steps, how to do it:
- First, go to the Customers menu and click on the Create Invoices.
- Now, go to the Customer: Job drop-down menu, and click on the customer or job.
- Insert all the appropriate information like the Date, Invoice, Bill to/Sold to, and Terms in the relevant fields in the form.
- Now, from the Detail section, click on the items like products or services, to combine in the sale.
- Click on Save and Close.
Step 5: Apply upfront deposits or retainers to invoices
When you give a product or service for which you have received an upfront deposit or retainer, and it is time to deposit the payment, you can apply the invoice deposit or retainer as payment on the invoice. It collects from the liability account to your income account.
You have two methods to do this:
- Insert the retainer or upfront deposit as a line item on the invoice
- Utilize the upfront deposit or retainer as a credit
The following segments give steps for every method. Choose the approach that operates well in your business.
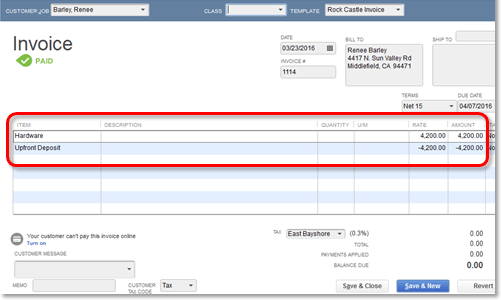
Method A: Insert the upfront deposits or retainers as line items
In the customer’s invoice, when you apply an upfront deposit or retainer, you need to insert it as a line item on the invoice, decreasing the total of the invoice by the price of the deposit.
Check out the below steps to enter an upfront deposit or retainer as a line item on an invoice:
- First, you have to open the client invoice.
- Go to the Detail section, and look for the next available line, click on the Upfront Deposit item that you have created in the Item drop-down list.
- Insert the amount to apply to the invoice in the Amount column.
- Click on Save and Close.
The deposit is recorded on the invoice and decreases the amount due. When the applicable deposit is for the full amount of the invoice, the transaction is considered as paid.
Method B: Apply upfront deposits or retainers as credits
In the customer’s invoice, when you apply an upfront deposit or retainer, you can insert the amount as a credit to pay the invoice. Go through the following steps to use upfront deposits or retainers as credits:
- First, go to the Customers menu and click on the Create Credit Memos/Refunds.
- Now go to the Customer: Job drop-down menu, and click on the customer or job.
- From the Detail section, click on the Upfront Deposit item that you have created from the Item drop-down menu.
- Next, go to the Amount field, and insert the amount of the deposit or retainer.
- Click on the Save and Close.
- Now the Available Credit pop-up dialog will seem on your screen, choose Apply Invoice and select OK.
- Go to the Apply credit to Invoice dialog that displays, click on the invoice and choose to apply the upfront deposit or retainer and click on Done.
The upfront deposit or retainer is only implemented on the selected invoice.
Canceled Job: Manage upfront deposits or retainers
If in case your customer eliminates a job for which you have accepted an upfront deposit or retainer, then the deposit does not persist a liability.
There are two possibilities to manage upfront deposits or retainers for canceled orders, but it all depends on your business method:
- It’s your choice to keep all or part of the deposit.
- Or return the full deposit to the customer.
Now, let’s discuss the above points in detail:
Method 1: Keep all or part of the deposit
Go with the below steps to keep a part of the deposit or deposit after the job or order is canceled:
- First, generate an invoice for your customer.
- Now, from the Detail section, click on the relevant items for the canceled project or from the Item drop-down menu, click on the job.
- On the next available line, select the item you created for Upfront Deposits from the Item drop-down list.
- Later, go to the next available line option and click on the item you created for the upfront deposit from the Item drop-down list click on the job.
- Insert the amount you are depositing in the amount field that you keep as a negative value.
- This is optional. Insert note to make it simpler to track this transaction in reports in the Description field.
- Click on the Save and Close.
The part of the upfront deposit or retainer you are holding is recorded as income, and the part you are not holding is returned to the customer.
Method 2: Issue a refund of an upfront deposit or retainer
Follow these steps to issue a refund:
- Go to the Customers menu, and click on the Create Credit Memos/Refunds.
- Now, go to the Customer: Job drop-down menu, and click on the customer or job.
- From the Detail section, click on the Upfront Deposit item that you have created from the Item drop-down menu.
- Now, insert the amount in the Amount field which you want to be refunded.
- Click on Save and Close.
- On your screen you will see, Available Credit pop-up dialog, click on Give a refund and choose OK to quit the dialog.
- On the issue, a Refund dialog that displays, click on the bank account the upfront deposit or retainer was basically deposited from the Account drop-down menu and click on OK to terminate the dialog.
- You can optionally define how to return the customer using the options on this refund issue through the drop-down list.
- Click on Save and Close.
Refunds are issued for the entire amount of the upfront deposit or retainer.
Hope, the above-discussed steps on how to set up, record, and manage upfront deposits in QuickBooks Desktop will work for you properly, but in case if you have any query or issue with the same topic or any accounting or Bookkeeping issues then you can directly reach us by dialing our toll-free +1-844-405-0904 and get instant help from our Intuit Certified ProAdvisors.