Wanna learn how to enter, set up & record a vehicle purchase in QuickBooks Online both as a Fixed asset and as a loan? Also, know the exact steps to record vehicle mileage and depreciation cost of the vehicle in QuickBooks. If you need dedicated technical support hire our team of Intuit certified ProAdvisor, and dial +1-844-405-0904.
QuickBooks provides you an option to add a vehicle to a list of your business vehicles and track expenses like billable mileage. You need to create a fixed asset account to keep track of the items. It also helps you to track your business health. You should know both your total miles and your business miles to accurately deduct vehicles on the tax return.
Record a Vehicle Purchase in QuickBooks
If you record a vehicle then you can easily track the depreciation cost of the vehicle as well which in turn assists you in concluding a decision like whether or not to retain the vehicle in the future.
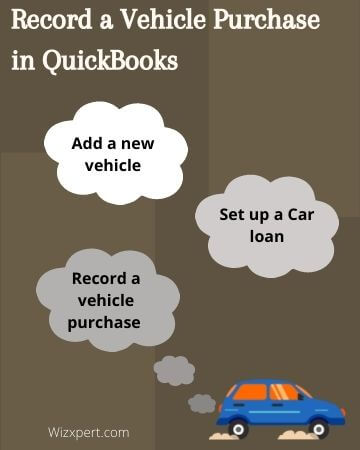
Add a New Vehicle as Fixed Asset
Follow the below 2 steps to add a new vehicle as fixed asset;
STEP 1: Create a Fixed Asset Account for Vehicle
First of all, you need to create a fixed asset account for the vehicle. Follow the steps to create the account;
- First open QuickBooks and then go to the Chart of Accounts option.
- And then select the New option.
- Then, from the categories drop-down menu, select the Fixed Asset option. If a fixed asset account is not available then select any closest account and continue.
- After that, enter a proper name and provide a description for the account. The name of the account could be Truck or Car and then you can also create a sub-account named as per vehicle model.
- In the Details Type, you need to enter the information of the newly purchased vehicle.
STEP 2: Enter the Purchased Vehicle information
Follow the instructions to put the vehicle details in QuickBooks Online;
- Here, if you want to track the depreciation of this vehicle then you need to select the YES otherwise NO.
- If you selected yes, then QuickBooks will automatically create a depreciation sub-account of this vehicle for you.
- Enter the amount of vehicle in the Original Cost field. (NOTE: If you are recording a loan then you can leave this field black.)
- Once you entered all the information, click on Finish.
Set Up a Vehicle/Car loan in QuickBooks
Here is the procedure to set up a vehicle loan in QuickBooks Online. Follow the steps to set up it;
Step 1: Create a Liability Account
At first, create a liability account by following the below procedure;
- First, Open QuickBooks.
- Then, click on the Gear icon and then select the Chart of Accounts option.
- After that, select the New option at the top right corner.
- In the next window, you can either select Other Current Liabilities (1 Year) or Long Term Liabilities (More than 1 Year).
- Then, choose the Detail Type either for Other Current Liabilities or Long Term Liabilities.
- Enter an appropriate name for the account. Select a name that will help you in recognizing the vehicle loan like bank name or Car loan.
- Leave the Unpaid amount field blank. We’ll enter this in the second step.
- Review all the fields and the Save.
STEP 2: Journal Entry for Vehicle/Car Loan
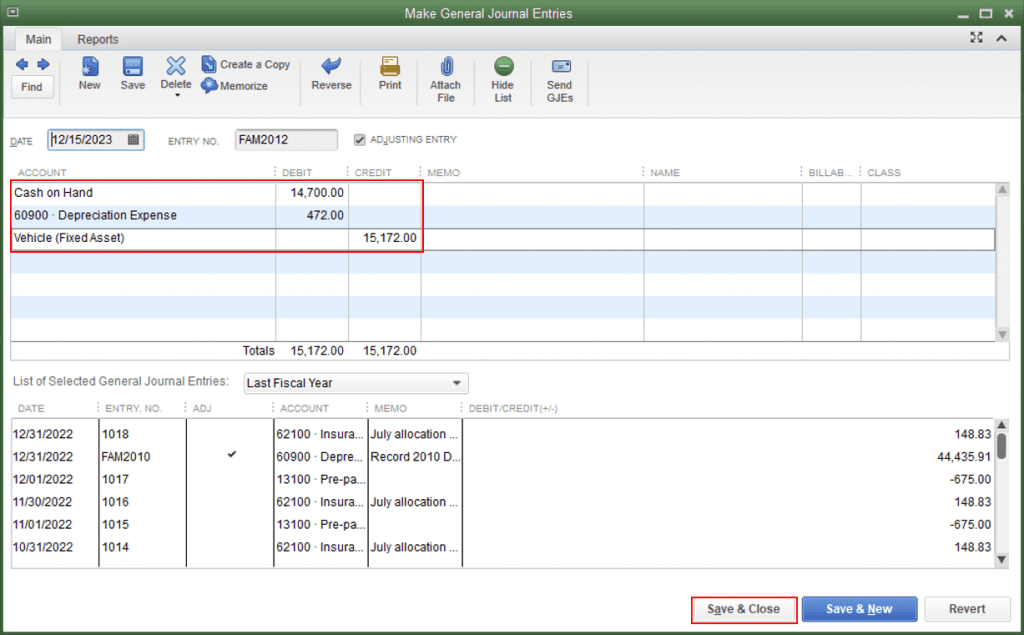
- First, click on the +New button.
- Then, select the QB Journal Entries option.
- After that, select the liability account that you’ve just created from the account drop-down option.
- In the Credit field, enter the amount of car loan.
- After that, select the Asset account that you want to link with the loan amount.
- In the Debit field, again enter the amount of loan.
NOTE: In addition to the loan amount, you also need to enter the down payment, documents, and registration fees. Once you did that make sure credit and debit are equal to zero in the journal entry.
To enter the depreciation, you need to follow the exact same steps mentioned above except choose the depreciation account instead of the long-term liability account.
How to Record a Vehicle Purchase in QuickBooks Online
Here is the simple procedure to record a vehicle purchase in QuickBooks Online.
- Login to QuickBooks Online.
- Add the fixed asset item in your account.
- Go to the bottom left side of the QuickBooks window, click on the Item button.
- Click on the New option for adding new one.
- A new fixed asset item box will open up, in which you have to fill the details of the account, and you vehicles.
- From the asset information section, fill the details of your new vehicle purchase.
- Click on OK and Continue.
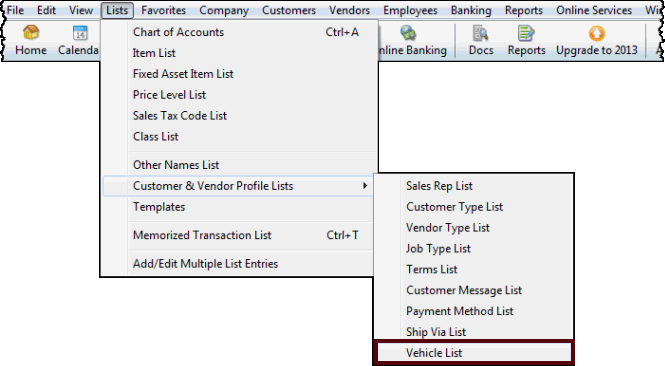
Set Up a Vehicle List in QuickBooks
Now we start, how to add vehicles in QuickBooks step by step. Read the instruction carefully and follow them:
- First, click on the List option from the top menu bar and then select the Customer & Vendor Profile Lists option.
- After that, click on the Vehicle list.
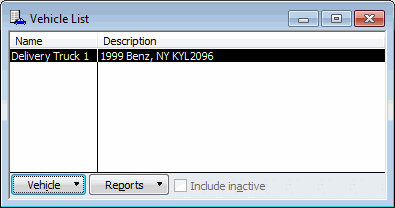
- Now, you will see the Vehicle list Window.
- In the Vehicle List Window, click on the Vehicle drop-down menu and then click on New option.
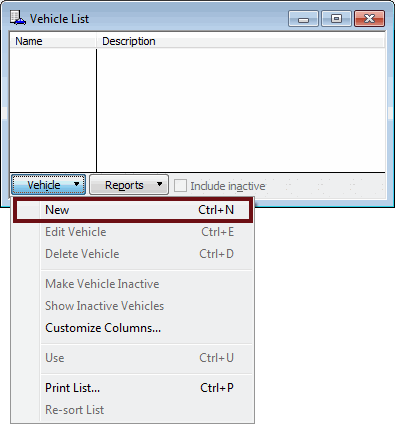
- Now, the New Vehicle window will open.
- In the Vehicle field, enter the name of the vehicle for which you want to track mileage.
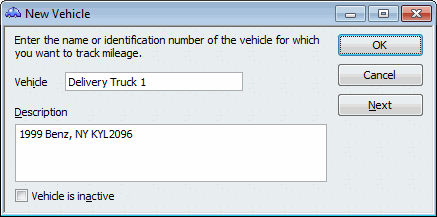
- In the Description box, you can either type the vehicle model or plate number or both.
- Then identify the vehicle according to their maker and year of manufacture.
- You may enter more identifying information if you have a fleet of cars or trucks.
- Now, click on OK to save the vehicle description.
If you click on the Reports button at the Vehicle list window, a menu will be displayed that will contain four different vehicle mileage reports as follows:
- Mileage by Vehicle Summary
- Mileage by Vehicle Detail
- Mileage by Job Summary
- Mileage by Job Detail.
NOTE: In addition to the loan amount, you also need to enter the down payment, documents, and registration fees. Once you did that make sure credit and debit are equal to zero in the journal entry.
Record and Track Vehicle Mileage in QuickBooks
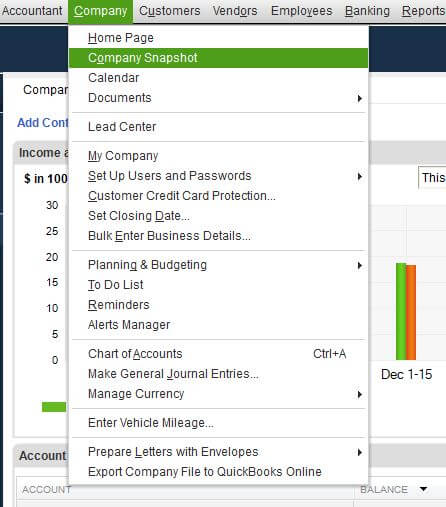
- From the top menu bar click on the Company option and then select the Enter Vehicle Mileage option at the bottom.
- After that, from the Vehicle drop-down option, select the vehicle for which you want to track the mileage.
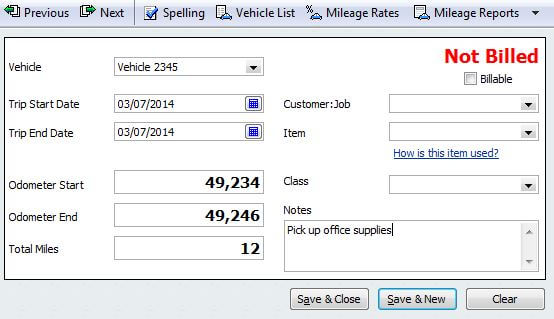
- Then, enter the trip start date and trip end date in their respective fields.
- Now, enter the mileage start and end reading in the respective fields. QuickBooks will automatically fill the total mileage field.
- If you want to create a bill for the miles then checkmark the Billable box.
- In the Customer: Job field, select the customer to whom you want to bill this mileage.
- In the Item field, you can select options like delivery, mileage, or anything like this.
- In the Notes field, you can write like what is the purpose of this trip?
- Once you entered the required information in every field then you can select the Save and Close option.
Record Vehicle Info in QuickBooks Self-Employed
If you are a QuickBooks Online Self-Employed user and want to enter vehicle details in the QuickBooks Self-Employed for the first time, then follow the procedure. Here we have two methods to put the vehicle detail in Self-Employed; on the web browser, and in iOS mobile. Follow the procedure, according to your need;
On a Web Browser
Follow the procedure, if you are going to enter the vehicle details in Self-Employed on a web browser;
- Open the browser, you are using for the QuickBooks Self-Employed login.
- Go to the ‘Profile‘ icon, and click on the ‘Vehicle Info‘ option.
- Select the tax year from the ‘Vehicle Info‘ drop-down menu.
- Now you can find different fields to fill out the detail of vehicle.
- Enter the vehicle name, and year.
- How much did the vehicle: Enter the purchase rate of the vehicle.
- Ownership status: Choose anyone of the options for the ownership status.
- Date you bought the vehicle: Select the buying date of the vehicle.
- Date placed in service: Put the date, you have started to use the vehicle.
- Estimated business miles: Make an estimate. By adding an estimate, you can track the actual mileage with the app.
- If you have added the complete detail of the vehicle, click on the ‘Save‘ option.
On iOS (iPhone & iPad)
If you are using the QuickBooks Self-Employed app then it must be in the iOS set (iPhone or iPad). Follow the steps to put vehicle info in the Self-Employed app;
- First of all, open the QuickBooks Self-Employed app.
- And visit your profile, by clicking on the ‘Profile’ icon.
- Choose the ‘Vehicle‘ option then put the detail of the vehicle.
- Tax Year section: Select the tax year.
- Nickname: Enter the vehicle name (Suggestion: [My work car: 2022])
- Put the vehicle odometer.
- After the complete detail of the vehicle, click on the ‘Save‘ option.
It was everything about the recording of vehicle purchase in QuickBooks Online and QuickBooks Self-Employed. Still, if you have any kind of doubts regarding the topic then you can dial the toll-free number +1-844-405-0904 to get instant QuickBooks support for your query.