Are you looking for how to manage and enter bills in QuickBooks Online? Here we are to aid you with an article having detailed information about managing and entering the bills in QBO. Read the article, we have provided here explained the process and relevant matter to the subject, you will find the steps to do the task with ease and images to represent the process flow. so continue and complete the blog to get all your answers and get your issue resolved. Still, having an issue contact us toll-free; +1-844-405-0904
In the present scenario, it is very important to manage bills in order to run a successful small business. And, if you are a business person or looking for guidance on how to manage and enter bills in QuickBooks Online then you are at the right place. In this article, you’ll get a complete step-by-step guide to manage & enter bills in QuickBooks Online. Let’s proceed further and discuss on this topic.
Therefore, it is very important for you to create various accounts where the cash amounts will be recorded in order to use QB and result from the above transactions effectively.
If you want to set up an expense in QBO account then click on Lists and also on the Chart of Accounts section given on the same menu. After that, click New under the Account option on the next window.
Now, on the new account window menu, click on an expense type of account and click continue.
You need to mention the name and description of the account and save it. For example, you can create an electricity bill expense account easily with a concise description like; “ electricity bill expenses are listed here”.
The best thing is that you can set up as many expense accounts, depending on your specific requirements. This is basically a simplified guide on how you can enter bills into the QBO system. Also, there are some additional information is mentioned at the end of this blog to help those who are just getting started.
Entering and Receiving Bills in QuickBooks Online system:
- In order to enter accounts payable in QB, you just need to do:
- Just click Suppliers & select Enter Bills.
- Next, you need to click Enter Bills given below the Supplier title.
- Now, select suppliers from the drop-down menu.
- Select Terms as well as Bill Date, and Due Date.
- Again from the drop-down menu, select the expense account.
- It also provides a brief description of the bill.
- After that, you need to enter the specific amount along with the accompanying tax rate.
- Finally, just click on the Save option and Close.
Paying Bills in QuickBooks
So, once you entered your bills successfully, you can efficiently manage how and when to make payments for them. Well, you have options to either to make payments using the expense form available or by using the ability to print checks given in the QB application. Also, if you want then you can make the payment using vendors or suppliers page.
QuickBooks Online Bill Pay is another important feature to pay bills of products online.
Sometimes, it is possible that you might run out of money by making immediate payments for the bills. And for that reason, you can make partial payments if possible in order to keep our business without any financial crisis.
There are many options available from which you can make a payment for your bill.
The very first and foremost option is that you can make payments directly from the suppliers or vendors page.
- At first click on Suppliers.
- Click Pay Bills: You’ll find two options at the top of the supplier’s page, which allows you to filter the bills for making payments.
- And you can click on the supplier’s bill for which you want to make payment.
- QB will automatically show the information such as supplier’s names, the invoice number and the due amount of the particular bill.
- Next, Enter the amount to pay.
- After that select the account from which you want to make payment.
- Then click on Pay Selected Bills, Save, and Close.
These are the areas where QB completes the Bill Payment form immediately
- Payee(The Supplier name)
- Account: By default, it helps to set up your primary account in QB. Suppose you have multiple accounts, in that case, you can choose the particular accounts from the drop-down menu in order to make the payment.
- Ref. no.: Here the application for the next check number is assigned.
- Amounts: By default, it is seen that the application assumes that the payment being made is full. And, if you are thinking to make a partial payment, then you can enter a different amount.
- Outstanding Transactions: QB also lists the outstanding pending bills for some suppliers. In case, if you want to make payments only for some particular bills then you can check or uncheck them by using the box available in the left of the bill description.
Set Reminders for Unpaid or Overdue Bill Payments:
- Initially, you need to click on the Edit menu.
- Next, click on the Preferences that are given below in the edit menu and a new window will open.
- Now, under the Preferences option, click on the Reminders.
- Go to Under my preferences menu and then check the box “ show reminder list when opening a company file.”
- After that tap on the company preferences menu and set the Bills to Pay. Now, just verify the button which is appropriate for you and also enter the number of days in order to get the reminder from QB.
- Tap OK. Here you’ll be reminded about your unpaid and overdue bills as soon as this set up gets completed.
- Finally, you can also click on Reminders and Alerts to view the current reminders at QB’s home page.
Moving further let’s discuss the possible related questions that might come to your mind;
How to Enter Bills in QuickBooks Online
There are three easy steps are involved to enter bills in QuickBooks. After logging into your QuickBooks Online account, look to the bills entered by clicking Plus at the top of the homepage. later, select “Bill” which is located under the vendor column. Insert the details of the bill like date, amount, and records of what was purchased. Save the bill and reexamine it for correctness.
Below are the three steps below to enter bills into QuickBooks Online:
1. Navigate to Enter Bills
First, you need to login to your QuickBooks, look at the top right of the screen, and click on the plus sign. Later, select “Bill” from the vendor column. Here we will guide you with step-by-step screenshots below.
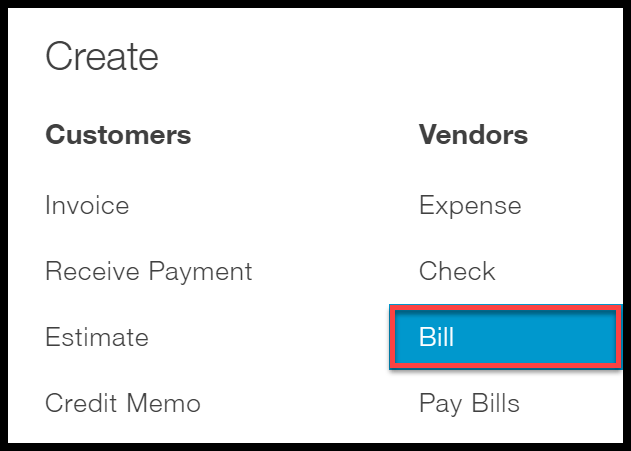
- Go to the homepage, choose the plus sign located at the top of your screen, as shown in picture below:

- Choose Bill under the Below the Vendors column, as shown in the picture below.
2. Enter Bill
Enter Bill window will be displayed on your screen. There are various areas that need to be completed. These cover the fields of the vendor, payment terms, bill date, and due date.
The Enter Bill window will be shown on your screen:
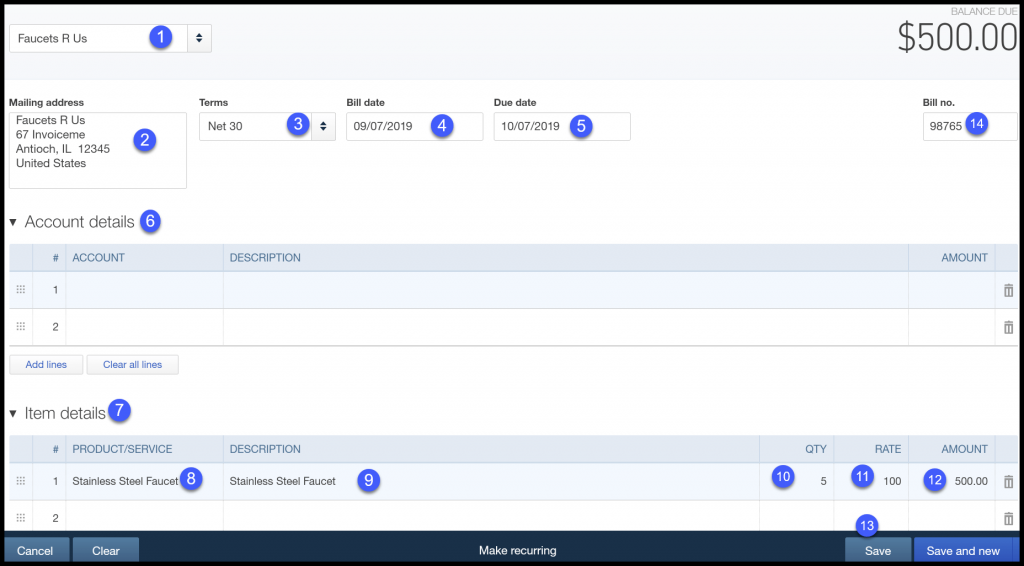
The field has a brief description of the information to include (above):
- Vendor: Choose the vendor from the drop-down list. TIP: If you have not set up the vendor yet you can do it by following this procedure. Go to the drop-down arrow and choose Add New. In the settings tutorial, we go step by step to explain how to set up your vendors.
- Mailing Address: This field will be populated automatically with the information contained in the vendor profile. TIP: This field will be empty if you have not entered a mailing address for your vendor. You can insert a mailing address in this field but it will not renew the vendor profile.
- Terms: Payment terms will be automatically populated with the population established in the vendor profile. TIP: If you have not set special payment terms for a seller, this field will default to the payment terms for all sellers. During the installation expense tutorial, we trained step by step to tell you how to set the default payment terms for all vendors.
- Bill date: This is the date that displays on the bill received from your seller.
- Due Date: It is based on the payment terms, here, QuickBooks will calculate the due date for you. For example, the payment terms for this seller are Net 30. This means that the due date will be 30 days from the invoice date.
- Account details: If you are spending on a service like utility expenses or tax preparation services, then you will have to meet this part of the bill. But, if you are paying for a product, you have to complete the item description section.
- Item Details: If you are spending on a product, like a piece of material that you will use in your business or inventory that will be sold to customers, you will meet this part of the bill.
- Product / Service: Choose the product or service you are paying for from the drop-down menu, . If you have not installed the product/service, you can do it by choosing Add New from the drop-down menu.
- Description: This field will be populated from the list of products and services automatically. You can also type a customized description straight in this form. But, it will not update your product and services list.
- Quantity: Show the quantity of your purchase, if appropriate.
- Rate: This area, which includes the cost per product or per service, will be automatically populated by the list of products and services. You can also type the rate directly in this form. However, it will not update your product and services list.
- Amount: QuickBooks will multiply the quantity column by the rate column to calculate this field.
- Save: Save all the bill, once you have completed all the required fields
- Bill No: This is the invoice number that appears on the bill received from your seller.
3. Review Bills
- Go to the Home page and choose Vendors from the left-hand menu bar.
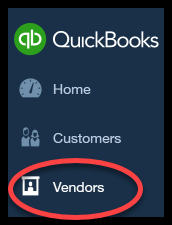
- On your recent screen, you can view a list of vendors with the remainder remaining. Choose the seller’s name in the first column to proceed to the next screen as described below:

What Impact Does entering Bills Have on my financial statements?
When you enter a bill in QuickBooks to pay for something that is not going into inventory the accounts and financial statements are affected in the following manner;
| Account Affected | Impact on Account | Financial Statement |
| Accounts Payable account | Increase | Balance Sheet |
| Expense account | Increase | Profit & Loss |
And, when you enter a bill in QB to pay for an asset like equipment or any product then that will be added to inventory, the accounts, and financial statements are affected in the following manner;
| Account Affected | Impact on Account | Financial Statement |
| Accounts Payable account | Increase | Balance Sheet |
| Inventory asset/fixed asset | Increase | Balance Sheet |
As we have discussed above how to manage bills in QuickBooks Online with a simplified guide. I hope this information will help to solve all your queries. And, if you have any other questions related to QuickBooks Desktop, hosting QuickBooks Online and QuickBooks Online then feel free to contact our QuickBooks support team. You can also dial our toll-free number in order to take advice from our QuickBooks Proadvisors.