In this article, we’re going to demonstrate what you need to do if you do not enter an opening balance in QuickBooks Online. The article deals with the solutions to resolve the issue of not entering an opening balance in QuickBooks Online While creating the account, go through the article to learn the methods of troubleshooting. Still having an issue, let us know if our QuickBooks ProAdvisor consults you. Contact us on:+1-844-405-0904
You need to choose a day to start tracking your business transaction while you create a new account in QuickBooks Online. In order to match and reconcile everything from the beginning with QuickBooks, you need to enter your real bank account balance. This is called the opening balance in QuickBooks.
But, what to do if you somehow forgot to enter an opening balance in the start when you created the account? If something like this happened to you then one way to fix this is by creating a journal entry to record the opening balance. After that, you can continue with your business as usual.
Point to Remember: You should only use this step if you haven’t reconciled your account yet. But, if you have already reconciled your account in the past then we recommend you contact your accountant or an expert because this process can be a bit confusing. If you don’t have an accountant then don’t worry you can call QuickBooks ProAdvisor at a toll-free number +1-844-405-0904 to resolve your issue.
What is an Opening balance?
When any organization enters with the amount of money in the new financial year, the very first entry that is carried forward at the start of the fiscal year is the opening balance. The bank and credit card accounts in the QuickBooks you are tracking must match in real life. You need to select the day on which to start tracking transactions while creating a new account in QuickBooks. Next, you input your actual bank account balance on whatever day you want. Then this sum of the amount is determined as the account’s opening balance and the start date.
How to enter an opening balance
Historical transactions up to a certain date can downloaded automatically by Quickbooks in case you are going to connect your bank and credit card account. So if you are not going to connect your account then you can enter the opening balance manually. The steps are given below:
- You have to know the exact amount at the time of opening balance.
- Then next you have to go to Settings ⚙.
- After that choose Chart of Accounts.
- In the next step, you need to click on New and then set up your account.
- Now pick the date in the open balances section to start tracking your finances from.
- After doing the above steps you have to enter the account balance for that date.
- Then choose Save.
How to Edit an Opening Balance
If you need to edit the start date and the balance then you have to follow the given steps:
- Firstly you need to go to Settings.
- Then choose charts of accounts.
- Now find the account, and choose View register.
- After that locate the opening balance entry. Sort the date column such that the oldest entries appear first.
- Choose the entry for the opening balance.
- Here you can change the date and then the amount. Click Edit to make any necessary changes if needed.
- Choose Save.
What If You did not Enter An Opening Balance
STEP 1: Check whether you have entered an opening balance or not
Before proceeding further, we want you to make sure that you already haven’t entered an opening balance. If you entered the opening balance twice using a journal entry then it will create a discrepancy in your book & your transactions will be counted twice as well.
- From the left-side navigational panel select the Accounting menu and then select the Chart of Accounts option.
- Find the appropriate account and select the View Register option from the action column.
- Here, you need to search the register for a previous opening balance.
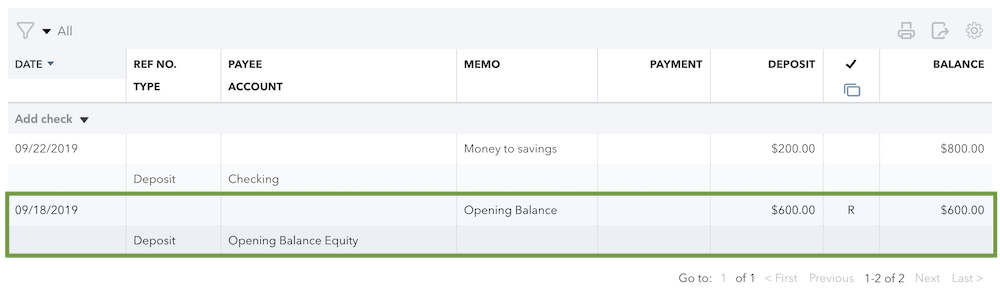
- If you have already registered the opening balance then in the Payee/Account field you’ll be able to see Opening Balance Equity and in the Memo field, you’ll see Opening Balance.
If you already have an opening balance then there is no need to create the journal entry. Simply note down the amount and date. With the help of your bank record check if the opening balance is correct or not.
However, if you don’t see any opening balance then just note down the amount and date of the oldest transaction in the account. Follow the further instructions step by step carefully.
Other Useful Resources:
- 4 Reasons To Take A Loan From Legitimate Money Lenders
- QuickBooks Online Login: How to Sign in & Access Your QuickBooks Account
- How to Update QuickBooks Desktop to Latest Release
STEP 2: Create a Journal Entry
Remember that, you should only use this if you haven’t entered the opening balance before.
- Click on the +New icon from the left side navigational panel.
- From here, select the Journal Entry option.
- Then, enter the date of the oldest transaction in the current bank account. The date you entered here is going to be your new opening balance.
- After that, you need to choose an account for which you have entered this opening balance.
- To enter the opening balance you need to use your bank account. Remember that, the opening balance we’re using here is from your real-life bank account.
- Assets (saving and checking accounts) and Expense Account: In the Debit column, you need to enter the opening balance.
- Liability, Equity, and Income Account: In the Credit column, again enter the opening balance.
- Account Payable: In the Name field, you need to select the vendor to whom you owe the money. If you want to increase the amount furthermore then you enter the amount as a credit. But, You can enter the amount as debit if you want to decrease it. You can also create separate lines for every vendor. Just make sure that the total amount is equal to the opening balance.
- Account Receivable: In the Name field, you need to select the customers who owe money to you. If you want to increase the amount then you should enter the amount as a debit. But, if you want to lower the amount then you should enter the amount as a credit. You can also create separate lines for every customer. Just make sure that the total amount is equal to the opening balance.
- On the second line, from the account column, select the Opening Balance Equity option.
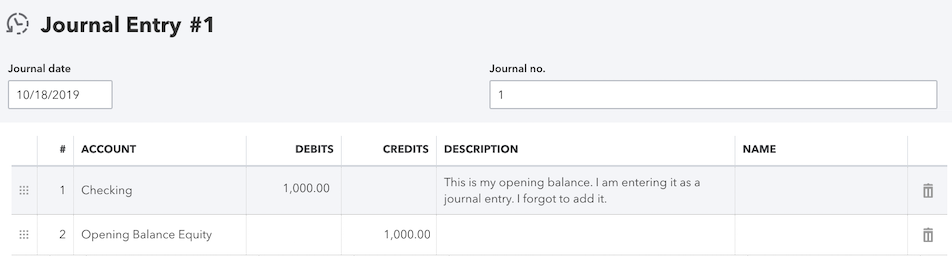
- In the Description field, you can add a summary here regarding what the journal entry is for.
- Review all the fields and then select Save.
STEP 3: Mark the Journal Entry as Reconciled
You need to reconcile the journal entry, although you haven’t reconciled your account yet. By doing so this journal entry will not be showing in future reconciliations.
- Go to Settings > Chart of Accounts option.
- Find the appropriate account and from the Action column, select the View Register option.
- Here, search the opening balance journal entry that you just created and then click on it to expand it.
- You can read this article to learn how to reconcile transactions in QuickBooks Online.
- When a transaction is reconciled, you’ll see “R” in the column as in the image below.
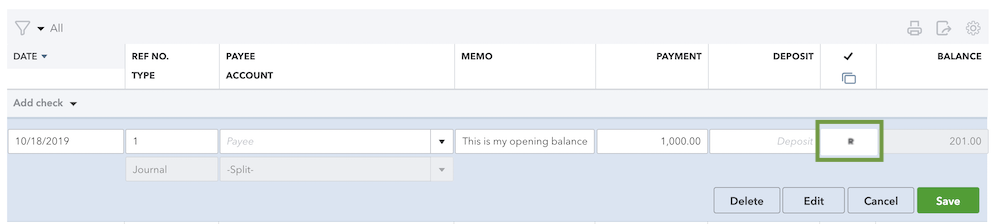
- Then, select Save.
Now your opening balance is recorded with the help of a Journal Entry. Since the journal entry is now reconciled so you don’t count it twice. In this way your accounts are balanced. Now you can reconcile your account in QuickBooks Online the usual way.
The Bottom Line
Now you know what you need to do if you did not enter an opening balance in QuickBooks Online. If your accounts are still not balanced in QuickBooks Online or you find any discrepancies in your account then you don’t need to worry let an expert handle this problem. You can have assistance from an Intuit certified QuickBooks ProAdvisor, by calling at 24/7 toll-free number +1-844-405-0904 they can solve any problem instantly.