Want to fix the 3000 status code error in QuickBooks Desktop point of sale? Don’t worry, the article is here to aid you with solutions that effectively resolve it.3000 Status code errors occur while the financial exchange between QuickBooks Desktop Point of Sale and QuickBooks Desktop. So here we will discuss the various solutions to fix 3000 status code errors in QuickBooks Desktop Point of Sale. This error occurs with a different error message, so have a look at all error messages of 3000 Status Code, and then go to the solution accordingly, which error you received. Still facing the issue contact us: [QuickBooks]

The different error messages are as follows.
| QuickBooks Error 3000 Series Code | Error Description |
| Status Code 3000 | The given object ID in the field “list id”: is invalid |
| Error Status code 3100 | The name “#######” of the list element is already in use |
| Status code 3140 or 3120 | The specified account is invalid or of the wrong type |
| Status code 3140 | There is an invalid reference to QuickBooks AR/AP Account “###### – #########” in the Receipt or Bill |
| Status code 3140 | The sales tax detail line must have a vendor |
| Status code: 3412 | There is an invalid reference to QuickBooks Account “###### – #########” in the item Non–Inventory. QuickBooks error message: The expense account is invalid |
| Status code 3170 | There was an error when trying to modify a vendor/customer list element. |
| Status code: 3180 | There was an error when saving an Employees list, element “Employee, Name” |
| Status code: 3180 | There was a problem with saving the General Journal Transaction |
| Status code: 3180 | QuickBooks error message: A/P (or A/R) detail line must have a vendor |
| Status code: 3180 | QuickBooks error message: The posting account is invalid |
| Status code: 3180 | There was an error when saving a Sales Receipt |
| Status code: 3180 | Sales tax detail line must have a vendor |
| Status code 3260 | Insufficient permission level to perform this action |
Precautionary Actions Before Troubleshooting Error Code 3000
You should take some precautionary actions before fixing the error, these actions help to safeguard your Quickbooks company file. It helps to avoid the loss of the data file. Here we’ll give some steps that you should follow:
- Firstly you have to back up your QuickBooks Desktop company file manually. For this, you have to go to the File menu, choose Backup Company, and then create a local backup.
- Then secondary you have to create your backup for QuickBooks payroll data from the company name tax forms.
- You have also the option to back up your data with Intuit data protection. For this, you have to open “Intuit data protect” and select backup now.
- And last but not least you have to switch to single-user mode from multi-user mode through the file menu. for this, you have to select the utilities and then tap on stop hosting multi-user access.
Solutions To Fix 3000 Status Code Errors In QuickBooks Desktop Point of Sale
It is necessary to create a backup of your QuickBooks Point of Sale file and QuickBooks Desktop file before you perform the steps.
Error Message 1- Employee Hours Status code: 3000; Status message: The given object ID in the field “list id”: is invalid
You got this error message when the employee is inactive or the track data is not set up in QuickBooks Desktop
How To Fix
Set up track data time in QuickBooks Financial
- First, click on Employees, and next go to the Employee Center.
- Now, go to the activity log and look for the designated employee on the list.
- When you found your employee name in the list then right-click the employee name, and click on Edit employee.
- Click on the Payroll Info tab.
- Review the Use time data for creating paychecks box, and next click on OK.
Set up an inactive employee
- First, click on Employees, and next go to the Employee Center.
- Next, go to the Employees column, and click on All Employees from the drop-down list.
- Now, go to the activity log and look for the designated employee on the list.
- When you found your employee name in the list then right-click the employee name, and click on Make Employee Active.
Status code: 3000; Status message: The given object ID in the field “list id”: is invalid
This error occurs when QuickBooks Financial has an outdated patch. To fix this error, check out the below steps.
- First, go to your downloads and updates center.
- Now, look for the version of your QuickBooks.
- Click on Get Latest Update.
Error Status code 3100: Status message: the name “#######” of the list element is already in use
This error occurs when a customer or vendor is corrupted or duplicated from both QuickBooks Point of Sale or QuickBooks Desktop. To fix this error, check out the below steps.
Important: Before performing the below steps, you need to create a backup copy of your company files and also make sure to switch to the single-user mode on your QuickBooks Desktop.
Solution 1: Find the duplicate names
In QuickBooks Desktop,
- Click on the Customers (Vendors) menu, and next, click on the Customer (Vendor) Center.
- Look for the name that is shown in the error.
- Review for any duplicates
- If yes, you need to merge the duplicate names
- If none, then simply continue with Solution 2
In QuickBooks POS
- First, go to the Customers (Purchasing) menu, and next click on the Customer (Vendor) List.
- Now, go to the search field, insert the name shown in the error, and look for any duplicates.
- Select the I want to… ▼drop-down menu, and click on Merge.
- When the Merge window displays on your screen, then click the customer/vendor you require to keep and discard.
- Click on Merge Customers/Vendors
Note: Transactions made on both names will be named after the name you will keep.
Solution 2: Fix the damaged customer (vendor) names
Steps to create a new customer (vendor)
- First, go to the Customers menu, and click on the Customer Center.
- Next, click on the New Customer & Job tab, and next go to the New Customer from the ▼ drop-down list.
- Insert the Test Customer for the name, ignore the other given fields blank, and click on OK.
Steps to merge names
- Look for the customer name and right-click on it, and next click on Edit customer.
Note: If in case there is a Job below the customer, click on the Job and a blank cross will show. Drag cross and adjust it below the new customer name. - Displace the customer (vendor) name, type Type Customer, and click on OK.
- Now, you will see the merge window will display on your screen, and click on OK.
- Edit the customer (vendor) name by setting in back the original name, and clicking on OK.
- Quit the QuickBooks Desktop, and again open it.
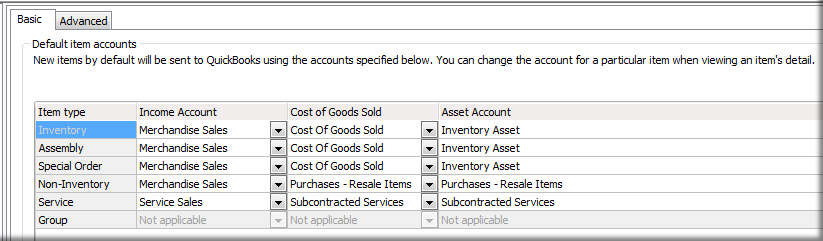
Status code 3140 or 3120: The specified account is invalid or of the wrong type
This error occurs when accounts are not mapped correctly. To fix this error, check out the below steps.
- First, go to the QuickBooks Desktop Point of Sale.
- Next, click on the File menu, and click on Preferences.
- Click on Company.
- Now, below the Financial, click on Accounts.
- Look for the Basic and Advanced tabs. Make sure that the accounts are mapped accurately, and click on Save.
Note: Whenever you see the account name in brackets ([ ]) shows that the account is not mapped. - Now you need to run the financial exchange.
Status code 3140: There is an invalid reference to QuickBooks AR/AP Account “###### – #########” in the Receipt or Bill
This error occurs when the accounts receivable and payable in Point of Sale are mapped to incorrect accounts. The error you got will symbolize the inaccurate setting.
- There is an invalid reference to QuickBooks AR Account “###### – #########” in the Receipt. The account for this transaction must be of the type of Accounts Receivable
- There is an invalid reference to QuickBooks AP Account “###### – #########” in the Bill. The account for this transaction must be of the type Accounts Payable
To fix the above errors, check out the below steps:
- First, go to the QuickBooks Desktop Point of Sale.
- Next, click on the File menu, and then click on Preferences.
- Now, click on the Company.
- Below the Financial section, click on Accounts.
- Be sure that the accounts are mapped to an account whose type are A/R and A/P respectively, and later click on Save.
- Now you need to run the financial exchange.
Status code 3140: Status Message: There is an invalid reference to QuickBooks Account “###### – #########” in the item Non-Inventory. QuickBooks error message: The expense account is invalid
This error occurs when the mapped item account in Point of Sale is inaccurate, or also when the item account is idle or deleted in QuickBooks financial. Check out the below steps to fix this error.
- First, go to QuickBooks Financial, click on the Lists menu, and next click on Chart of Accounts.
- Click on Account at the bottom, and next click on Show Inactive Accounts.
- Note: If the account is inactive, then it has an X mark with its name.
- Click on the X mark or you can also give right-click the account, and next click on Make Account Active.
- Now you need to run another financial exchange.
Note: If your account is deleted, then create an account in QuickBooks.
Status code: 3412, Status message: Customer has an overdue transaction
This error occurs when the preferences of QuickBooks Desktop are fixed to not allow selling to overdue customers. Check out the below steps to rid of this status code.
- In QuickBooks Desktop, click on Edit and next click on Preferences.
- Go to the left menu, and click on Sales & Customers.
- Next, go to the Company Preferences tab.
- Here, you need to uncheck the option, do not sell to overdue customers.
- Click on OK to save all the changes.
- Next, go to the QuickBooks Point of Sale and run a financial exchange.
Status code 3170: There was an error when trying to modify a vendor/customer list element
This error occurs when any duplicate name is present between QuickBooks Desktop Point of Sale and QuickBooks Desktop. Check out the below steps to fix this error.
Step1: Review the activity log in QuickBooks Desktop Point of Sale
This status error includes the name of the customer or vendor. If you can get the name, then jump to step 2. If no, go with the below steps
- Go to the Customers menu, and click on the Customer List.
- Now, give right-click on the column header. Click on Customize columns and next click on QB Status.
- Click on the QB Status header to sort the list and determine any customer name with Not Posting or Error Status. You can also go with the same process for the vendor list.
Step 2: Edit the name of the customer or vendor in QuickBooks Desktop
- Go to the Customers menu, and click on the Customer Center. If you want to edit vendors, then go to the Vendors menu, and click on the Vendor Center.
- Now, when you got the listed name in the Activity Log then right-click on it, and click on Edit.
- Now, you have to add the number “1” at the end of the name and click on OK.
- Now you need to run another financial exchange.
Step 3: Merge the edited names
In your QuickBooks Desktop, you need to merge the edited and new name which is created by Financial Exchange.
- Go to the edited name and double-click on it.
- Now, you need to remove the number “1” and click on OK. QuickBooks will also advise you to merge the customer or vendor to the customer or vendor created by financial exchange.
- Next, click on Yes.
Status code 3180: There was a problem with saving the General Journal Transaction
The main causes of the occurrence of this error are listed below:
- When the voucher is corrupted.
- The account mapped to the item was incorrect when the sale was in process.
- When the account that is associated with the item is idle.
- When the account is deleted in QuickBooks Desktop.
How To Fix
Solution 1: Recreate the voucher
- Reverse the voucher.
- Re-create the voucher
- Run the financial exchange.
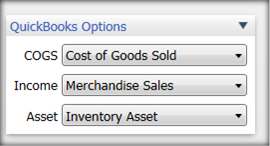
Solution 2: Recheck the accounts
- Go to the Home page, click on Sales History, and make a note of all the affected items.
- Now, come back to Home, click on Item List, and next click on Edit.
- Below the QuickBooks Options, examine the account mapping that is accurately set up.
- Now, in your QuickBooks Desktop, Be sure that the accounts that are affected are active.
- Go to your QuickBooks Desktop Point of Sale, click on Item List, and next Edit to configure the correct Income/Asset/COGS account in the item/s.
- Click on Save, and after that, you need to run a financial exchange.
Status code 3180: …QuickBooks error message: A/P (or A/R) detail line must have the vendor
This error occurs when QuickBooks Desktop accounts receivable or payable was used to generate a Paid Out in QuickBooks Desktop Point of Sale. The error you got will symbolize the inaccurate setting. You also go with the same error mentioned below.
- There was an error when saving a General Journal transaction. QuickBooks error message: A/P detail line must have a vendor.
- There was an error when saving a General Journal transaction. QuickBooks error message: A/R detail line must have a vendor.
How To Fix
- First, go to the Point of Sale’s home page, and click on Sales History.
- Now, head to the Receipt Type column, and click on the most recent receipt tagged as Payout.
- On the I want to… ▼drop-down, click on Reverse.
- Next, re-create the Paid Out using an account rather than A/P or A/R.
Status code 3180: QuickBooks error message: The posting account is invalid
This error occurs when the incorrect QuickBooks Desktop account was used in mapping accounts in QuickBooks Desktop Point of Sale, check out the below steps to fix this error.
Status code 3180: Status message: There was an error when saving an Items list, element “XXXXXXXX”. QuickBooks error message: The posting account is invalid. 140108 payment item lookup error “XXXXXXXX”.
Solution 1: In QuickBooks Desktop Point of Sale
- Go to the File menu, click on Preferences
- Next, click on the Company.
- Below the Financial section, click on Accounts.
- Look for the Basic and Advanced tabs. Be sure the accounts are mapped accurately, and next, click on Save.
- Now, you need to run a financial exchange.
Solution 2: In QuickBooks Desktop
- Go to the Lists menu, and click on Item List.
- Review every Point of Sale item in the list and make sure that each item is using the appropriate account.
- Now, you need to run a financial exchange
Solution 3: Rename and re-create each financial method
- Go to your QuickBooks Desktop, click on the Lists menu, and click on the Customer & Vendor Profile Lists.
- Next, go to the Payment Method List.
- Look for the Cash method and double-click on it, and next, click on the Edit Payment Method.
- Here, you also need to add the letter X in the Payment Method field (XCash) and click on OK.
- Now, give right-click on the Cash method, and click on New.
- Select it as Cash, and next run the financial exchange. If required then rename and re-create all payment methods.
Status code 3180: Status message: There was an error when saving a Sales Receipt
This error occurs when there is a corrupted payment item or if it is the wrong type.
- Open your QuickBooks Desktop, click on the Lists menu, and next, click on Item List.
- Next, go to Include Inactive.
- Choose the header Type to sort the list.
- Now, you need to rename the Point of Sale payment items.
- To do this, you need to right-click the payment item that starts with POS, then click on Edit Items.
- Attach “OLD” to the item name (e.g. OLD POS Visa Credit Card).
- Click on OK.
- Now, you need to run the financial exchange from your Point of Sale.
- Next, you need to merge the duplicate items in QuickBooks Desktop.
- Now, go to the OLD payment and give right-click on it, and next click on Edit Item.
- Remove “OLD”, and click on OK. QuickBooks Desktop must ask you to merge the items.
- Click on Yes to confirm.
Status code 3180: Status message: Sales tax detail line must have a vendor
Status code 3180: Status message: There was an error when saving a Sales Receipt (or Credit Memo). QuickBooks error message: Sales tax detail line must have a vendor.
Here, are the several causes of this error, check out below how this error occurs:
- When the QuickBooks Desktop sales tax item is not linked with any vendor.
- When the account mapping of the sales tax payable account is inaccurate.
- The sale tax payable account is used to generate a payout.
- The sales tax payable account (QuickBooks desktop account) of one or more items on receipts is selected as the target account.
Solution 1: Make sure a vendor is assigned to the sales tax item
- Open your QuickBooks Desktop, click on the Lists menu, and click on the Item List.
- Click on the Include Inactive.
- Choose the header type to sort the list.
- Be sure that all sales tax item has a tax agency connected to them.
Solution 2: Check your tax preference
- Open your QuickBooks Point of Sale, click on the File menu, and click on Preferences.
- Next, click on Company.
- Below the Financial, Click on Accounts.
- Check the Basic and Advanced tabs. Make sure the QB Sales Tax Payable is only listed in the sales tax row. If not, change it and run a financial exchange.
Solution 3: Make sure the problem receipt is not paid out using sales tax payable
- Go to your QuickBooks Point of Sale, and click on Sales History.
- In any column, give right-click on it, and next, click on Customize Columns.
- Here, you need to make sure QB Status is chosen.
- Search for receipts that are not completed yet. If any of certain receipts are paid out to sales tax payable, click on the receipt, and click on Reverse Receipt.
- Re-create payments using a non-sales tax payable account and run a financial exchange.
Status code 3260: Status message: Insufficient permission level to perform this action
This error occurs when you don’t have full access rights to your computer. Check out the below solutions to fix this error.
Solution 1: Run both applications as admin
- Go to the application and right-click on it, then click on Properties.
- Click on the Compatibility tab and next set a check in the Run this program as an administrator box.
- Click on Change settings for all users, and next click on the Run this program as an administrator box.
Note: If you prefer not to run the application as an administrator, you can remove this option, but be sure to remove ADMIN in both applications.
Solution 2: Log in as an admin in the QuickBooks Desktop file
If you sign in as a user you might require to log off the file.
- First, click on the File menu.
- Terminate Company/Log off (option message change depends on the version of QuickBooks)
- Now you need to sign in with admin credentials.
140109: Account lookup error: “Accounts Receivable/Accounts Payable” when running Financial Exchange
This error occurs when the A/R or A/P accounts in Point of Sale are not mapped to A/R and A/P accounts, this happens because of a modification of Financial Exchange mapping. The error which you got will show the accurate setting. You may see the following errors.
- 140109: Account lookup error: “Accounts Receivable”
- 104109: Account lookup error: “Accounts Payable”
How To Fix this Error
- Go to your QuickBooks Point of Sale and click on the File menu, and click on Preferences.
- Choose the Company.
- Below the Financial section, click on Accounts.
- Make sure the A/R and A/P accounts are mapped to an account whose type is A/R and A/P individually, then click on Save.
- Now, you need to run the financial exchange.
Status code 510 when running Financial Exchange
Status code 510 status message: Unable to return object; 140116: QB customer lookup error: “Counter Sales” when running Financial Exchange.
This error occurs in the remote store when Headquarters is running Financial Exchange. Data damage can also be the main reason. So below are the steps to fix it in your Point of Sale.
Note: Make sure to backup QuickBooks Financial and Point of Sale, before proceeding to these steps.
Step 1: Clean up the data
- Go to the File menu, click on Utilities and next click on Clean Up Company Data.
- Now set a check mark on the Compress data box after the warning message. Click on OK
- (This is an optional step) go to the Non-history documents window, choose the list you wish to remove from your file, and then click on Next.
- (This is also an optional step) go to the Historical documents and another data window, choose the data you need to remove and the date, and next click on Next.
- Next, go to the Proceed with Cleanup window, click on Cleanup, and wait till the cleanup ran perfectly.
- If in case you received an error, then you need to run the second cleanup with the compress data option checked.
Step 2: Verify and Rebuild both on Headquarter and Remote Store company files
Create a journal entry for receipts
Many times, receipts in QuickBooks do not transfer successfully after a financial exchange and at that time you need to re-enter them. Below are some reasons.
- When you void the receipt before the Financial Exchange
- If there is an unbalanced payment
- Skipped because of a large amount
- When the receipt was sent to a different file
Step 1: Check the accounts used when setting up the affected item on the sales receipt
- Go to the File menu, and click on Preferences.
- Next, click on Company.
- Now, below the financial section, click on Accounts.
- Basic Tab is For Items
- Advanced Tab is For Transaction Accounts
Step 2: Check the accounts used for the item that had an error on the sales receipt/voucher
- Go to the Item List, and look for the corrupted item.
- Click on Edit.
- Make a note of the accounts below the QuickBooks Options.
Step 3: Mark the receipt with the error as sent
- First, head to the Sales History, and look for the sales receipt and highlight it.
- Choose I Want to… ▼ drop-down menu, and click on Show Financial Detail.
- Click on the Mark this document as a sent box.
Step 4: Create a journal entry with the info collected
Till now, you have information gathered with that information to create the journal entry, to do this read our article How to Create a Journal Entry in QuickBooks Desktop.
How accounts should be calculated before proceeding to journal entry
Note: The following examples are just visual illustrations of how it will be set in QuickBooks after marking a transaction in POS.
| COGS | 100 |
| Sales | 250 |
| Discount | 50 |
| Sales Tax | 5% |
A discounted item that had been reversed
- Determine the absolute amount of Sale in the receipt for the Income Account.
- Calculate the reduced amount from the Total Sale.
- Subtract Sales Tax from the Total Sale.
- Multiply QTY by Order Cost to receive COGS.
- The inventory asset must be the same amount as the COGS.
| Income | 250 | |
| Undeposited | 260 | |
| Sales Tax | 10 | |
| COGS | 100 | |
| Inventory Asset | 100 |
An inventory item that had been sold from POS with a receipt
- Find the total amount for the sale in the receipt for Income Account.
- Deduct Sales Tax from Total Sales.
- Multiply QTY by Order Cost to get COGS.
- Inventory Assets should be the same amount as COGS
| Income | 250 | |
| Undeposited | 260 | |
| Sales Tax | 10 | |
| COGS | 100 | |
| Inventory Asset | 100 |
- An item that had been received
- Determine the complete amount of the voucher. As you paid for the item, these items will be added to accounts payable.
- The amount of inventory assets will increase after the item is received.
| Accounts Payable | 100 | |
| Inventory Asset | 100 |
An item that had been “return-exchanged” for another item
- Find the total amount for the sale in the receipt for Income Account.
- Deduct Sales Tax from Total Sales.
- Multiply QTY by Order Cost to get COGS.
- Inventory Assets should be the same amount as COGS
| Income | 100 | |
| Undeposited | 100 | |
| Sales Tax | 5 | |
| COGS | 20 | |
| Inventory Asset | 20 |
If there’s a different item but with the same amount on the receipt
Note: Make an adjustment in the Point of Sale with a journal entry incorporating COGS and inventory in QuickBooks.
- Find the total amount for the sale in the receipt for Income Account.
- Deduct Sales Tax from Total Sales.
- Multiply QTY by Order Cost to get COGS.
- Inventory Assets should be the same amount as COGS.
Here, are the best possible solutions to fix 3000 status code errors in QuickBooks Point of Sale. Hope this will work for you, but still, if you have any issues then feel free to contact us on our toll-free+1-844-405-0904 and get connected to our Intuit Certified ProAdvisor for instant solutions for your queries. We are 24*7 available for the assistance of our customers. You are welcome anytime soon with your queries.