Want to record a vendor refund check in QuickBooks, but have confusion with different scenarios? In this article, we will show you, how to record a refund check from a vendor in QuickBooks Desktop and QuickBooks Online in multiple ways. You can follow the procedure, according to your situation type, and can find different ways to adjust the vendor. In the meanwhile, you can drop a call through this number +1-844-405-0904 for a clear, and instant solution.
When to Enter a QuickBooks Credit Card Refund
When you buy any item using your business credit card, you might required to return something because it was corrupted or it simply can not work. The seller will normally process the return using the same credit card you used to make the purchase. When this credit appears on your credit card statement, you must enter it as a QuickBooks credit card refund.
How to Record a QuickBooks Vendor Refund in QuickBooks Desktop
There are four possible scenarios of a refunding check from a vendor in QuickBooks Desktop. We have discussed all of the possible scenarios. Choose the procedure as per your requirement:
Case 1: The vendor sends you a refund check for a paid bill
If in case, a vendor sends you a refund check for a bill, which has already been paid then you need to follow these steps to record a refund check from a vendor in QuickBooks Desktop.
Step 1: Record a Deposit of the vendor check
- Go to the banking menu and click make deposits.
- The payments to deposit window may appear, click ok.
- Go to the make deposits window, click on received from the drop-down and choose the vendor who sent you the refund.
- In the from account drop-down, choose the appropriate accounts payable account.
- Go to the account column, and fill in the actual amount of the vendor check.
- Enter a memo, the check number, the payment method, and the class although this is optional.
- Click save and close.
Step 2: Record a Bill Credit for the refunded amount
- Go to the vendor’s menu and select enter bills.
- Select the credit option button to account for the return of goods.
- Enter the vendor name.
- Click on the Expenses tab and enter the accounts on the original bill.
- Go to the amount column, and enter the appropriate amount for each account(the amounts may have to be prorated).
- Click save and close.
Step 3: Link the deposit to the bill credit
- Go to the vendor’s menu, and select pay bills.
- Verify the deposits that match the vendor check amount.
- Select Set credits and apply for the bill credit you created earlier then click done.
- Click on pay selected bills, then click done.
Case 2: The vendor sends you a refund check for returned inventory items
Step 1: Record a Deposit of the vendor check
- Go to the Banking menu, and select Make deposits.
- Then the Payments to Deposit window may appear, click OK.
- Go to the Make Deposits window, click on the Received from the drop-down and select the vendor who sent you the refund.
- Go to the From Account drop-down, and select the appropriate Accounts Payable account.
- Now from the Amount column, enter the actual amount of the Vendor check.
- Enter the remaining information in the Deposit account.
- Click Save & Close.
Step 2: Record a Bill Credit for the returned items:
- Go to the Vendors menu, and select Enter Bills.
- Select the Credit option button to account for the return of goods.
- Enter the Vendor name.
- Click on the Items Tab.
- Enter the returned items with the same amounts as the amount on the refund check.
- Click Save & Close.
Step 3: Link the deposit to the Bill Credit:
- Go to the Vendors menu, and select Pay Bills.
- Verify the Deposit that matches the Vendor check amount.
- Choose Set Credits and apply the Bill Credit you created earlier.
- Click Done.
- Then choose the ‘Pay Selected Bills‘ option.
- Click on the ‘Done‘ option to complete the procedure.
Case 3: The vendor sends a refund check that is not related to an existing bill
For Example rebates, reward incentives, refunds, reimbursements, or checks issued by vendors to cash out an existing credit.
Step 1: Record a Deposit of the vendor check
- Go to the Banking menu, and click Make Deposits.
- Then the Payments to Deposit window may appear, click OK.
- Go to the Make Deposits window, click Received from the drop-down, and select the vendor who sent you the refund.
- Go to the Account drop-down, and select the appropriate Accounts Payable account.
- From the Amount column, enter the actual amount of the Vendor check.
- Enter the rest of the information in the Deposit.
- Click Save & Close.
Step 2: Record a Bill Credit for the amount of the Vendor Check:
- Go to the Vendors menu, and select Enter Bills.
- Select the Credit option button to account for the return of goods.
- Enter the Vendor name.
- Click on the Expenses Tab and enter the Accounts you would normally use for refunds.
Note: If you are not sure which account to select, we recommend you contact your accounting professional. - Go to the Amount column, and enter the appropriate amount for each Account (the amounts may have to be prorated.)
- Click Save & Close.
Step 3: Link the Deposit to the Bill Credit:
- Go to the Vendors menu, and select Pay Bills.
- Verify the Deposit that matches the Vendor check amount.
- Choose Set Credits and apply the Bill Credit you created earlier.
- Click Done.
- Click on the Pay Selected Bills then click Done.
Case 4: A vendor sends a refund check on behalf of the original Vendor
Step 1: Create a deposit for the vendor who sent the refund check
- Go to the Banking menu, and select Make Deposits.
- The Payments to Deposit window may appear, click OK.
- Go to the Make Deposits window, click Received from the drop-down, and choose the vendor who sent you the refund.
- In the From Account drop-down, select the appropriate Accounts Payable account.
- Go to the Amount column, and enter the actual amount of the refund.
- Enter a memo, check number, payment method, and class although this is optional.
- Click Save & Close.
Step 2: Create a Bill for the Amount of the Deposit and apply it to the Deposit:
- Go to the Vendors menu and select Enter Bills.
- From the Vendor field, choose the vendor who has sent the refund.
- Go to the Amount Due field, then enter the amount of the refund.
- Click on the Expense Tab.
- Choose the ‘Wash account’ option from the ‘Account’ field.
- Go to the Amount field, and enter the amount of the refund.
- Click Save & Close.
- Now go to the Vendors menu and select Pay Bills.
- Select the Bill and click on the Set Credit.
- Now, select the Credit and press Done.
- Click Pay Selected Bills and then click Done.
Step 3: Create a Credit for the Original Vendor:
- Go to the Vendors menu, and select Enter Bills.
- Choose the Credit option button.
- Go to the Vendor field, and select the vendor who sent the refund.
- From the Credit Amount field, enter the amount of the refund.
- Click on the Expense Tab.
- Go to the Account field, and select the account used on the original Bill.
- Go to the Amount field, and enter the Amount of the refund.
- Click Save and then Close.
Step 4: Create Bill for the Amount which affects with the wash account
- Go to the Vendors menu, and select Enter Bills.
- Again go to the Vendor field, and select the vendor who sent the refund.
- Go to the Amount field, and enter the amount of the refund.
- Click the Expense Tab.
- Go to the Account field, and select a Wash account.
- From the Amount field, enter the amount of the refund.
- Click Save & Close.
- Go to the Vendors menu and select the Pay Bills option.
- choose the Bill and click on the Set Credit.
- Select the Credit and click Done.
- Click Pay Selected Bills and then click Done.
Case 5: The vendor sends you the refund as a credit card credit
- Go to the Banking menu, and select Enter Credit Card Charges.
- From the Credit Card drop-down, select the credit card account.
- Select the Refund or the Credit option button.
- Choose the appropriate Vendor name and enter the Date, Reference Number, and Amount.
- Enter a relevant memo to describe the transaction.
- If you have returned Items, click the Item Tab and enter the Items and Amounts from the refund.
- If the refund does not have Items, click on the Expenses tab, select the appropriate Accounts and enter the Amount.
- Click Save & Close.
If you are not sure about it ask your accountant, or get help on how to find an accountant.
How to record a refund from a vendor in QuickBooks Online
The vendor can issue a credit document stating that you no more owe the amount or they can also issue a refund check. In both cases, we’ll teach you how to record a refund from a vendor in QuickBooks Online.
In the first case, when a vendor issued a credit document then you need to record it on the vendor credit and apply it when you pay the vendor’s bill.
And in the second case, when a vendor issued a refund check then you still have to record it to the vendor credit but also you need to add the deposit for the vendor check and link it to the vendor credit.
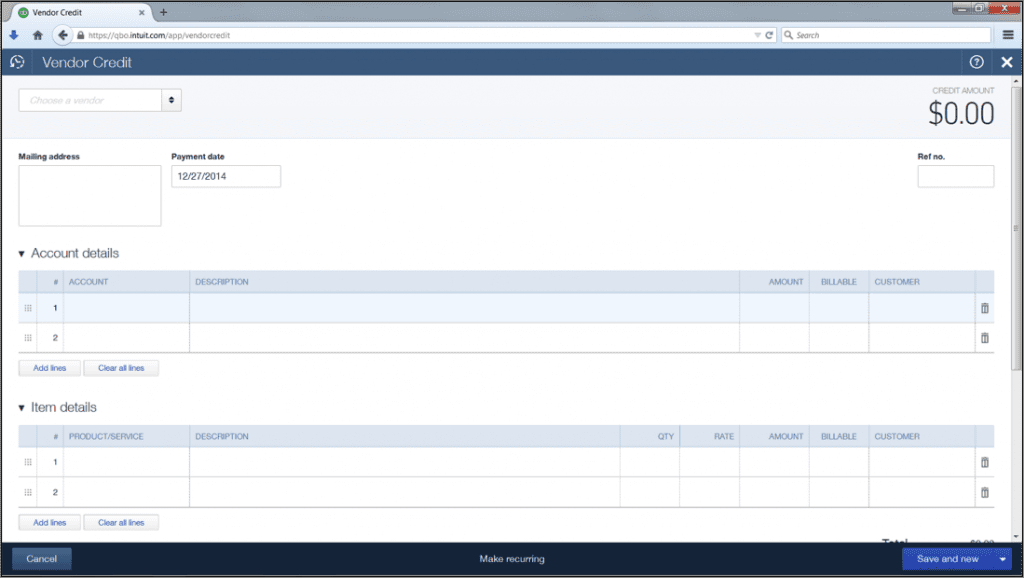
Step 1: Enter the vendor credit
- Click on ‘+New’.
- Then from the ‘Vendors’ list select the ‘Vendor credit’ option.
- Browse the vendor from the ‘choose the vendors’ drop-down menu.
- Enter the issue date of the credit document/refund check.
- At the top right corner enter the credit amount.
- Next, In the account details select the account you used for original billing.
- In the Item details, select the items that you returned to the vendor.
- You can also attach an electronic copy of the credit.
- Lastly, save and close from the bottom right.
And if you receive a check then you have to record a refund check from a vendor in QuickBooks Online.
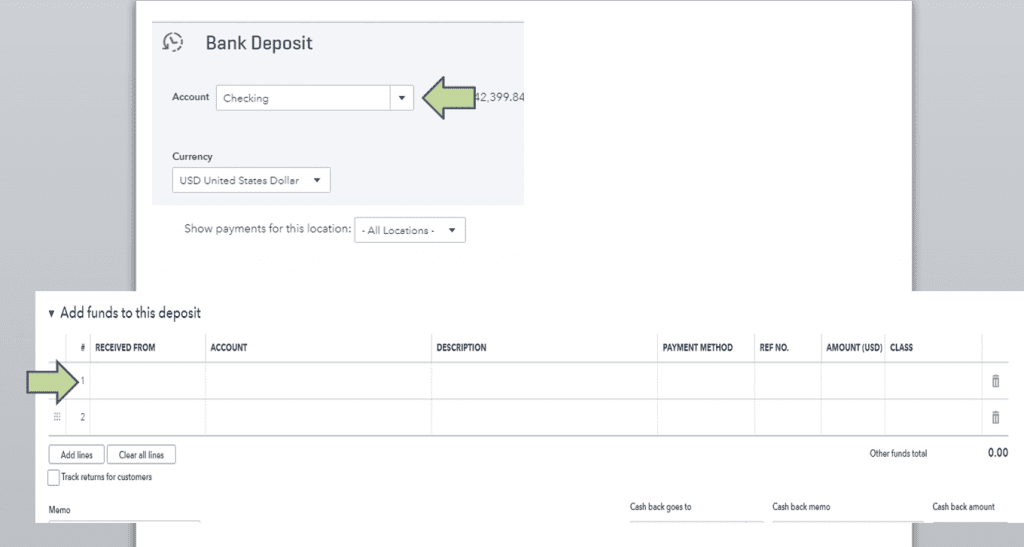
Step 2: Deposit refund check of vendor
To record a refund check QB Online after recording it into vendor credit you also need to deposit check in the QuickBooks.
- Click on ‘+New’.
- Then from the ‘Others’ column select the ‘Bank deposit’ option.
- In the ‘Add new deposit’ section fill all the required fields.
- From the ‘Received from’ enter the name of the vendor.
- In ‘Account’ select the account payable.
- In the ‘Amount’ field enter the amount of refund.
- Click on the downward arrow on the side of ‘Save and new’ and select the ‘Save and close’ option.
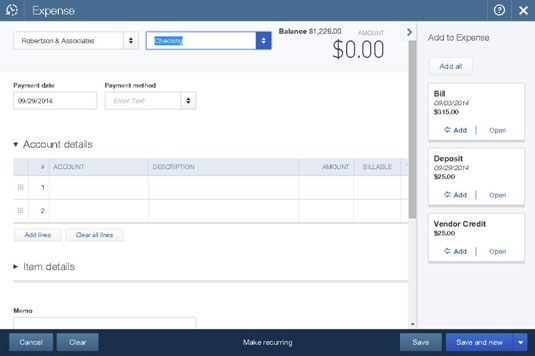
Step 3: Link Vendor Credit and Bank Deposit
For linking vendor credit and bank deposits, we’ll be using expenses. This will help in keeping accurate vendor expenses. Make sure to set up expenses in QuickBooks Online properly.
- Click on the ‘+New’ icon.
- Then from the ‘Vendors’ column select the ‘Expenses’ option.
- Select the vendor that issues credit documents/refund check.
- On the right hand add the current transaction in both Vendor credit and bank deposit.
- After adding the net balance of the bill payment will become zero.
- At last ‘Save and close’.
This is the whole procedure to record a refund from a vendor in QuickBooks Online.
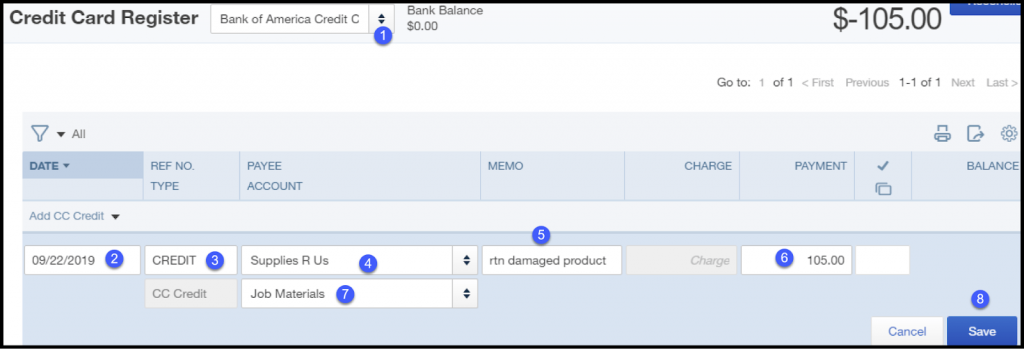
Step 4: Record a credit card refund in QuickBooks Online
This method is used when you make a purchase using the business credit card and for some reason, you have to return the product. Then the vendor usually will issue a refund to the credit card account that you used.
- Click on ‘Chart of Accounts’ from the ‘gear’ icon on the left.
- Select the credit card from the list and then click on the ‘view register’ on right.
- Next in the ‘Add CC expense’, drop-down menu select ‘CC Credit’.
- A new window named ‘Credit Card Register’ will appear in this you need to fill in some details.
- In account, check whether you select the right credit card or not.
- Next, enter the date you returned the product.
- In the Payee account, select the vendor to whom you return the product.
- In the Memo, you can add a relevant description.
- In the Payment section, enter the price of the returned product.
- After correctly entering the fields. Click on the ‘Save’ on the bottom right.
Frequently Asked Questions
How to record insurance refund in QuickBooks
- Visit the ‘Banking‘ menu, and select the ‘Enter Credit card charges‘ from the list.
- Select the right credit card account.
- Now in the ‘Purchased form‘ field, select the insurance company, and click on the ‘Refund/ Credit‘ radio button.
- Put all the required information in the form.
- Must fill out the field of date, expense account, and amount.
- At last, click the ‘Save, and Close‘ option.
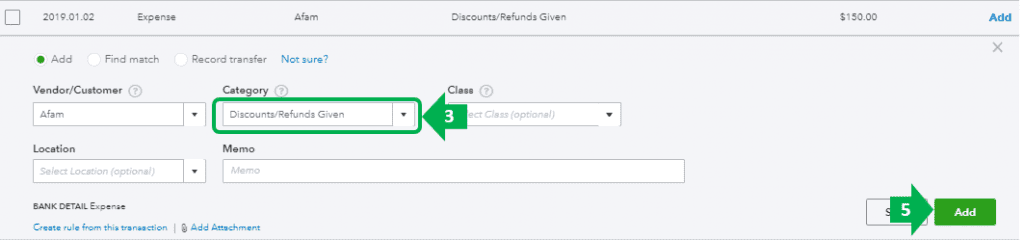
How do I categorize a refund in QuickBooks?
A refund can be easily categorized from the downloaded transaction list. Follow the procedure to categorize the refunds in QuickBooks.
- Go to the ‘Banking‘ page.
- Click on the ‘Banking‘ menu, and select the ‘For Review‘ tab.
- Then select the downloaded transaction, and choose the category refund.
- At last, ‘Add‘.
How to handle a refund on a QuickBooks desktop?
Just follow the given steps:
- First, you need to go to the customer’s menu.
- Next, you need to select the credit memos/ refunds.
- Now in the next step, you need to go to the customer job dropdown and select the customer you need to refund.
- After that, you have to enter the products and services that need to be refunded.
- Next, you have to select the save and close tabs.
How do I enter a vendor credit invoice in QuickBooks?
You need to follow the given steps to apply vendor credit invoice in QuickBooks.
- Begin by entering the vendor credit.
- Then next you need to go to the + new option.
- Choose Vendor credit under the Vendors.
- After that, you need to go to the drop-down menu and choose the Vendor’s name.
- Next, you have to list the sales receipts and invoices for which you received credit.
Why do you need to record vendor refunds in QuickBooks Desktop?
Many times in business, there is a possibility of return of inventory received from the vendors. So for these returns, you need to maintain the data to avoid a mismatch in the records you have to record vendor refunds in QuickBooks Desktop.
Above we have covered all the methods to record a refund from a vendor in QuickBooks Online as well as in QuickBooks Desktop. You can perform any of them as per your requirements. Still, if you need any help then, contact the certified QuickBooks ProAdvisor for the expert solution.