Here we will discuss how to import & Create purchase orders in QuickBooks Desktop. Use the purchase order to tell sellers what you want to order. Track the items you have ordered and received, and know what it costs. Go through the article to learn it with steps and exact images plotted here to describe it with ease. For any assistance and help contact our QuickBooks ProAdvisor Through Toll-Free: +1-844-405-0904
Now let’s proceed further, have a look at the steps to import & create a purchase order in QuickBooks Desktop.
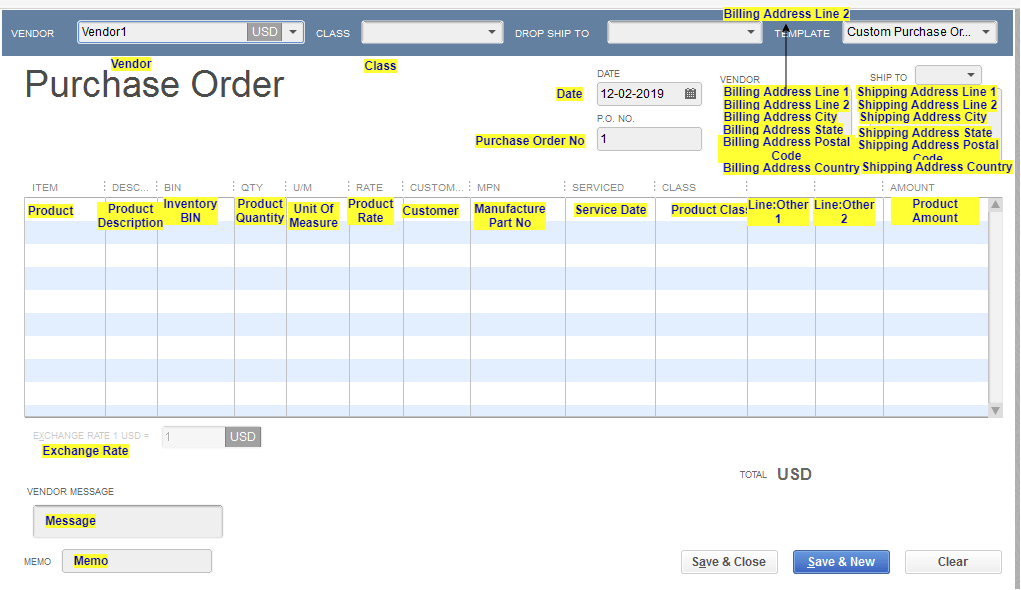
Steps to Create Purchase Order in QuickBooks Desktop
- First, you need to turn on purchase orders, if you are not turn on yet, follow these steps to turn on the purchase order in QuickBooks Desktop.
- Open QuickBooks and click on the Edit menu and choose Preferences.
- Choose Items & Inventory and later click on the Company Preferences option.
- Now click on the checkbox Inventory and purchase orders are active.
- Now Choose to OK.
- After turning on the purchasing order, Click on the Vendors menu, and choose to Create Purchase Orders.
- Choose the vendor to whom you like to create a purchase order, under the Vendor drop-down. to add a new vendor, you can also choose Add New
- Fill all the given fields, and also add the items you would require to order.
- Click on Save & Close.
Note: Purchase orders are a part of the Accounts Payable (A/P) workflow.
Steps to Create a Purchase Order in QuickBooks Desktop
First, go to the import button in the Dashboard screen or under the File menu you can also find the Import option, later in the menubar look for the File Selection screen of the Import Wizardwizard(Step 1).
- Step 1: File Selection- Click on “QuickBooks Transaction Type” as “Purchase Order”. “Now choose your file”, you can also click on “Browse File” to browse your from a particular location of your local computer folder
- Step 2: Mapping- Now, set up the mapping of the file columns corresponding to QuickBooks fields. Download the Sample Template file.
- Step 3: Review & Import- Review all your file data Under the Review Grid screen and go to the “Send to QuickBooks” to upload your file data to QuickBooks.
Hope, you have understood the steps to import & create purchase orders in QuickBooks Desktop and also after reading this article you will perform above steps very smoothly if in case you are facing any issue then directly reach us by dialling our toll-free +1-844-405-0904 and get-in-touch with our Intuit certified ProAdvisors for quick help.