Returned or bounced checks in QuickBooks means there is not sufficient money in the bank account to clear the cheque. Your bank will charge anNSF(Not Sufficient Funds) fee for the bounced check. That you need to record in Account Receivable (A/R) and Expenses. In this tutorial, we’ll guide you on how to record a returned check in QuickBooks Online and Desktop. Read the complete article and get your query resolved, in case you have any issues contact our QuickBooks ProAdvisor toll-free: +1-844-405-0904
It is important to enter a bounced check because if you didn’t record the check then it will be difficult to reconcile your bank account with QuickBooks.
How to Enter a Bounced Check in QuickBooks
QuickBooks Desktop offers an option to record a bounced check that you received as payment in sales receipts or invoices from the customer. QB tags the invoice as ‘Unpaid’ and also lets you enter the fees charged by the Bank for the bounced check.
QB Desktop will create a new invoice for the NSF (Non-sufficient Funds) fee charged by the bank and you need to send it back to the customer with the bounced check. Follow the instructions mentioned below carefully to enter the bounced cheque.
- Open QuickBooks Desktop and go to ‘Customer’ from the top menu bar.
- Then, in the customer menu click on the ‘Receive Payment’ option.
- In the next window, find and select the customer payment that is canceled due to the bounced check.
- Now a new window named ‘Receive Payments’ will pop up.
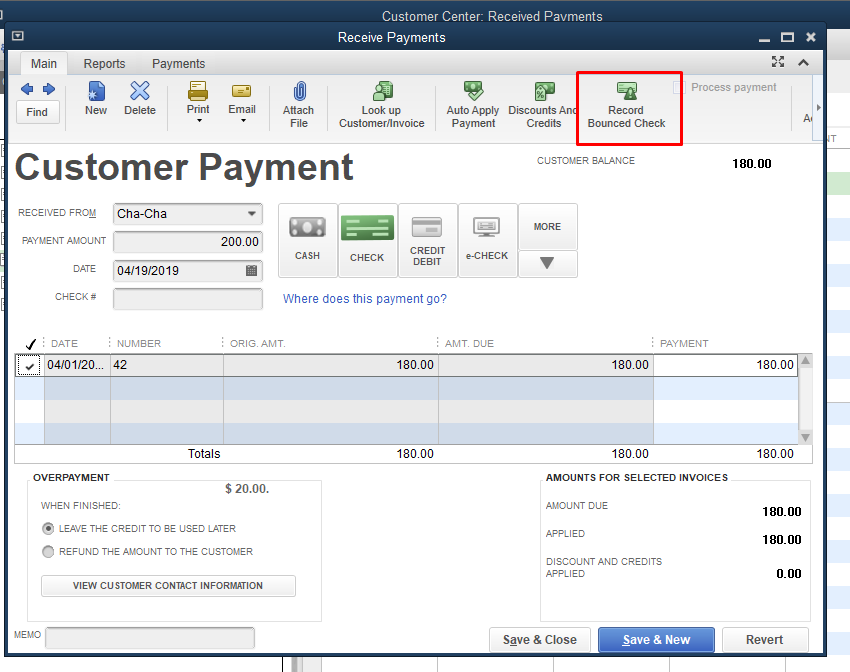
- In this window click on the ‘Record Bounced Check’ option at the top right corner.
- After that, another window named ‘Manage Bounced Check’ will open.
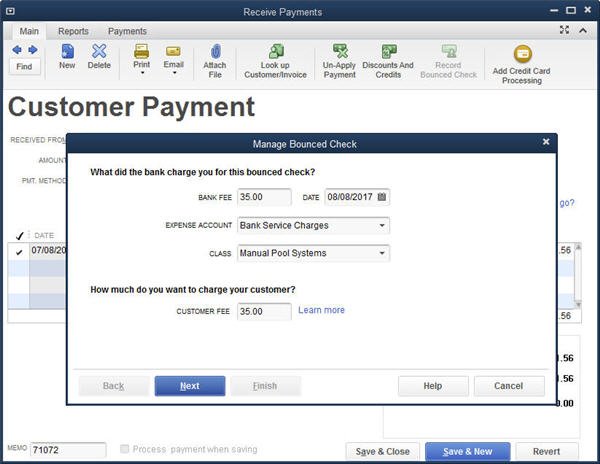
- Here, enter the fee that the bank charged you for the bounced check and the date in the adjacent column.
- Next, select the Expense Account from the drop-down menu from which the NSF (Not Sufficient Funds) was charged by the Bank.
- Select Class, if you have enabled the class tracking in QuickBooks.
- In the last Customer Fee field, enter the amount you want to charge the customer for the bounced check.
- Review all the fields and then click on the Next button.
- In the Bounced Check Summary window, QB will show you what will happen when you record bounced check.
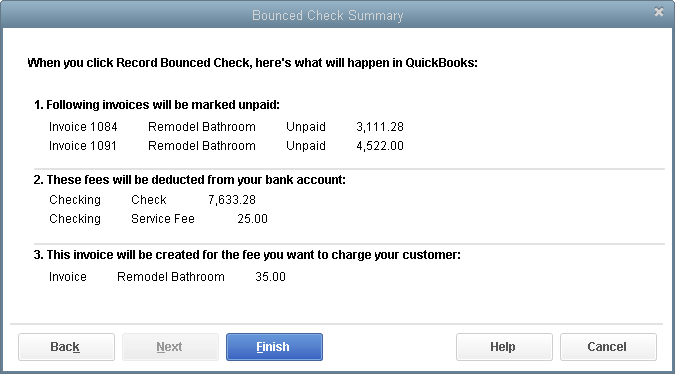
- Note the transactions that are marked ‘Unpaid’ by QuickBooks.
- After reviewing the final time, hit the ‘Finish’ button.
Now the only thing left is to send the new bounced check fee invoice created by the QB along with the original invoice.
Enter a Bounced Check in QuickBooks Online using Journal Entry
There is also another method to record an NSF check inQB Online using the QuickBooks journal entry. For this, you first need to create a journal entry representing the non-payment amount and then delete the original invoice that was created for the customer.
Step 1: Create a Journal Entry
- From the navigational panel, click on the +New.
- Select the Other section and then click on the Journal Entry.
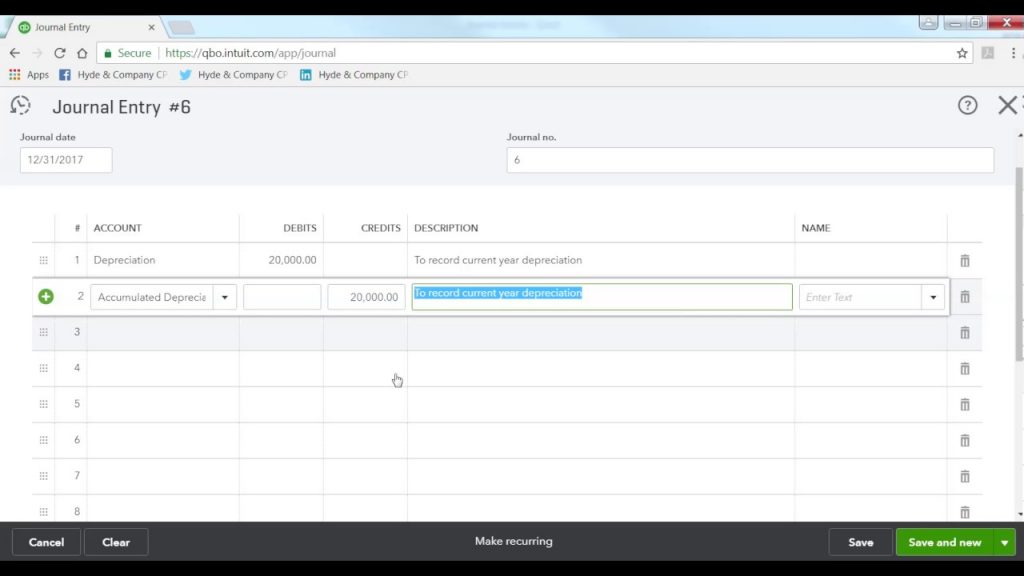
- In the Journal Date field, enter the date when the check was bounced.
- In the first line of the Account, select ‘Account Receivable (A/R)’.
- Enter the amount of bounced check in the Debit column and the customer’s name in the Name field.
- In the second line, select the bank account in which the check was bounced. The credit amount will auto-fill in the respective column.
- Write brief information about the bounced check in the Description field and save the entry.
After doing that, the second step is to delete the original invoice that was paid with the bounced check and attach the bounced check with the journal entry you created.
Step 2: Remove the Original Invoice and link the Bounced Check
- From the left-side menu click on Sales or Invoicing.
- In the Next window, open the customer tab and then select the customer who issued the bounced check from the transaction list.
- Uncheck the invoice to which the bounced check is applied and select Journal Entry instead.
- At last, save and close the window.
Then you need to follow the procedure from STEP 3 to STEP 5 as mentioned in the previous method for charging the NSF fees from the customer.
How to Record a Returned Check in QuickBooks Online using Write Checks
The process of recording a returned check in QBO is a bit different than the desktop version. The entire process can be divided into 5 steps. Follow these steps to record a bounced check in QuickBooks Online.
Step 1: Write a Check to Record a Decrease in Bank Amount
- From the left-side navigational panel, click on the +NEW icon.
- Under the Vendors column, select the ‘Check’ option.
- Now a new window named ‘Write Check’ will open, here fill in the required fields.
- Payee: Select the customer who issued the bounced Check.
- Bank Account: Select the Bank account in which the check was bounced.
- Payment Date: Enter the date on which the check was bounced.
- Account Details: In the account section, select Account Receivable(A/R).
- Description: You can write brief info about the bounced check.
- Memo: Additional information.
- Amount: Enter the amount of the bounced check.
- After reviewing all the fields, save and close the window.
Step 2: Create a New Service Item for Bounced Checks and NSF Fees
Here, we need to create two new service items, one for the bounced check and another for the bounced check fees for the customer.
- Click on the gear icon.
- Under the List column, select the ‘Product and Service’ option and then click on ‘New’.
- In the Product/Services information panel. Select ‘Services’.
- In the Name field, enter Bounced Check, and in the account, select the bank account in which the check was bounced.
- After this, click on the ‘Save and New’ to create another item.
- Name the second service item as Bounced Check Fees and add a new account or you can also select the expense account which you use for tracking charges.
- After having a final look, select ‘Save and Close’.
Step 3: Create an Invoice for Bounced Check NSF fees
- Click on the +New icon from the left side navigational panel.
- Under the Customers column, select the ‘Invoice’ option.
- Enter the customer name and the invoice date in their respective fields.
- In the Product/Service, select Bounced Check Fees that we created in the previous step.
- In the Description, write some details about the bounced check for the customer.
- Enter the amount you want to charge from the customer in the Amount field.
- Select ‘Save and Close’.
Step 4: Enter the Bank NSF Fee as Expense
In this step, you need to add the NSF (Non-Sufficient Fund) fee charged by the bank for the bounced check in the expense account of QuickBooks Online.
- Click on the +New icon, from the left side navigational panel.
- Under the Vendors column, go to ‘Expenses’.
- Select the bank account in which the check was bounced.
- Enter the date when the check bounced, in the Payment Date.
- In Ref No, type ‘Bank NSE Fee’.
- In account details, select the bank that you used for tracking the bank charges.
- In the Amount field, enter the NSE fee that the bank charged to you when the check was bounced.
- Select ‘Save and Close’.
Step 5: Print and Send Statement to the Customer
After accomplishing the above steps, now you need to send a statement to the customer with information about the bounced check.
- Go to the left-side navigational panel and then select the ‘Sales and Invoicing’ option.
- Find and select the customer who issued the bounced check, from the Customers tab.
- Now the transactions list will open, here from the ‘New Transaction’ drop-down menu select the statement.
- In the Create Statement window, select the statement type, start date, and end date of the statement.
- After reviewing, click on Save and send the option to send an email to the customer.
Steps to Record Returned or Bounced Check in QuickBooks Desktop using Journal Entry
Step 1: Make a Journal Entry
- Open the QuickBooks navigation panel.
- Click on the New Button and choose the Other section.
- Now, select the journal entry tab.
- Go to the journal date section and mention the journal date of bounced check.
- Click on the A/R (Account Receivable) in the first line of account.
- In the Debit column, enter the amount mentioned on the bounced check.
- Mention also the name of the customer in the name field.
- After that navigate to the second line and click on the Bank account that the check was bounced.
- You will auto-fill the Credit Amount in the column.
- In the Description field, you have to write a brief description of the check that bounced.
- At the end click on the Save button.
Step 2: Link the Bounced check after removing the invoice
- Go to the left-hand menu in QuickBooks.
- Choose the Sales or Invoicing option from the menu.
- Now a new window opens.
- Click the Customer tab in this.
- Then, select from your list of transactions the customer who printed the bounced check.
- You must have removed the tick mark from the invoice on which the bounced check was posted.
- Then, select which journal entry to attach to that invoice.
- Lastly, choose Save and then Close the window.
Step 3: Enter the Bank Service Fee for a Bounced Check
- Click the New button and choose Expenses under Vendors.
- In the Payee field, type in the name of your bank.
- Go to the Payment Date field and type in the date of the bounced check.
- In the Ref No field, include the NSF fees.
- In the first line, click Category and select Bank Charges Expense account.
- Navigate to the amount column and type in the amount the bank charged on the bounced check.
- Lastly, click on the Save button to save these changes.
Step 4: Create the Invoice for the Bank Service Fee
- For the New button click on the + Sign.
- Choose the Invoice from the Customers option.
- Select the customer name.
- The Date should be entered in the Invoice date field. This date was that the Check was Bounced.
- You have to navigate to the Product and Service column.
- Create the Bounced Check Fee item from further options.
- Enter the Amount of Bounced check.
- Last, Save and Close.
Step 5: Print the Statement
Print the statement with the beginning and ending date. To make a copy of the print, click on it. Once the copy is made, it has to be sent to the customer so that they can pay you.
Step 6: Receive the Payment of the Customer
You receive payment from your consumer when they remit the returned check. Set a new account for it under Receive payment, which will show the date and type of payment.
How to Record a Returned or Bounced Check Using an Expense?
Follow the steps to record a returned or bounced check using an expense:
Step 1: Add the Bounced Check as Expense
- Select + New and then click on the Expense.
- Select the customer name who got a bounced check in the Payee box field.
- Choose the account where the money was pointed to be deposited from the Payment Account selection.
- Enter the date when the check bounced in the given Payment date field.
- Select and open the Category Details dropdown.
- Select Accounts Receivable in the particular Category field.
- Enter the returned check amount in the given Amount column.
- Add a note like NSF check or bounced check to the Description field.
- Choose Save and Close.
Step 2: Unapply the Bounced Check Payment
- Go to the Get Paid and Pay option.
- Now, select customers and find with name of the client whose check bounced.
- Select the Bouced check record after finding it.
- Choose the invoice with the bad check and uncheck the box.
- After that select the checkbox for the individual expense.
- And add a bounced check as an expense.
- Last click on the Save and Close option.
Step 3: Prepared an Item for the Bounced Check Charges from the Bank
- Firstly, open the settings.
- Navigate to the List section then select Product and Service.
- Now, click on the New and select the Service tab.
- Add a bounced check in the name field.
- Select the specific bank account from the Income account dropdown list where the check was returned.
- After that choose Save and New option.
- Give the second item the name of the bounced check fee.
- Choose the bounced check fees income account from the Income account dropdown list.
- Hit on the Save and Close tab.
Step 4: Add the Particular Service Fee Charged by the Bank
- Select + New.
- Choose Expense under the Vendors section.
- Choose your bank from the available Payment Account dropdown list.
- Enter the date the check bounced in the specified Payment date field.
- In the specified reference number field, enter the NSF fee.
- Choose the Bank Charges expense account from the dropdown list in the Category details section.
- In the specified amount column, enter the amount your bank has charged you for the submitted bounced check.
- Click Close and Save.
Step 5: Create an Invoice for the Bounced Check and Send it to the Customer
- Click on the New tab and choose Invoice from the Customer option.
- In the Invoice date filed enter the customer name and choose the date the check bounced.
- Choose the bounced check fee item from the dropdown list in the specified product/service column.
- Add the amount that should be charged to the customer for providing the returned check.
- Note: Describe to the customer the aim of the fee and the grounds for charging it.
- To close the process, click on the Save and Close tab.
Step 6: Send statements to your clients
- Go to Get Paid and Pay or Sales.
- Now select Customers.
- On the respective Customer’s tab, select the customer’s name by whom the bounced check is issued to open the Transaction List.
- Select Statement from the given New transaction dropdown list.
- Select the Statement Type to prepare from the given dropdown list.
- Select the Statement Date, Start Date, as well as the End Date.
- See the Description column. You’ll note your note concerning the second invoice.
- Choose Print to issue a statement copy.
What are the Fundamentals of a Returned Check?
Here are a couple of basics that are essential for returned checks:
- Stop Payments: A request to hold payment of a check already issued can also cause a returned check.
- Insufficient Funds: Insufficient funds in the account also cause a bounced check.
- Incorrectly Written: The check can be returned if the sender does not sign it.
- Too Old to Honor: A cheque can be considered uncollectible by a bank if it is presented for payment more than six months from the date it was written.
Conclusion
So, this is all you need to know on how to record a returned check in QuickBooks Online and Desktop. We’re hoping that now you can handle the NSF or bounced checks easily. Before doing so remember that if not done right, then it can affect your financial statement and later on your Tax filing. But don’t worry if you need assistance you can hire a QuickBooks ProAdvisor. They have years of experience in accounting and bookkeeping. The only thing you need to do is contact us via our 24*7 toll-free QuickBooks support number +1-844-405-0904.