In this article, we are going to discuss in detail about How to add new Vendors in QuickBooks Online. Vendors are the peoples or companies who are working for you and you do pay money for it, such as a store, utility, landlord, or subcontractors. Read the complete article to know the importance of setting up new vendors in QBO, when to add excel and CSV files, how to import vendor information, modify it nad much more. Go through the article to get the steps to add new vendors in QBO and import vendors’ information from excel or CSV file. still, having an issue contact our QuickBooks ProAdvisor toll-free:+1-844-405-0904
Importance of setting up new vendors in QuickBooks Online
If you are looking to pay bills in QuickBooks, then you must be wanting to set up your vendors. Setting up your vendors will allow you to do the following:
- QuickBooks rapidly enter vendor bills with details like remit to address and due date automatically pre-populated from the vendor profile.
- You can also track your expenses by the vendor. With the help of this, you can run reports that will provide insight into which vendors you are spending the most money with and what product you are purchasing from them.
We are explaining the process to set up vendors in QuickBooks manually. In addition, if you are having more than 10 vendors to set up in QB. Then, you should import vendor info into QuickBooks online by using an excel or CSV File.
Add new vendors in QuickBooks Online manually
- First of all, To set up your vendors in your company file, navigate to the seller center by clicking on vendors on the left menu bar right below the customer.
- After that, click the blue New vendor button in the upper right-hand corner.

- After that, enter the vendor information.
- First and Last Name:- In this field, you have to enter the first and last name of the vendor.
- Company: This field is only for your commercial or business vendors and this info will appear on all purchase forms that you create.
- Display name as:- This is auto-populated based on the information entered in the vendor name field. This will show up on your vendor list in QuickBooks.
- Print on Check as:- This field helps you, if you want to write checks and pay vendor bills, then the payment information will come from here. If the payee name is different from the vendor name, then this field helps you to change the payee name.
- Address:- In this field, you have to enter the address of your vendor where you need to email your payment to the vendor.
- Notes:- In this field, You can enter any additional information here. This detail is for internal purposes only and will not be visible to your vendors.
- Email:- In this field, you have to enter vendors email id, if you want to send the order to vendors.
- Phone/Mobile/Fax:- In this field, you have to enter the telephone numbers provided by your vendors.
- Website:- In this field, you have to enter the supplier’s website address for quick reference.
- Payment Terms:- In this field, you can select here payment terms according to any vendors.
- Tax ID: In this field, you have to enter the tax ID or Social security number of all suppliers.
- Track Payments for 1099:- In this field, QuickBooks will track these vendors and include them in a 1099 report. If the supplier is not incorporated, you are required to send them a 1099 tax if you pay them $600 or more in a calendar year.
- After that, you have to add some other vendor information.
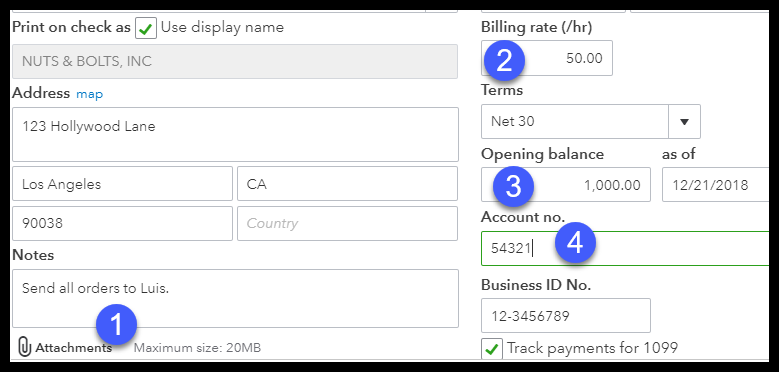
- Attachments: In this field, you can attach any documents that you would like to keep on file for the vendor.
- Billing rate: In this field, you have to enter the billing rate for the vendor for easy reference.
- Opening balance: In this field, you have to enter an outstanding balance that you have with a vendor.
- Account Number: In this field, you have to enter an account number with your vendor for easy reference.
- You can review the vendor set up and after that, the vendor information will appear in the vendor center.
When to Add Vendors using an Excel or CSV file
Once you finish setting up vendors profile in QuickBooks Online then it will be very easy for you to enter vendors bills because most of the information are pre-filled and most fields will be populated automatically. If you want to set up more than 10 vendors then the best way to add those new vendors is to first add their information into to an excel document and then later on import that information into QuickBooks Online.
Below we have discussed the entire process of how you can add vendor’s information in QuickBooks using an Excel or CSV file.
How to import vendor information using an Excel or CSV file in QuickBooks Online
You should definitely use this method if you want to add information of more than 10 vendors in QuickBooks Online. First, enter the data of all vendors in the spreadsheet. Once you entered the data then go to the Vendor Center and then click on the arrow next to the New Vendor option. After that, click on the import vendor option and then follow the on-screen instructions to import the vendors’ information.
There are 4 important fields that you have to include in your vendor’s information spreadsheet. Although, you can add a lot more information than this in QuickBooks.
- First and last name of the vendor or company or business.
- Email address
- Phone Number
- Remit address
You don’t have to worry about the layout of the excel sheet just make sure that the above-mentioned 4 fields should be in it.
The import will be completed as soon as you completed the five steps procedure mentioned below.
Step 1: Navigate to import screen
To import information in QuickBooks, first, go to the Vendor Center and then from the top right corner of the screen, click on the New Vendor drop-down menu and then select the Import Vendors option.
Step 2: Choose the excel spreadsheet or CSV file to upload
Now, in the import vendors window, click on the Browse button and find the excel or CSV file on the location at your system, then click on the file to upload it. Once you have done then, click on the Next button at the bottom of the screen and follow the next step.
NOTE: You can also see a sample excel file, to do this click on the download a sample file link. But if you find your spreadsheet different from the sample file than it is not necessarily important to redo your spreadsheet. In the next step, we are going to map the data so QuickBooks pulls the correct data from your spreadsheet.
Step 3: Map the data
Here, we will direct QuickBooks from which field it needs to pull it data from the spreadsheet. Once we finishing the mapping of data, all the information in the fields will be correct in QuickBooks. In the Your Field column, select the options one by one in your spreadsheet that imitates to the QuickBooks field.
Here is the brief description of the fields that needs to be completed.
- QuickBooks Online Field: This is the field in the QuickBooks software and here the information will be imported.
- Your Field: From the drop-down, you need to select the field in the spreadsheet that corresponds to the QuickBooks field.
Tip 1: There is no need to match the QuickBooks Online field with Your field. For example, Its Name in the QuickBooks Online field on the other hand its Customer Name in Your Field.
Tip 2: If your spreadsheet has more field than QuickBooks Online then you don’t have to worry about it. The only fields that will import into the QuickBooks are those you already matched to QB fields. If you don’t want to import any specific fields then just don’t match them with QuickBooks fields.
Step 4: Review the data before you import
Now, you can review the mapped data before your import the information. Make sure to select the following options.
- The number of records that match with your spreadsheet.
- Make sure all the information are in the correct fields (like email address, phone number, etc)
If you found any error in the fields then click on the back button and make the necessary changes. Once you have done making all the changes, select the Import option.
Step 5: Import is completed
As soon as the import is complete, QuickBooks will send you the message of completion. 9 out of 9 vendors has been imported to the QuickBooks.
Watch this video to learn more about How to add your vendor information to QuickBooks.
How to Modify or Delete a vendor?
Vendor Information can easily be modified anytime. You just need to click on the vendor’s name from the vendor center. Make whatever changes you like to make to the vendor profile.
Just like customers, vendor information cannot be changed once it is used in a transaction as transactions are linked with the financial statements. You can only deactivate the vendor if you have decided that you don’t want to work with the same vendor anymore. Deactivating the vendor will not hide vendor from financial records but they will not appear in the vendor center.
You can easily deactivate the vendor from the vendor center by following the steps mentioned below:
- First of all, go to the vendor center and select the vendor you want to delete.
- Click on Edit at the right corner of the next screen.
- Now Select “Make Inactive” button and Click on save your changes
The Bottom Line
This is everything you need to know about setting up vendors in QuickBooks Online. We’ve discussed, how you can add new vendors in QuickBooks as well as how you can import vendors information from an excel or CSV file to the QuickBooks Online. Read the full article for more information.
I hope you find this article useful. If you have any queries related to this or any other topic, you can call QuickBooks Support +1-844-405-0904.