Learn here to import or export Ms-Excel files or transaction lists in QuickBooks. MS- excel files or transaction lists on QuickBooks can be imported and exported easily. QuickBooks Import Customer, Vendor, Supplier, Items, and chart of accounts from an Excel spreadsheet. There are multiple alternatives available to import or export MS Excel files in QuickBooks. You can do this using a different file format. Read the complete article to learn several options we have provided here. Still, having an issue contact our QuickBooks ProAdvisor: +1-844-405-0904
Several Options to Import or Export MS-Excel Files in QuickBooks

Option 1: Standard Import
Users can enter their information in a formatted excel spreadsheet in QuickBooks. You can review results and view your data in QuickBooks when you want to save and close the files. To import customers, vendors, and products you sell follow the given steps-
- Go to the File menu then select utilities.
- After selecting utilities go to import and select excel files.
- Then you may get an add or edit multiple lists entries window, click No.
- Follow the steps to import files.
- Firstly, you have to choose the type of data.
- Enter your information in the QuickBooks formatted excel sheet opened by QuickBooks.
- Save the file and close it, an option occurs to add my data now.
- Review the results in QuickBooks and view the data.
- Select close.
To import a chart of accounts
Before importing you must create a backup of your company file.
- Go to the lists menu then click on the chart of accounts.
- After that, click on the account drop-down at the bottom.
- Then the next step is to select import from excel.
- Click on browse to select the excel file you want to import.
- Select the file and click open.
- Select the excel sheet where you want to import the data.
- For the next step Map your accounts. (Mapping process tells QuickBooks how to import the data from your excel sheet). The column heading in QuickBooks can differ from excel so you need to match them by following the given below steps-
- Type a mapping name
- Select the account as an import type.
- Then match the information under QuickBooks with the column heading in the excel sheet.
- Click save.
- Select import( if it’s your first time importing, click yes to confirm).
Option 2: Advanced Import
Step 1-Turn on inventory preferences.
- First login to your company files as admin.
- Ensure first you are on the single-user mode.
- Then Go to the QuickBooks Edit menu and select Preferences.
- Go to the left pane and select items and inventories.
- Go to the company preferences tab.
- Put a checkmark on inventory and purchase orders are in the active box.
- Select Ok.
Step 2- Set up accounts in the data file
- Go to the menu lists, and click the chart of accounts.
- Right-click on the chart of accounts and select new.
- Then choose account types. You can create the following account types-
- Income account(to track sales)
- Cost of goods sold account(COGS)
- Inventory asset account.
Step 3: Create your data with the following for each item
- Enter the item name that is the name you want in your item list.
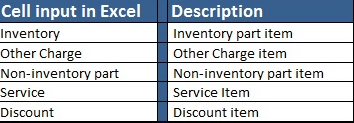
- Create the item type: Specify the item’s type, such as service, inventory part, etc. The item name must be written exactly as it appears in QuickBooks.
- Enter a description of the item: The item’s written description must match what is found in the item list, sales orders, sales receipts, and invoices and that written description will appear in the item lists.
- Enter the name of the income account in which sales of the item will be recorded.
- Create an inventory asset account in which the value of the inventory will be recorded.
- Enter the name of the COGS account. It will record all purchases of the items.
- Enter On hand quantity of the item but inventory items only.
- Enter the cost of the item
- Enter the sale price of the item
- Enter the total value of the new inventory item
- Enter the as of the date ( date of last purchased item).
- Put Y in the Is Passed Thru column so that you can track both the cost and price of the item.
Step 4: Create the spreadsheet
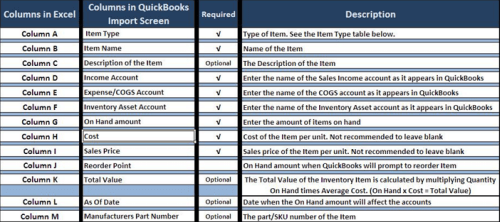
Create the spreadsheet using these tables as guides:
Step 5: Prepare to import
- Start QuickBooks.
- Open your company data file.
- Back up the QuickBooks company file without overwriting any previous backup.
Step 6: Import the spreadsheet
- Go to the File menu then select utilities.
- Go to the import and select excel files.
- Click no to add or edit multiple list entries.
- Select advanced import.
- Set up a mapping.
- Click Browse and pick the Excel file.
- Choose the correct sheet.
- Check whether the data file has a header rows box or not to identify the available headers from your file.
- Go to Choose a mapping dropdown, and select Add New.
- On the Mappings window:
- Fill in a mapping name in the mapping name field.
- Go to the import type drop-down, and select the data you are importing.
- Compare and match the QuickBooks and Import Data columns.
- Then select Save.
- Click Preview (verify the mapping).
- Click Import.
- If you receive the Duplicate Record Found error, you will get these options:
- Keep existing data and discard import data.
- Alter existing data with import data, ignoring blank fields.
- Alter existing data with import data, including blank fields.
To fix the errors:
- Select the appropriate option.
- Click Apply or Apply to all.
- You will receive a notification indicating the number of successful imports and the number of errors. If you have errors, select Save for the error log and review it to determine the necessary action to resolve them.
- Re-import the list as needed.
For customers, vendors, and other lists of data
Use this option if you are importing Customers, Vendors, Items, and other lists data or if you have an Excel file or CSV data already formatted for QuickBooks.
- Go to the File menu, click Utilities
- Go to Import and select Excel Files.
- Go to the Add/Edit Multiple List Entries, click No.
- Select Advanced Import.
- Set up a mapping.
- Click Browse and then select the Excel file.
- Select the appropriate sheet.
- Check whether the data file has a header rows box or not to identify the available headers from your file.
- Go to the Choose a mapping dropdown, and select Add New.
- On the Mappings window:
- Fill in a mapping name in the mapping name field (Customer, Vendors, etc).
- Go to the import type drop-down, and select the data you are importing.
- Compare and match the QuickBooks and Import Data columns.
- Then select Save.
- Click Preview (verify the mapping).
- Click Import.
- If you receive the Duplicate Record Found error, you will be presented with these alternatives:
- Preserve existing data and remove import data.
- Alter existing data with import data, ignoring blank fields.
- Alter existing data with import data, including blank fields.
To fix the errors:
- Choose the appropriate option.
- Click Apply or Apply to all.
- You will receive a notification indicating the number of successful imports and the number of errors. If you have errors, select Save for the error log and review it to determine the necessary action to resolve them.
- Re-import the list as needed.
Option 3: Add or edit multiple lists
With this option, you can add or edit multiple customers, vendors, and items. This is used for list information and not used to import transactions.
- Go to the lists menu, and select add or edit multiple list entries.
- Press the list dropdown and select the list you want to work with.
- Filter the list to see a particular record.
- Click on the customize column button to select the columns you want to see in the add or edit multiple list entries windows. By doing this you can easily work on the columns you need. Click the default button to return to the present column of the list.
- To add: Go to the left pane, select a column, and click add.
- To remove: Go to the right pane, select a column, and click remove.
- To rearrange the column order: Go to the right pane, select the column, and click move up or move down.
- Click Ok
- Columns of customers and vendors are required and cannot be removed but you can change the order if you want.
- Add or edit the entries by clicking on the appropriate fields. (You can copy data from excel by Ctrl+C and paste it into this window by Ctrl+V. And you can also copy down the duplicate rows).
- Click Save Changes.
After saving the changes you may receive a warning about the number of records saved. Quickbooks will also tell you if there are errors that need to be fixed.
To fix the errors
- Hover your mouse in any field to see what the error is.
- Update the record for fixing the error.
- Click save changes and repeat the process until all errors are fixed. ( you can ignore the error and save the changes you have made and click close without making further changes. Quickbooks will not save changes that contain errors.
Export Excel files
You can export Customer, Vendor, and Payroll lists and transactions, as well as Item lists and reports into an Excel spreadsheet.
Customer, vendors, payroll list, and transactions
- First Open the Customer/Vendor/Payroll center.
- Click the Excel drop-down and select:
- If you want to export customer/vendor/employee data such as name, balances, and contact information. Select Export Customer, Vendor, and Employee list.
- Export Transactions if you want to export transactions. (you can export either by name or transaction type).
- Go to the Export window, and select whether you want to create a new worksheet or update an existing worksheet.
- Press the Export button to edit the information you needed on MS Excel.
Items
- Go to the list menu and select the item list.
- Go to the excel dropdown and export all items.
- Go to the export window and select either create a new worksheet or update an existing one.
- Click on the export button to edit the information on ms excel.
Report
Information/data that QuickBooks exports to MS Excel files are:
- The Data in the report
- The formula for subtotals, totals, and other calculations
- Row labels
- Headers and footers from the QuickBooks report
How to export reports to MS Excel-
- Open the report you want to export.
- Click the Excel drop-down at the top of the report, then select either Create New Worksheet or Update Existing Worksheet
- Go to the Send Report to Excel window, and choose what changes or anything you want to do with the report.
- Press the Advanced button to see the other available options for the exported report then click OK. To check whether the exported report shown in the Header information
- If you are using a newer version of MS Excel and the exported report is not showing header information, go to the Printing options select the On Printed report and screen the radio button.
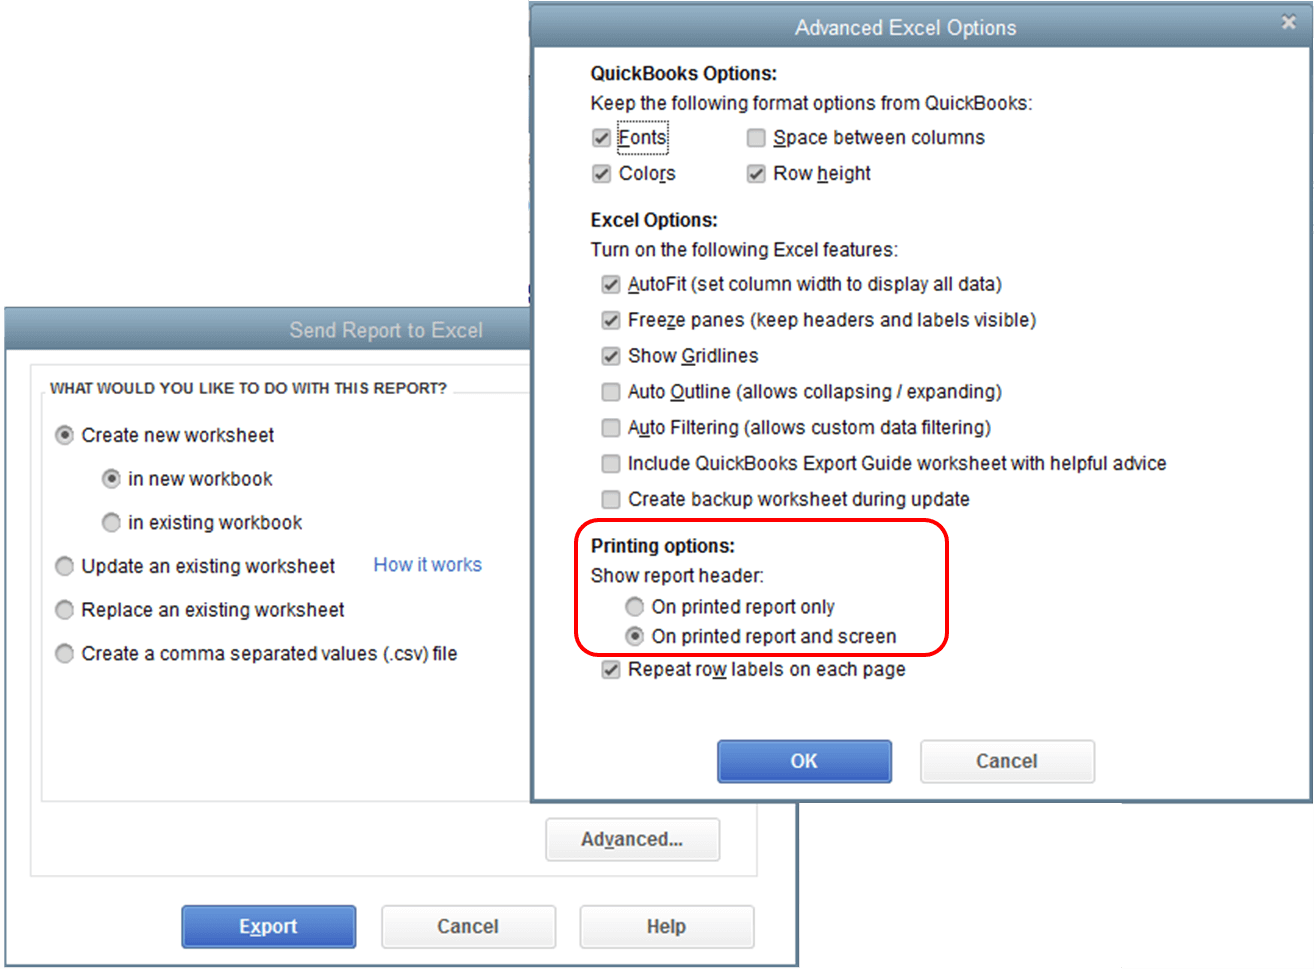
- Click the Export button to edit your data as needed in MS Excel.
Which four list types can be directly imported into QuickBooks online from excel?
Here we will discuss the types of lists that can be imported easily into QuickBooks Online from Excel.
From an Excel spreadsheet, you can import the customer, vendor, items, and chart of accounts. The possibilities for importing Excel files from QuickBooks are numerous.
Conclusion
We hope this blog will help you to import or export MS-excel files or transaction lists to QuickBooks. If you are still unable to do so or facing any issues in between the process you can contact the wizxpert team of QuickBooks proadvisor.