In this article, we are going to discuss two ways to add customers to QuickBooks Online – first using an excel or CSV file and second manually. Also know how to set up, get customer profiles & add a field to customers in QBO. We’ll explain how to manually add buyers and how to upload buyer data from an Excel or CSV file. If you need further assistance or help, contact our QuickBooks ProAdvisor toll-free +1-844-405-0904.
As your company grows, it is critical to stay organized and track your customers. You can add customer profiles to QuickBooks Online so that you can quickly add them to transactions or invoices. Let’s look at how to add customers and maintain your customer list.
Importance of Setting Up & Adding New Customers in QuickBooks Online
As a businessman, we know very well adding customers to QuickBooks Online is an important part if you need to send invoices to your customers.
If you give the invoice to customers, then you definitely want to set up profiles for your buyer in QuickBooks. Setting up your buyers will allow you to do the following:
- QuickBooks rapidly create invoices for your customers since all of your customer details like billing address, shipping address, and due date will automatically populate from the customer profile.
- You can easily track sales by customer, which could be a better way to get to know what your customer likes.
Gathering Information for Each Customer
You must first compile all of the necessary data for each customer in a spreadsheet that can be imported into QuickBooks. Determine if the client’s information is already stored in another software and can be exported to a spreadsheet. Gather the following information for each customer:
- Company name
- Address
- Contact name
- Website address
- Email address
- Telephone numbers
- Opening balance
If you are using a spreadsheet to collect data, make sure you separate the data into the appropriate columns so it is easy to import. If you are manually entering your client information, do so to get a better understanding of the fields available.
How to Add Customers to QuickBooks
Here, are the two ways to add customers to QuickBooks Online.
- Add customer Manually
- Add customers using CSV and Excel files.
When to Use an Excel or CSV File to Add Customers in QuickBooks
Setting up customer profiles in QuickBooks Online enables you to pre-populate invoices with customer data and track customers’ sales. If you want to add more than 10 clients to QuickBooks, then we highly recommended that you place your data in an Excel document and import data into QuickBooks Online. When done in this way, you can create a customer profile in half the time, it will take you to manually enter this information.
Steps to Add Customers in QuickBooks Using an Excel or CSV File
You must have to enter your customer data in a spreadsheet format if you want to add customers to QuickBooks using an Excel or CSV file. For this, it is mandatory to have your customer’s name or company name, your contact’s first and last name, their email, and their telephone number. If you want to send invoices by snail mail then you also require a billing address for your customer.
QuickBooks enables you to catch a lot of data about your customers, but the key fields that are available in your Excel or CSV file are:
- First/Last Name for individual customers or Company name for a business
- Phone
- Billing address
Follow these five steps to add customers in QuickBooks by using Excel or CSV file is:
1. Search for the Import Screen
To import into QuickBooks, look for the right-hand side blue new customer button, go to the drop-down arrow, and choose Import Customers, as shown here in the picture.

2. Choose the Excel Document to Upload
Choose the Browse button to find your Excel file, as shown in the picture below, and later proceed to the next screen.
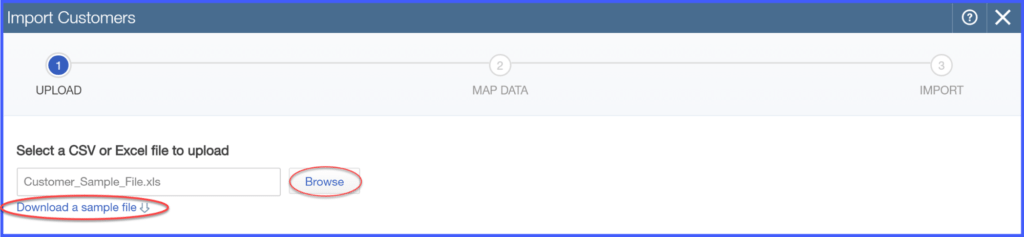
TIP: If you need to view a sample Excel file, then go to the download sample file link as given below. One thing always keeps in mind is that you don’t need to reformat your spreadsheet. In the third step, we are going to map the data so that QuickBooks fetch the accurate data from your spreadsheet.
3. Map Your Data
Here, you will choose which fields in your spreadsheet should be connected to the corresponding fields in QuickBooks. This will assure you that the accurate fields in QuickBooks are populated with the correct information.
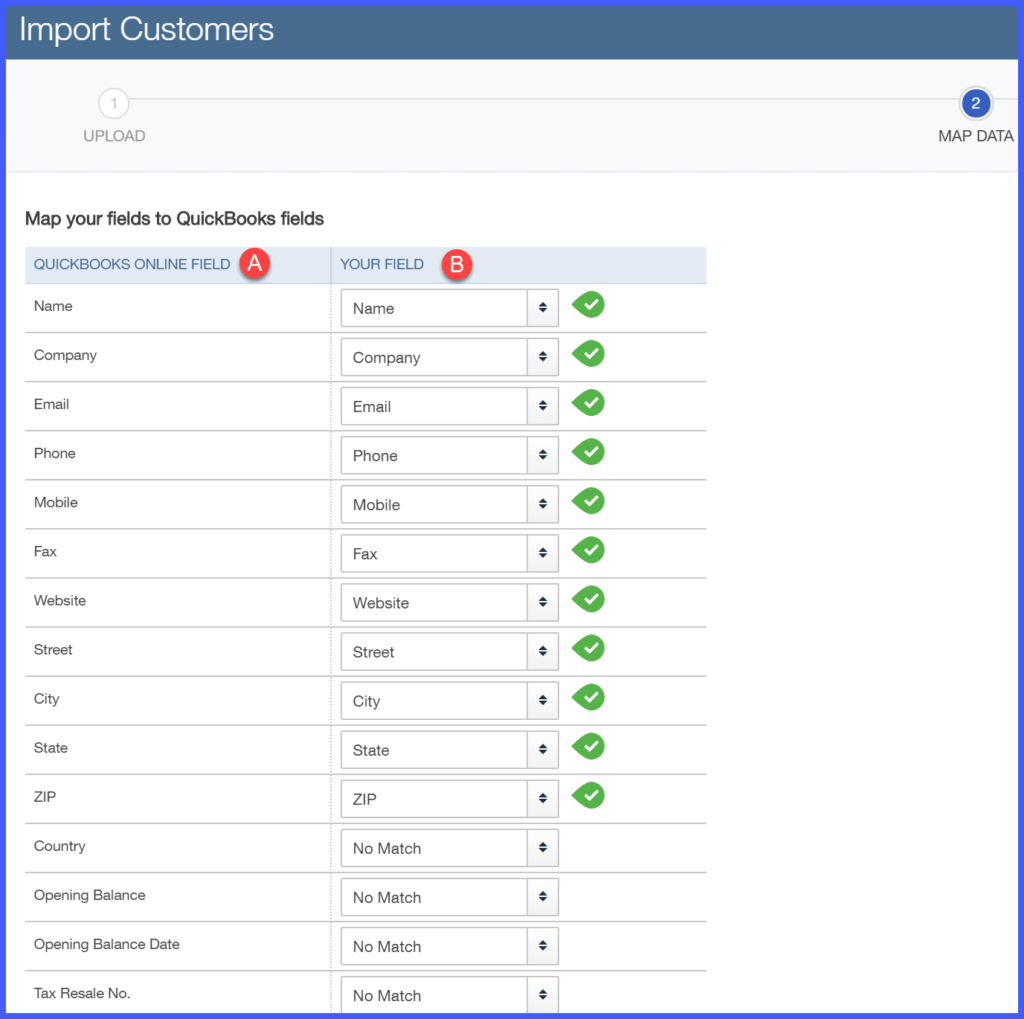
The fields that you have to complete, and a description of how that information will be used by QuickBooks, are:
- QuickBooks Field – This is the field, where the data will import in QuickBooks
- Your Field – Choose the field in your spreadsheet that meets the QuickBooks field from the drop-down, i.e. The area where information should be imported.
Once you are done with mapping your data, then go to the next screen.
#TIP 1: The fields that are given in the spreadsheet usually do not have to same as the field names in QuickBooks as shown in the above example. For instance, there is a field in QuickBooks called Mobile, and in a spreadsheet, it is known as a cellphone. The data will import fine, as long as you map the cellphone field to the mobile QuickBooks field in your spreadsheet.
#TIP 2: Don’t be bothered about having more fields in your spreadsheet than what you observe in QuickBooks. Keep in mind, that the only data you can import into QuickBooks is the fields that match the QuickBooks field. You cannot show any matches for fields that you do not want to import into QuickBooks, as explained above.
4. Run a Final Review of the Data Before Import
This is your last possibility to reexamine the data and import it into QuickBooks. Make sure you double-check the following:
- The number of records matches with your spreadsheet
- Check that the report is in the right fields like the email address is in the email field, etc.
If something is going correct, then go to the back button to go back and perform any necessary corrections. Once you are ready to proceed to choose Import.
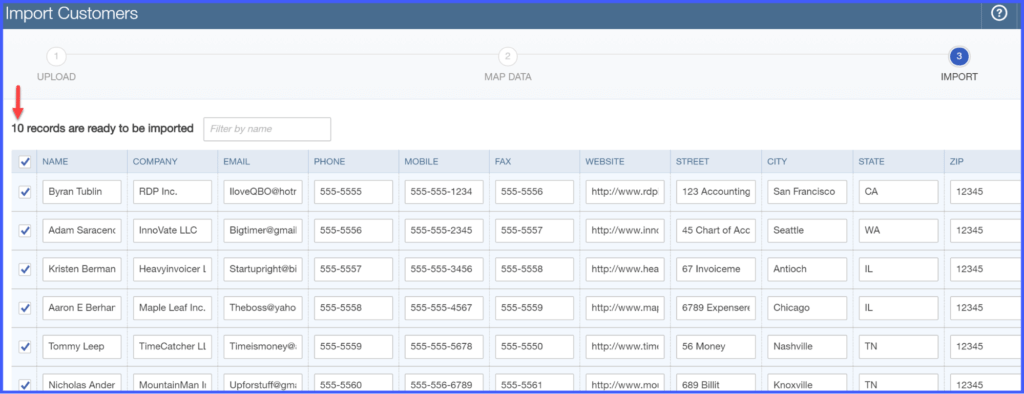
5. Import Is Complete
Once you are done with your import process then QuickBooks will give you a message similar to the following: 10 out of 10 customers have been successfully imported!
Steps to Add Customers in QuickBooks Manually
You can do this manually if you have only a few customers to add to QuickBooks but, if you want to add more than 10 clients, you have to import this information from a CSV file.
Follow these six steps to set up customers in QuickBooks Online manually:
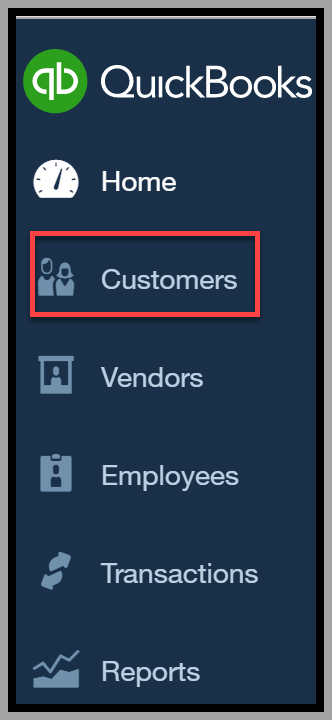
1. Navigate to the Customer Center
Go to the Customer Center by clicking on the customer’s bar on the left side menu, to set up your customers in your company file.
2. Create New Customer
To create a new customer, look for the blue New Customer button in the top right-hand pane, as shown in the picture:

3. Insert Customer Information
At the least, you must enter primary contact information for your customers. This involves the contact name, business name, billing address, email address, and telephone number.
Let’s understand with the following picture.

Here are the fields you have to complete and how this information will be used by QuickBooks:
- First and Last Name – Enter this for specific customers, this information will show on all sales forms like bills, sales slips, and estimates.
- Company – You need to fill in this information for your commercial or business customers, this information will also show on all sales forms like invoices, sales receipts, and estimates.
- Display name as – This is an auto-populate field based on the information recorded in the Customer Name field. This is how your customer will appear on your customer list in QuickBooks.
- Print on the check as – If you want to write a check to your customer for any purpose then this field enables you to change the payer’s name if it is distinct from the customer’s name
- The Address tab allows you to insert your customer’s billing address. This must be the mailing address wherever you can send your invoices to your customers.
- Shipping address – This is the address that will be used to ship products to your customers. If you do not ship products to your customers, then just leave the default setting (which is to make the shipping address the same as the billing address).
- This field allows you to enter the same address to which you want to ship products to your customers. In case, if you don’t want to ship products to your customers, just leave with the default setting i.e, it makes the shipping address the same as the billing address.
- Email – The email address that you will enter here will allow you to send customers their invoices if you want to email them and not mail them.
- Phone/Mobile/Fax – Here you need to insert the contact telephone numbers given by your customers.
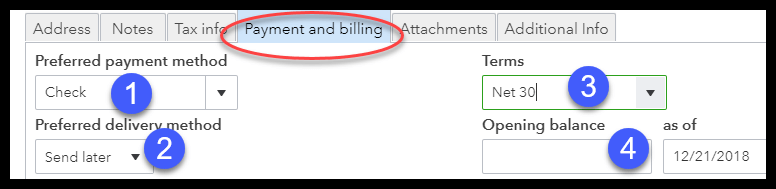
4. Enter Payment & Billing Information
For QuickBooks to notify you when a customer invoice is arriving or past due then you have to set the payment terms. In addition, you can symbolize your customer’s preferred payment method like a check, cash, or credit card, favored invoice delivery method like email or U.S. mail, and their starting balance if you are converting QuickBooks from another system.
The fields you have to complete, and here we discuss the all fields that you need to enter, or what info you enter.
- Preferred Payment Method – Here you can tell which method your customer wants to pay. If it is a credit card, you can enter credit card information here, so that you have this file.
- Preferred Delivery Method – You can register here in what way your customer prefers to receive an invoice. If you require to modify the default delivery method for any customer, you can able to do this in the customer profile.
- Payment Terms – In the setting invoice text, we can set up the default payment terms for all customers. If you desire to change the default payment terms for a customer, you can do it from the customer profile.
- Opening Balance – This field allows you to enter an unusual balance for a customer. For instance, if you want to convert QuickBooks from another bookkeeping system and your client has some outstanding bills or invoices, you need to insert the entire outstanding balance here when you set them in QuickBooks. When the same customer sends you a check, you can utilize it to this opening balance in QuickBooks Online.
5. Enter Additional Customer Information
Here we discuss some additional customer information you need to track in QuickBooks:
- Notes – Insert any additional information you want to keep track of for your customer for eg, additional contact name or number. This is internal purposes information and also not visible to your customers.
- Tax Information – If they are not subject to sales tax, enter your customer’s resale permit information here.
- Attachments – Add any report or document that you would like to keep on file for this customer (e.g., signed contracts or copy of email correspondence).
6. Review Customer Setup
Now you need to complete the customer setup, the customer will show in the Customer Center as shown below in the picture.

Modify Customer Information in QuickBooks Online
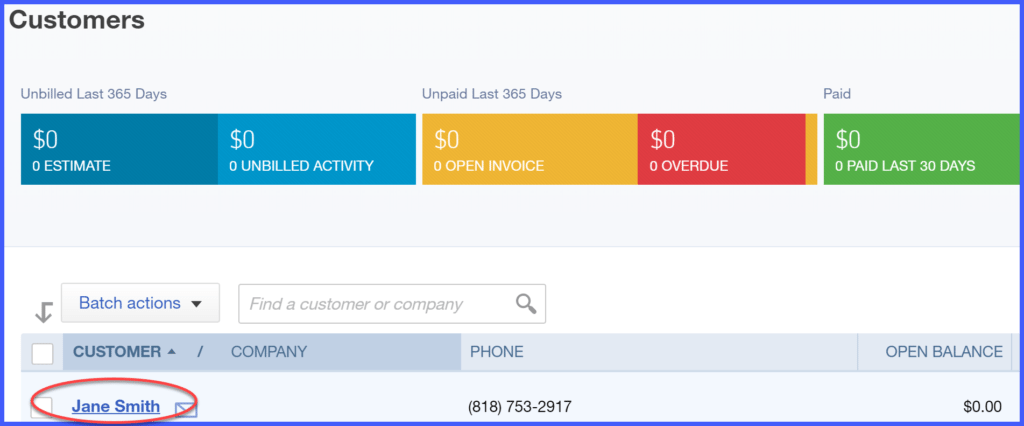
You can edit or refresh/update your customer information at any time. To change or edit go to the Customer Center, click on the name of the customer, as shown below, and execute any required modifications to the customer profile.
How to Delete a Customer in QuickBooks Online
Same to the products and services, you are not able to delete a customer once when you use them in a transaction. For example, once you create an invoice for a customer, it is recognized as a transaction. This invoice (transaction) is associated with your financial records, and those financial records will be used when you register your tax.
But, if you decide that you will no longer do business with a customer, you can deactivate the customer in the same way as you can for products and services. The deactivation facility will hide the customer from the customer center, but they will still appear in all financial records even if the transaction occurs.
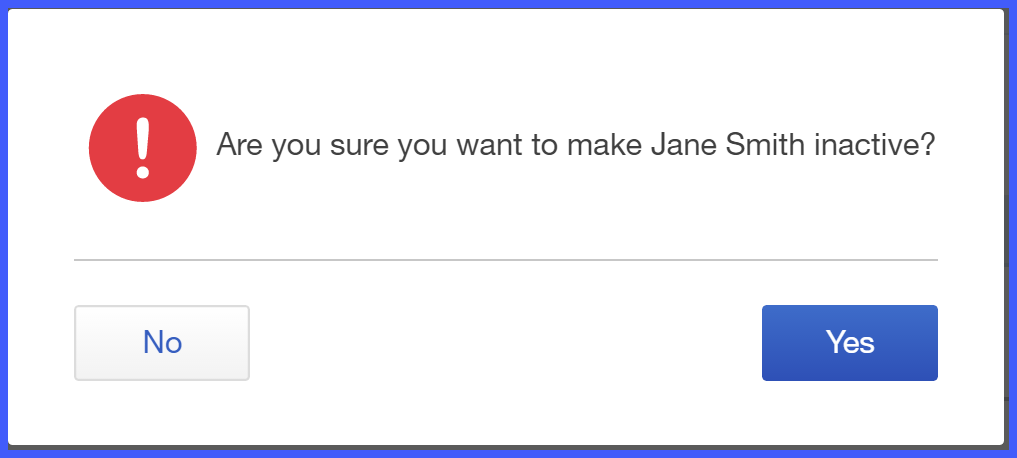
Choose the customer and go to the drop-down arrow next to Create Invoice, and click Make Inactive, to inactivate a customer from the Customer Center,

Confirm that you want to deactivate the customer by selecting Yes
I hope you found this article useful. If you have any queries or issues related to this or any accounting and bookkeeping issue, then you can directly reach our Intuit-certified ProAdvisor by dialing our toll-free +1-844-405-0904 and get instant solutions for your queries.