want to learn QuickBooks Online bank feeds? Here we are with an article to provide you with a comprehensive guide to learning QB bank feeds. While Working with QuickBooks Online Bank Feeds you may face some difficulties such as How to use QuickBooks bank feeds. Here we discuss the bank feeds more productively and efficiently for your clients. It helps you to take more advantage of QuickBooks Online with Bank Feed. Go through how to connect bank feeds and learn several tips using bank feeds that you can do on your own. For more Info contact us toll-free: +1-844-405-0904
What is QuickBooks Online Bank Feeds
You may track and manage your receipts and expenses with the help of the QuickBooks Online bank feed without having to manually enter each bank transaction. QuickBooks Online bank feed enables you to record, report, and analyze the same transactions without manual entry when you access your online bank statement transactions and online credit card transactions. Because bank feeds are automated, this option saves time and money.
Connect Your Bank Feeds Using Open Banking
By using open banking, you can easily download your recent transactions that are downloaded automatically. For that, you have to add your bank accounts. But before connecting a bank account you should check whether your bank support opens banking or not. So check it first and upgrade your bank feeds.
- Firstly go to banking and click on connect account.
- In case, you have already an account then you have to select upload transactions.
- Now the next step is to search the bank from which you are going to do the transaction and then click on Continue and then click on Agree after reading the terms & conditions.
- Now you have to follow the steps that are given on the internet banking page so that you can connect and authorize QuickBooks.
- After doing all the above steps you have to select the bank account that wants to connect and link to Quickbooks.
- Click on connect now you can see the transactions that are available in the banking menu.
If you are connecting your bank account to QuickBooks then it is beneficial for you. Let’s discuss the benefits.
- Setup takes less than a minute and it is quick, simple, and secure.
- See all of your company’s finances in one location.
- Use synchronized solutions to save time.
- Use current data and future forecasts to manage your financial flow.
Tips for using Bank Feeds in QuickBooks Online
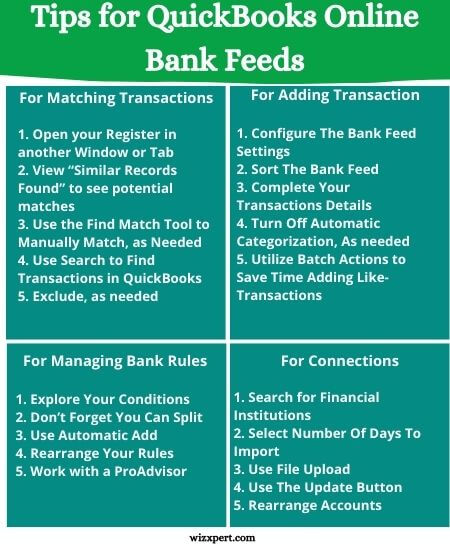
For Matching Transactions:
Here, are the following tips for matching transactions in QuickBooks Online bank Feeds:
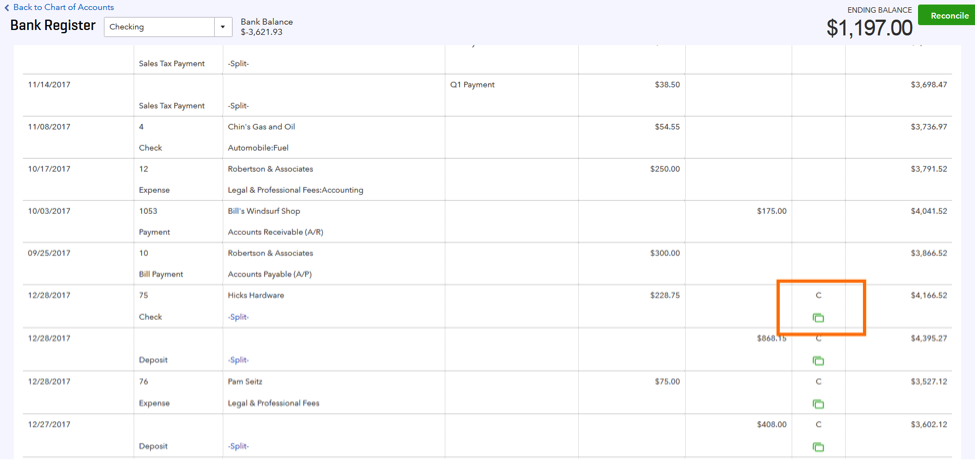
Tip 1: Open your Register in another Window or Tab
It may be useful to open the bank register in another window or tab so that you can already mention the transaction while reviewing the bank feed. If QuickBooks does not recognize that the transactions match, you can easily research why not.
Make sure to restore the page to show changes done in another window or tab. Transactions added or matched are automatically “cleared” in the register after you are accepted into the bank feed.
Tip 2: View “Similar Records Found” to see potential matches
When QuickBooks scans for a match then it examines books for recorded transactions that may be a match. These transactions will appear as “# similar records found”.
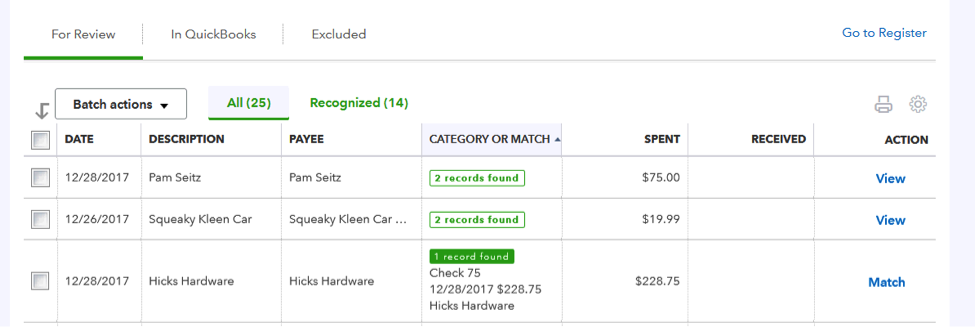
Select to enlarge the details and take a closer look by clicking on the transaction (link) in QuickBooks. If the match is accurate, select Match to allow the transaction. If it is not, you can change the selection to add or move or select the “Find other records” button.

Tip 3: Use the Find Match Tool to Manually Match, as Needed
There are numerous reasons QuickBooks may not identify a match. Usually, this is because the transaction is not in the books. But if it is in the books, you can use the Find Match tool to solve it manually.

Here are the main causes the match may not have been recognized:
- When your transaction is older than 180 days
- Maybe when your dollar amount in QuickBooks is distinct from what cleared the bank.
- The type of transaction is different in QuickBooks than in a bank. QuickBooks needs to match a check with a check and an ACH or debit/credit card swipe.
- The transaction was reported in another bank account, For this checkout tip 4.
- Transactions from the bank are the payment/deposit of two or more open transactions in QuickBooks.
In the Match Find tool, turn on the recommended matches to view options for matching. Or, you can use a filter/search to detect transactions.
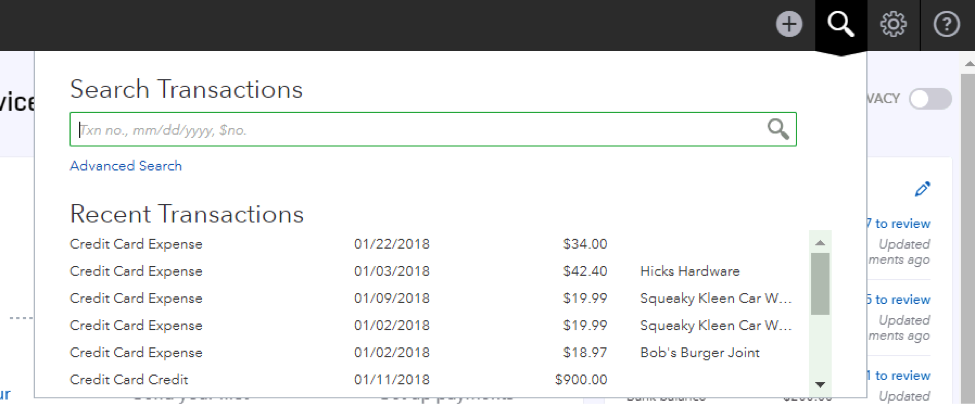
Tip 4: Use Search to Find Transactions in QuickBooks
If you assume that a transaction has been recorded in QuickBooks, but a match has still not been found using the tool, then you can use the search option in the top right corner of QuickBooks to assist you to find the transaction. When searching for dollar amounts remember to use the dollar sign or decimal point.
Oftentimes, transactions in the wrong bank account were recorded in QuickBooks. Sometimes, Match Find is not located with the Match tool because the dollar amount in QuickBooks is higher than the bank transaction. If so, edit the original transaction and refresh the bank feed window.
Tip 5: Exclude, as needed (and with caution!)
If you are having transactions that cannot be matched and you are sure that these transactions are recorded in the books, then you have the option to exclude them in the bank feed. It is located under the Batch Actions.
Use Exclude with caution to avoid the obstacle of consolidating bank accounts when your transactions will not be recorded in QuickBooks. If you are not sure, then we are suggesting you work with an expert to avoid missing or duplicate transactions.
For Connections:
We Discuss the five tips related to working with Bank and credit card feeds in QuickBooks Online. These are some problem that comes in Bank Feed such as, forming connections and keeping your bank feeds organized and populated with the latest transactions to review.
Tip 1: Search for Financial Institutions
Firstly, you use the Add Account button to search for supported banks either by name or URL.
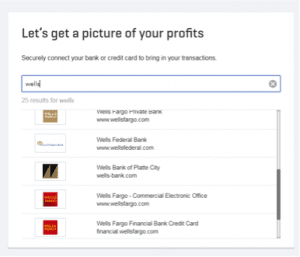
We prefer URL because some banks have a similar name, but the URL is different for all banks. If you do not establish connections with the bank’s website, you won’t be able to form connections with QuickBooks.
If you are having trouble connecting with QuickBooks so first, you check your login works in Bank. You can easily connect multiple bank and credit card companies.
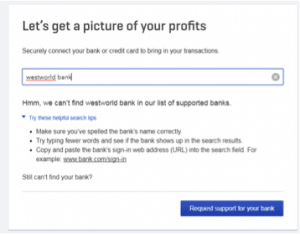
If you do not find results related to the search so follow the troubleshooting or request support for your client’s bank and see Tip#3 below
Tip 2: Select the Number Of Days To Import
We offer the option to select a shorter time period than 90 days when you choose which accounts to connect. Because in that reconciled period you can prevent trying to match or add transactions and keep the books clean.
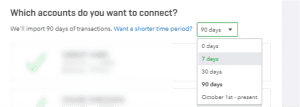
Go to the link and select an option from the drop-down menu as you want. if you only want to import new transactions going forward you select the 0 days from suggestions.
You exclude or include the transactions that are not needed for you from your accounts. Check all transaction details for future reference.
Tip 3: Use File Upload
You Upload a file of your bank account transactions if you are able to download from banks into CSV, .qbo, .qfx, or .ofx file format by clicking the drop-down arrow on the update button and choosing file upload.
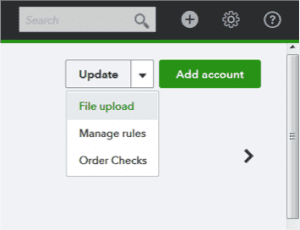
One thing noticed or keep in mind is, file upload accounts will show a $0.00 bank balance and will need to be manually updated. And QuickBooks will show the # of days since the last upload.
Tip 4: Use The Update Button:
Update the latest data in your QuickBooks Online for better support, once you click the update button located in the upper left corner of the banking page to refresh the feed, QuickBooks update the new data after clicking the Update Button.
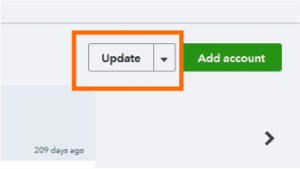
QuickBooks displays the updated data in a more recent hour so you do not need to stay on this page while it updates.
The best option for troubleshooting connectivity issues is updating because he provides the latest information so work is so faster a dal thing we updated that time.
Tip 5: Rearrange Accounts:
Manage your accounts or rearrange accounts it’s your own Duty in this way you properly focus on your account or specific accounts that display on the home page and in the banking tab.
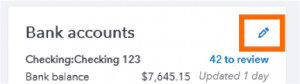
- Go to the QuickBooks Online dashboard for rearranging accounts.
- Now click the pencil icon in the upper right of the Bank account list and drag and drop accounts to the desired order and click save.
- It will display on your banking page after rearranging accounts.
For Managing Bank Rules:
Here we provide the information for bank rules related to QuickBooks online. When you connect with bank and credit card accounts, bank rules help you customize, control, and automate.
Tip-1: Explore Your Conditions:
Firstly, Establish the condition which is best suitable for your work with QuickBooks online. Only once time create your best conditions or rules, you easily corporate with QuickBooks online and fits your goals.
You choose Money In or Money Out and applicable bank and credit card accounts when you create the rule for QuickBooks Online.
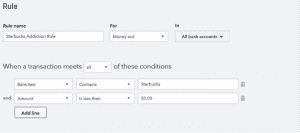
The first thing for creating a rule is structure, focus on the condition such as ANY or ALL, and utilize the Bank Text, Description, or amount. It’s your choice rule based on a single condition or combines up to 5 conditions in the single rule.
Bank text is the Transaction detail its includes information such as the store, state, city, phone number, date, and, among other items, etc. QuickBooks access all these things from the bank.

A description is the cleaned-up QuickBooks interpretation of the blank text. When you create a rule word description keep it in your mind.
An amount is another term used in the bank when you create a rule remember to establish whether is greater than, is less than, equals, or does not equal amounts.
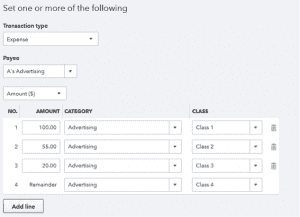
Tip 2: Don’t Forget You Can Split
- Split the transactions into multiple categories or classes.
- You have the option to split by dollar amount or percentage across up to 20 lines.
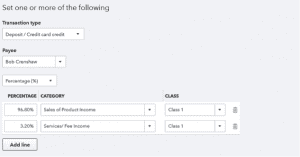
- Select the proper category on each line when splitting across classes only.
Tip 3: Use Automatic Add:
It saves more time in data entry. Automatic add directly allow QuickBooks to automatically add this transaction directly to the register, so your valuable time is saved.
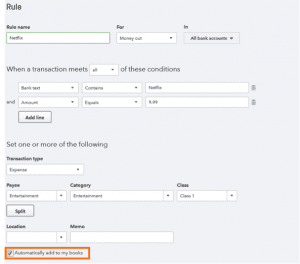
Use Automatic Add with caution and one thing you also remember, edit the rule to select this option later after you have tested it out.
Tip 4: Rearrange Your Rules:
Open bank sites go to bank rules to manage your list of rules by editing rules, creating some different rules, and deleting unused rules.
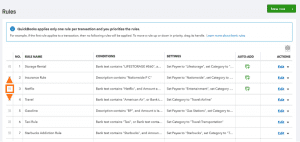
Rules modification or rearrangement rules are compulsory for a bank and for you because, in this way, you properly work on Quickbooks online.
Tip 5: Work with a ProAdvisor:
Sometimes we think this task is hard and this task has many difficulties, a reason for this thing is we do not understand bank rules or other things related to the bank. And regularly time and energy are wasted on bank work so we looking for expert help with QuickBooks Online.
Find a QuickBooks Proadvisor in your local area, he will help you and give the proper guidance related to the work
For Adding Transactions:
QuickBooks will scan your bank data from your account after connecting your bank and credit card accounts. You can add transactions directly from the bank feed if your feed transaction does not match the existing transaction in QuickBooks.
Five easy tips for adding transactions are described below.
Tips 1: Configure The Bank Feed Settings:
- Go to the small Gear, you will find options to configure here.
- You add and remove the necessary details as you add transactions, and payee and check number columns.
- Change the date of transactions from the bank by the Editable Date Field option, use this with caution.
- Copy bank Detail to Memo is turned on by default, it’s helpful during reconciliation.
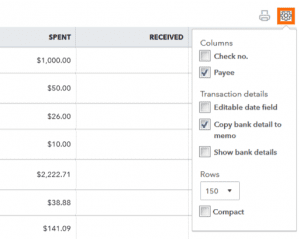
- Change the cleaned-up QuickBooks description to bank detail in the bank feed itself to be turned on and off Show Bank Details.
Tip 2: Sort The Bank Feed:
To sort the bank feed by any column. Choose the more effective option for sorting the bank feed. Newest transaction first or oldest transaction first, this option helps in sorting the bank feed in an easy way and you can swap between styles.
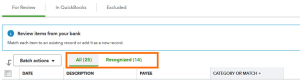
To view All or Recognized by the additional filter. Transaction in QuickBooks has auto-categorized based on your past behavior and recognized will display transactions with a match rule.
Tip 3: Complete Your Transactions Details
Use the split tool in QuickBooks Online Plus, to divide the transaction across multiple categories or classes.

QuickBooks Online Plus has advanced features. You can use these features to expand the transaction and ensure you are filling in all applicable fields.
Here are a few reasons:
- The transaction is older than 180 days.
- The dollar amount in QuickBooks is different than what cleared the bank.
- The transaction was recorded in a different bank account(see tip #4).
Tip 4: Turn Off Automatic Categorization, As needed:
QuickBooks saves time working by learning from your behavior and remembering how you categorize the transaction because you add these features already in QuickBooks.

- If some transaction is not in a category and you want to add this transaction.
- You simply add and edit the settings.
- After that check the box to leave the transaction Uncategorised from now on.
- Leave Uncategorised: What category to use each time these things only appear or indicate when Leave Uncategorised allows you?
Uncategorized Expense or Uncategorised Income will appear going forward and a special Uncategorised rule is saved in QuickBooks.
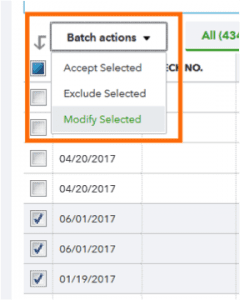
Tip 5: Utilize Batch Actions to Save Time Adding Like-Transactions
Use Batch action: For Modification, purposes select to assign the payee, category, and other details in batch-to-like transitions. If you select multiple transactions at once use your shift key.
Here are some common reasons:
- Two transactions in the bank feed are a match against one transaction in the register.
- The transaction is already reconciled in QuickBooks.
Additionally: Use Batch Actions, Instead of accepting each transaction individually, you accept Selected to add transactions in a batch.
Hope, this blog will helpful for you to understand QuickBooks Online Bank Feeds. If you still have any queries or want help then contact our QuickBooks support team via the toll-free number +1-844-405-0904.