Here, in this article, we will discuss how to find and connect bank and credit card accounts to QuickBooks Online so that you can automatically download all your current transactions. Reading the complete article you may learn to connect bank and credit card accounts to QuickBooks Online. We are always here to help you, if you have any queries or need help then let us know through the Toll-Free No: +1-844-405-0904
Online banking is also recognized as a bank feed and it is one of the most useful and time-saving features of QuickBooks Online. When you connect your account, QuickBooks itself downloads and classifies all your bank and credit card transactions for your ease. It adds all the details so you do not need to manually enter the transaction. Then you just have to approve the work.
You will receive updated info on your sales and expenses virtually with no data entry required. So let’s proceed further, and look at the steps to connect bank and credit card accounts to QuickBooks Online.
Find Your bank or credit card account in QuickBooks Online or Self-Employed
Here are some steps to find your bank or credit card accounts in QBO or Self-Employed. During the setup of online banking, your bank and credit card accounts also connect with QuickBooks and automatically download all the transactions. But, if you don’t find your account then follow the process given below:
Note: Before going to the steps, users might know the causes for not finding accounts.
- The bank does not connect all types of accounts(Personal and business accounts).
- During the banking sign-in, if you do not select the correct listing there is also a reason.
Note: You have to choose the correct listing or try all the possible links.
- The bank does not participate with financial institutions.
Now, move to the steps to find your bank or credit card account in QuickBooks Online or Self-Employed:
Step 1: Search for your bank
- First, you have to ensure that the spelling is correct.
- Spelling exactly matches your bank’s website.
- If you can’t find then try broader names like Citi.
- For example, your bank name is PNC so you have to search bank website URL in the form of PNC.com.
- Find the name of the bank that printed your bank card on the back of the card. The issuing bank can be Chase, HSBC, or Bank of America.
Step 2: Try another listed version of your bank’s name
Financial institutions sometimes use multiple bank names or allow various types of accounts. Here are some steps to list other versions of your bank or financial institutions:
- Start with navigating the transaction and select the bank transactions.
- After that, choose the link account option.
- Select the financial intuition from the list if the name is not there then enter the name of your financial institution.
- Click on the link to navigate to the bank’s website in the new window.
- You can access your bank account through the website and also view your bank transactions history, account summary, and account details.
- Sign out of the financial institution’s website if you have access to everything.
- Go back and add the account to QuickBooks.
Step 3: Support Appeal for your Bank
You can request support from your bank in the situation of not connecting with your bank.
In QuickBooks Online
- Start with navigating the transaction and choose the bank transactions.
- After that, select the link account option.
- You have to enter the name of your financial institution for QuickBooks to search and find it in its list of supported providers.
- If QuickBooks fails to locate your bank, you will receive the message, hmm, we can’t find [name of the bank you entered] in our list of supported providers.
- Choose the Request option by entering your Account provider name and Account provider sign-in URL.
In QuickBooks Self-Employed
- Navigate the profile section and choose the Connect bank option.
- You must enter the name of your financial institution for QuickBooks to search and find it in its list of supported banks.
- If QuickBooks fails to locate your bank, you will receive the message, hmm, we can’t find [name of the bank you entered] in our list of supported banks.
- You will find helpful tips to locate your bank account, after that, you can select the Request tab.
- Choose the Request option by entering your Account provider name and Account provider sign-in URL.
Steps to connect bank and credit card accounts to QuickBooks Online
Step 1: Connect a bank or credit card account
Check out the below steps to connect the bank and credit card (including PayPal) account that you are using for your business.
You can able to connect to as many accounts as you want. Feel free to connect to the accounts that you use for both business and personal purchases, but as you go, you will have to sort your expenses.
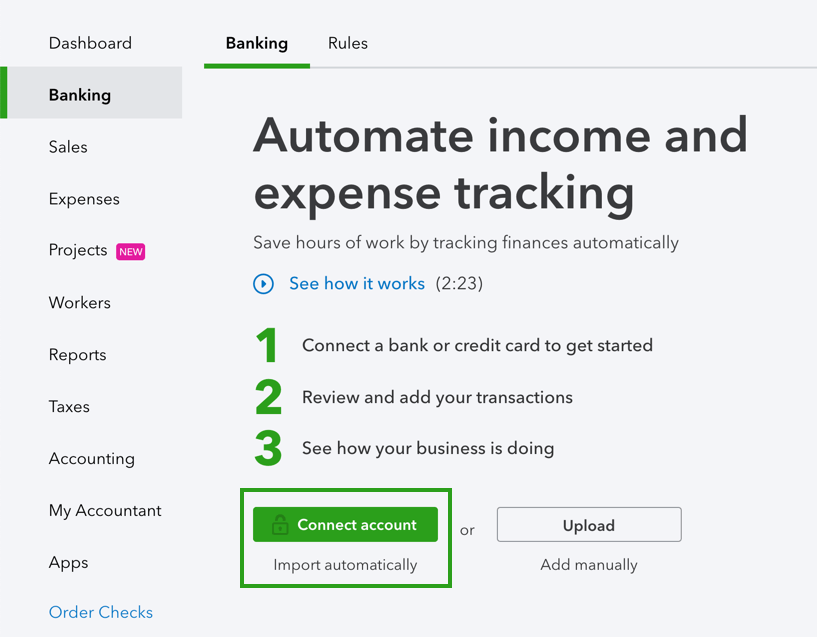
- Open QuickBooks and look for the Banking menu or Transactions menu.
- Click on the Connect Account on your current open page, or look for the option Add account or Link account if you have already created an account.
- Now look for your bank. Here, you can easily connect many banks, also small credit unions. If in case you are unable to find your bank on the available list but yet you need to add your transactions to QuickBooks Online, then you have to manually upload bank transactions from a CSV file. Here are the following steps to manually upload bank transactions.
- Go to the left Banking menu and click on the Banking.
- Click on File upload. If you have not already connected an account, then you need to click on Upload transactions manually. You also have an option to start your upload from the Import Data page (Click on Settings ⚙, Below the Tools option, click on Import Data, and then later click on Bank Data).
- Now, click on Browse and click on the file you have downloaded from your bank. If in case you have not still downloaded your CSV file, then go with the on-screen guidance in the Upload file window and download your transactions and later click on the file you have downloaded.
- Click on Open, then choose to Next.
- Click on the bank or credit card account from the QuickBooks Account drop-down list then click on the Next.
- Now, select a Date, date format, Description, and Account. Note: You can also select1 column or 2 columns.
- Click on Next.
- Choose the checkboxes of the transactions to import the .csv files and click on the Next.
- Click on Yes.
- Later, click on Let’s go! when the Import finished notification displays on your screen.
- Click on Continue. Then in the pop-up window enter the username and password used for your bank’s website. It might take a few minutes to connect. If your bank requires additional security steps, you will see the onscreen directions.
- Choose the accounts you need to associate with QuickBooks (savings, checking, or credit card). You should try to connect all your accounts with your financial institution and connect as many as you need.
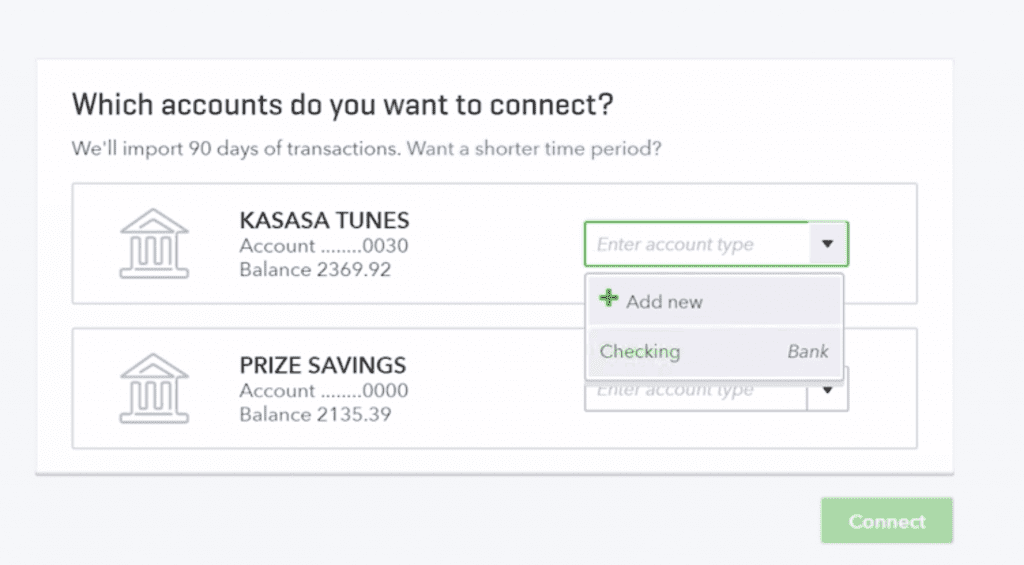
- For every account, click on the account type from the dropdown menu. If in case, you are new to QuickBooks or you do not see your account in the drop-down menu then follow these steps below:
- Click on + Add New. This will make a new account on your chart of accounts.
- If you want to create a new bank account: Go to the Savings or Checking under the Detail type. Enter all the required info in the form. Then later click on Save and Close.
- If you want to create create a new credit card account: Firat you have to change the Account type to Credit Card. Enter all the required info in the form. Then later click on Save and Close.
- Click on the date range for the download. It depends on the bank because most of the banks download only the last 90 days of transactions, some are going back for 24 months.
- Click on Connect.
Steps to connect American Express Business account
Step 1: Create an American Express account in QuickBooks
First, you need to create an American Express Business account on charts of account, if you already not sign up for an account then follow these steps to create:
- First, click on Accounting, then click on theChart of accounts to set up.
- Click on New, this will create a new account.
- Click on Credit Card from the Account Type ▼ drop-down menu.
- Now, give a name to your account.
- Click on Save and Close, when you are completed with the above steps.
Step 2: Connect your American Express Business account
- First, click on the Banking menu or Transactions menu.
- If this is your first time connecting an account, click on Connect on the arriving page. Or if in case, you are already connected to an online banking account, choose Add account.
Now, look for the Search for option and click on American Express Business Credit Card. Then later click on Continue.
- Now the pop-up window will display on your screen, you need to sign in with your American Express user ID and password. If American Express asking you for the extra security steps, you will see the onscreen instructions.
- Click on the accounts that you require to connect to QuickBooks.
- For every account, from the dropdown click on the account type. This is the same account that you created in step 1 in your accounts chart.
- Click on the date range for the download. It depends on the bank because most of the banks download only the last 90 days of transactions, some are going back for 24 months.
- Click on Connect.
Steps to connect bank accounts from your chart of accounts
Check out the following steps to connect bank accounts from your chart of accounts.
- First, click on the Accounting menu and click on the Chart of Accounts.
- Look for the account that you need to connect.
- Click on the small arrow ▼ symbol near to View register from the Action column.
- Click on the Connect bank.
- Now, go with onscreen guidance.
Step 2: Download and categorize your recent transactions
Once your accounts are connected, then QuickBooks Online will download automatically transactions so that you do not need to enter your information manually.
You just need to evaluate and validate the method for which QuickBooks categorizes the transactions. Here are the steps to review and categorizing downloaded transactions, check out these steps:
Steps to download your bank and credit card transactions
QuickBooks downloads automatically the freshest available transactions around 10 pm PT every night. But it is not possible for every bank because for most of the banks, transactions are regularly prepared for QuickBooks to download, after posting them on your bank’s website. But, some banks take some more time, it’s all depending on your bank.
If you want then you can also perform a manual update for the latest available transactions:
- First, select the Banking menu or Transactions menu.
- Click on Update. It will update all your bank and credit card accounts. If it requires additional authentication, then go with the onscreen guidance. Additional authentication is not required for all the banks, some banks need for extra security.
Steps to review your downloaded bank transactions
- First, select the Banking menu or Transactions menu.
- Click on the blue tile for the account that you need to review.
- Later, click on the Review tab to begin your review process.
QuickBooks automatically convey your downloaded bank transactions to the For Review option. This is often known as “bank feed.”
Steps to review transactions after you’ve matched or added them
When you match or add, downloaded transactions are recorded in your accounts in QuickBooks. Your bank reviewed review goes to the reviewed tab.
Do an immediate review after matching or adding some transactions, if you need to make changes, then check out the below steps:
- First, select the Banking menu or Transactions menu.
- Click on the blue tile for the account that you need to review.
- Later, look for the Reviewed tab.
- Click on the link in the Added or Matched column to examine the transaction. Now, review the “Deposit” field. This is the same account that QuickBooks has classified into transactions.
- If you want then add additional info.
If you want to re-categorize a transaction and want to transfer the transaction to a different account, then click on the Undo option. This gives the transaction back to the For Review tab.
Step 3: Keep your accounts up to date
Whenever you want, you can modify the account type of a connected bank account, change its name, add details or description type or also make it a sub-account of another bank account.
You can also update your bank or credit card information, such as username or password, you can do this directly from the Banking menu.
- First, select the Banking menu or Transactions menu.
- Click on the Banking tab.
- Later, go to the Edit ✎ symbol in the tile for the bank account you need to update.
- Click on the Edit sign-in info.
- Update the account as required in the fields given in the Account dialog,
- Last, click on Save and connect.
Hope, this article will be helpful to you to connect bank and credit card accounts to QuickBooks Online. If still, you are seeking technical help then feel free to reach us by dialing our toll-free +1-844-405-0904 and get instant help from our Intuit certified ProAdvisors.